在使用LNMP包安装PHP时,发现直接修改php.ini的配置是无法生效的,其原因竟然是因为nginx的配置文件,覆盖了php.ini的配置。
——————————————————————–
LNMP 1.4上如果不想用防跨目录还需要将 /usr/local/nginx/conf/fastcgi.conf 里面的fastcgi_param PHP_ADMIN_VALUE “open_basedir=$document_root/:/tmp/:/proc/”; 删除,需要重启nginx。
LNMP 1.4上也可以直接使用lnmp1.4/tools/ 目录下的 ./remove_open_basedir_restriction.sh 进行移除。
作者归档:xinlu
一个专门收集开源库的网站
http://mobdevgroup.com
搭建elasticsearch中遇到的一些问题记录
elasticsearch的学习文档:https://www.elastic.co/guide/en/elasticsearch/reference/current/index.html
执行:/home/elk/elasticsearch-5.5.0/bin/elasticsearch
——————–
报错如下:
ERROR: [2] bootstrap checks failed
[1]: max file descriptors [65535] for elasticsearch process is too low, increase to at least [65536]
[2]: max virtual memory areas vm.max_map_count [65530] is too low, increase to at least [262144]
—————-
解决办法:
sudo vi /etc/sysctl.conf
添加下面配置:
vm.max_map_count=655360 【修该项即可】
并执行命令:
sysctl -p
然后,重新启动elasticsearch,即可启动成功。
sudo vi /etc/security/limits.conf
添加如下内容:
* soft nofile 65536 #【修改该项即可】
* hard nofile 131072
* soft nproc 2048
* hard nproc 4096
需要系统重启。
——————-
elasticSearch启用匿名登录。直接在config/elasticsearch.conf添加该行即可。
xpack.security.enabled: false ####开启用户认证
——————–
elasticSearch数据持久化,默认情况不启用数据保存,故数据一般会几分钟就消失,按以下步骤保存索引数据。
#不同的集群名字不能相同。
cluster.name: es_vm_test
node.name: vmmaster、
#数据索引保存
path.data: /home/abc/elk-5.5.1/elkdata/data
path.logs: /home/abc/elk-5.5.1/elkdata/log
#关闭登录验证
xpack.security.enabled: false
rsync的几种方式
本地文件同步:
rsync -av /home/ /waypal
在指定复制源时,路径是否有最后的 “/” 有不同的含义,例如:
/home : 表示将整个 /home 目录复制到目标目录
/home/ : 表示将 /home 目录中的所有内容复制到目标目录
跨服务器同步:
rsync+sshd方式,需要输入密码,如下。
a. 增量同步
rsync -av --progress -e ssh root@kxtry.com:/alidata/www/kxtry.com ./kxtry.com
b. 镜像同步
rsync -av --progress -e ssh --delete root@kxtry.com:/alidata/www/kxtry.com ./kxtry.com
beanmapping之Orika
在处理后端协议时,时常需要将外域bean对象转换成当前域的bean对象,这时就需要对两个bean进行内容复制,如果觉得手动编码效率低,可以试试Orika开源库。
https://github.com/orika-mapper/orika
http://orika-mapper.github.io/orika-docs/
MapperFactory mapperFactory = new DefaultMapperFactory.Builder().build();
mapperFactory.classMap(PersonDTO.class, Person.class) //A ClassMapBuilder
        .field("lastNames", "surnames") //Register field mappings
        .field("streetAddress", "address.street")
        .field("city", "address.city")
        .field("postalCode", "address.zipCode")
        .byDefault() //the remaining fields on both classes should be mapped matching the fields by name
        .register(); //register the mapping with the MapperFactory.
lnmp1.4的xdebug配置
1.从lnmp.org网站,下载lnmp1.4包。
2.通过install.sh安装PHP7.1版
3.通过addons.sh安装redis\memcached\apcu。
3.下载xdubug源码,按以下设置并编译。php-config与php程序在同一个目录。
./configure --enable-xdebug --with-php-config=/usr/local/php/bin/php-config
make install
4.设置php.ini调试信息
创建/usr/local/php/conf.d/010-xdebug.ini文件。
添加信息如下:
[Xdebug]
zend_extension="xdebug.so"
xdebug.remote_enable = On
xdebug.profiler_enable = On
xdebug.profiler_enable_trigger = On

xdebug.auto_trace = on
xdebug.auto_profile = on
xdebug.collect_params = on
xdebug.collect_return = on
xdebug.profiler_enable = on
xdebug.trace_output_dir = "/home/wwwlogs/xdebug"
xdebug.profiler_output_dir = "/home/wwwlogs/xdebug"
xdebug.dump.GET = *
xdebug.dump.POST = *
xdebug.dump.COOKIE = *
xdebug.dump.SESSION = *
xdebug.var_display_max_data = 9056
xdebug.var_display_max_depth = 50
5.方便调试,后续步聚可以如下修改。
chattr -i /home/wwwroot/default/.user.ini
chown abc:abc wwwroot -R
chown abc:abc wwwlog -R
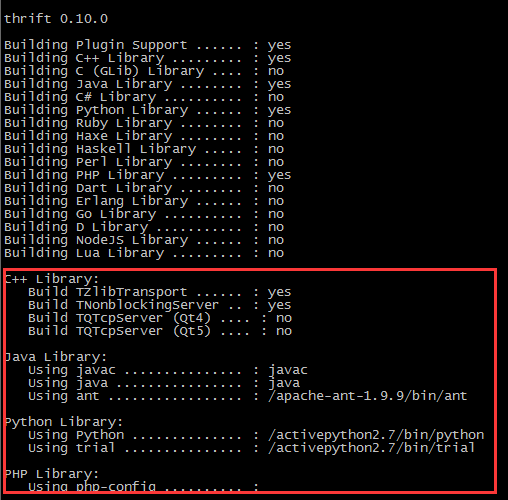
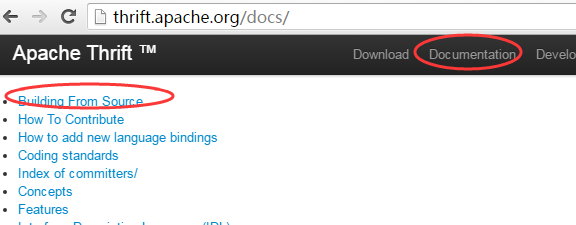
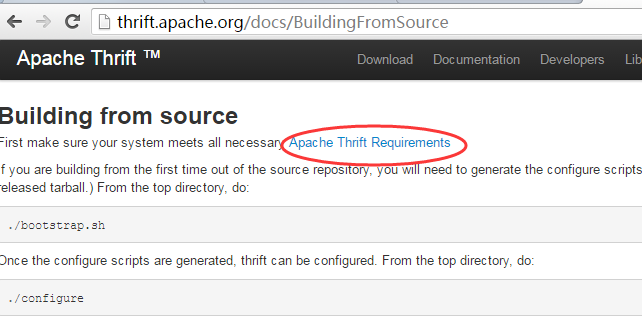
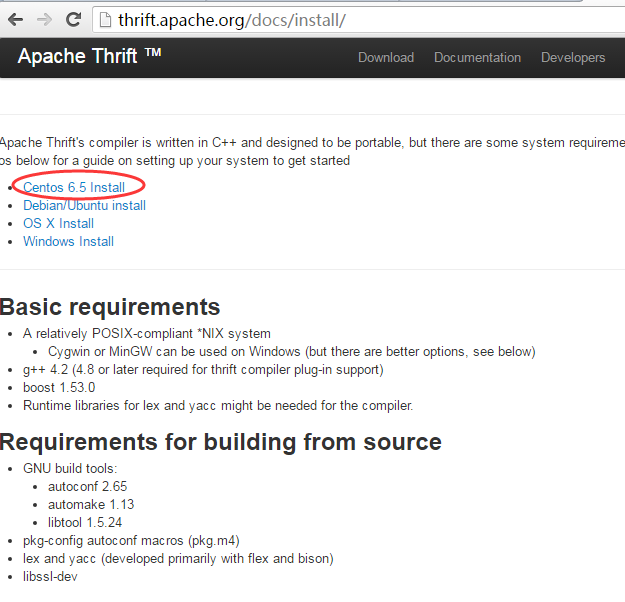
thrift开发环境的搭建
1.http://thrift.apache.org/docs/
2.http://thrift.apache.org/docs/BuildingFromSource
3.http://thrift.apache.org/docs/install/
4.http://thrift.apache.org/docs/install/centos
在纯净的CentOS7.3的环境中,应该如下操作。
sudo yum -y groupinstall “Development Tools”
sudo yum -y zlib-devel openssl-devel ant
安装libevent-2.0.22-stable.tar.gz
安装boost_1_53_0.tar.gz
安装thrift-0.9.3.tar.gz
JAVA和antoconf、automake、bison是系统自带的,只需要增加ant的安装。
————————————————
相关环境变量的配置
#set java environment
export JAVA_HOME=/jdk1.8.0_101
export JRE_HOME=/jdk1.8.0_101/jre
export CLASS_PATH=.:$JAVA_HOME/lib/dt.jar:$JAVA_HOME/lib/tools.jar:$JRE_HOME/lib
export PATH=$PATH:$JAVA_HOME/bin:$JRE_HOME/bin
export ANT_HOME=/apache-ant-1.9.9
export PATH=$PATH:$ANT_HOME/bin
———————
springcloud的调用链跟踪
https://cloud.spring.io/spring-cloud-sleuth/
提升代码质量:fingbugs与cobertura
                org.codehaus.mojo
                cobertura-maven-plugin
                2.6

                    UTF-8
                    true

                        xml
                        html


                            **/*Proto.class
                            **/*Proto$*.class
                            **/*Test.class
                            **/*Controller.class
                            **/*Vo.class
                            **/*Form.class


                org.codehaus.mojo
                findbugs-maven-plugin
                2.5.2

                    true
百度开源的 Disconf
专注于各种 分布式系统配置管理 的通用组件/通用平台, 提供统一的配置管理服务.
包括 百度、滴滴打车、银联、网易、拉勾网 等知名互联网公司正在使用!
专注于各种「分布式系统配置管理」的「通用组件」和「通用平台」, 提供统一的「配置管理服务」。
disconf: https://github.com/knightliao/disconf
demos: https://github.com/knightliao/disconf-demos-java
wiki: https://github.com/knightliao/disconf/wiki