打开pro项目文件,其宏格式如下:
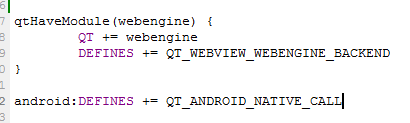
android标识代表,是应用android平台,因为qt是支持android和IOS的,android和IOS的配置差异就可以通过这来标识。
贴一个Android和IOS的宏:

打开pro项目文件,其宏格式如下:
android标识代表,是应用android平台,因为qt是支持android和IOS的,android和IOS的配置差异就可以通过这来标识。
贴一个Android和IOS的宏:
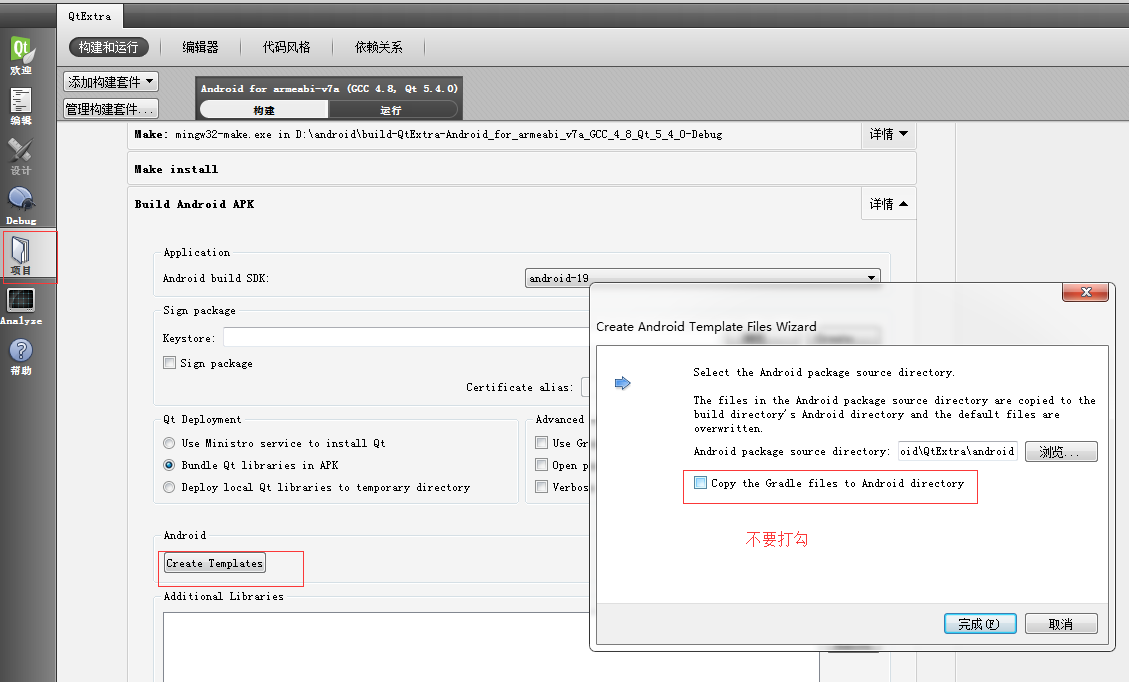
1.QtCreator创建QtExtra工程。
2.打开:项目->创建模板->确定。则可产生一个AndroidManifest.xml创建文件。
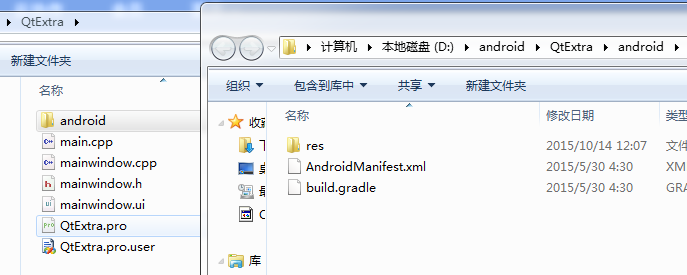
3.检查一下AndroidManifest.xml的所在目录。
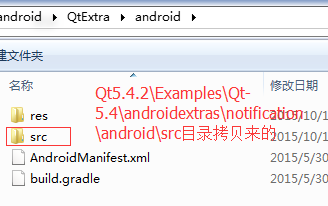
4.参考Qt5.4.2\Examples\Qt-5.4\androidextras\notification的例子,将其子目录android-sources\src目录拷贝到你的工程里,如下:
5.修改src目录下NotificationClient.java文件,如下:
package
org.qtproject.example.notification;
import
android.content.Context;
public
class
NotificationClient
extends
org.qtproject.qt5.android.bindings.QtActivity
{
public
static
String
systemProxy()
{
String
hostdef=“”,
host=“”,
port=“”;
int
portdef=0;
try{
hostdef
=
android.net.Proxy.getDefaultHost();
portdef
=
android.net.Proxy.getDefaultPort();
host
=
System.getProperty(“http.proxyHost”);
port
=
System.getProperty(“http.proxyPort”);
}catch(Exception
e){
}
return
hostdef+“:”+portdef+“|”+host+“:”+port;
}
}
6.在pro文件中添加androidextras库:
QT
+=
androidextras
7.在main.cpp函数里,这样调用:
#include
<QtAndroidExtras/QAndroidJniObject>
#include
<QDebug>
QAndroidJniObject
stringArray
=
QAndroidJniObject::callStaticObjectMethod(“org/qtproject/example/notification/NotificationClient”,
“systemProxy”,“()Ljava/lang/String;”);
QString
my
=
stringArray.toString();
qDebug()
<<
“my:”
<<
my;
8编译测试:
1.下载openssl的相关工具包。
2.使用以下命令生成相关https证书
如你的网站是example.com
openssl genrsa -out example.com.key 2048
openssl req -new -x509 -key example.com.key -out example.com.cert -days 3650 -subj /CN=example.com
注:本例子是在linux下测试。
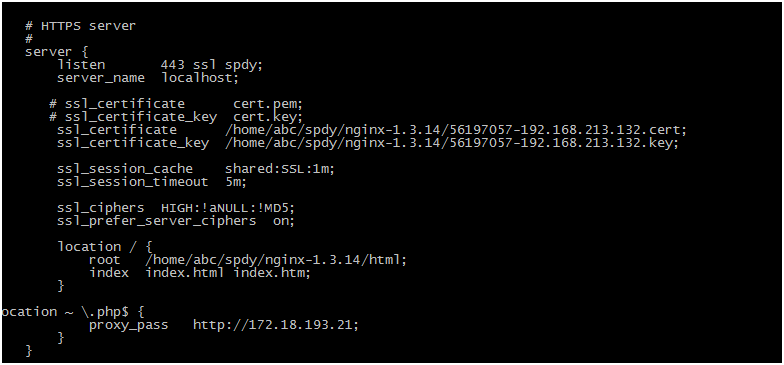
在原来配置下新增如下配置则可:
ssl          on;

ssl_certificate vhosts/kxtry.com.cert;

ssl_certificate_key vhosts/kxtry.com.key;
更复杂一点的配置如下:
本教程是经过验证可单步调试的环境搭建过程,如果不要求单步调试功能,则相关依赖版本可随意。
在Window7中,亲测如下:
android-ndk32-r10-windows-x86_64.zip
android-ndk-r10-windows-x86_64-gdb.tar.xz
jdk-7u71-windows-x64.exe
android-sdk_r22.6.2-windows.zip
qt-opensource-windows-x86-android-5.5.0.exe,这个版本的qtwebview在退出时,会崩溃。
qt-opensource-windows-x86-android-5.4.0.exe,这个版本经测试,可以调用qtwebview组件,且退出时不崩溃。
qt-opensource-windows-x86-android-5.4.2.exe,这个版本经测试,可以调用qtwebview组件,且退出时不崩溃,在5.4中最高的版本了,也是以后项目使用的版本。
apache-ant-1.8.4-bin.zip
google_usb_driver,这个在android-sdk_422.6.2中如果不自带,则可从其它版本中拷贝过来(我是从低版本中拷贝过来的,其版本号是7),放置到android-sdk的extras目录。
在MacOSX10.10系统中亲测如下:
Yosemite 即OSX10.10版本
android-ndk32-r10-darwin-x86_64.tar.bz2
android-ndk-r10-darwin-x86_64-gdb.tar.bz2
jdk-7u71-macosx-x64.dmg
android-sdk_r22.6.2-macosx.zip
qt-opensource-mac-x64-android-ios-5.5.0.dmg,这个版本的qtwebview在退出时,会崩溃。
qt-opensource-mac-x64-android-ios-5.4.2.dmg,这个版本经测试,可以调用qtwebview组件,且退出时不崩溃。
apache-ant-1.8.4-bin.zip
xcode_6.1.dmg
注:在OSX系统是Android是需要依赖xcode的,在安装完xcode时,则也可以用Qt来开发IOS了。这点也验证了。
注:各个qt版本均带有各自的qtwebview组件,从qtwebview的仓库(http://code.qt.io/cgit/qt/qtwebview.git)。
1.下载NDK和GDB调试版本。
根据Qt的官方要求,在不同的系统,其GDB对应NDK的版本是不同的,现整理如下:
注:如果不使用官方GDB,则可能导致无法执行单步调试,该联系是从http://download.qt.io/official_releases/gdb/的官方网站整理如下:
或Window-32系统
android-ndk32-r10-windows-x86.zip,下载地址:http://dl.google.com/android/ndk/android-ndk32-r10-windows-x86.zip
android-ndk-r10-windows-gdb.tar.xz ,下载地址:http://download.qt.io/official_releases/gdb/windows-7/android-ndk-r10-windows-gdb.tar.xz
或Window-64系统
android-ndk32-r10-windows-x86_64.zip,下载地址:http://dl.google.com/android/ndk/android-ndk32-r10-windows-x86_64.zip
android-ndk-r10-windows-x86_64-gdb.tar.xz,http://download.qt.io/official_releases/gdb/windows-7/android-ndk-r10-windows-x86_64-gdb.tar.xz
或Linux-32系统
http://dl.google.com/android/ndk/android-ndk32-r10-linux-x86.tar.bz2
http://download.qt.io/official_releases/gdb/linux-32/android-ndk-r10-linux-x86-gdb.tar.xz
或Linux-64系统
http://dl.google.com/android/ndk/android-ndk32-r10-linux-x86_64.tar.bz2
http://download.qt.io/official_releases/gdb/linux-64/android-ndk-r10-linux-x86_64-gdb.tar.xz
或MacOSX-64,一般情况只需要64位则可以,原因是MacOSX是64位和32位系统的混合体,系统在安装时会根据CPU的情况而自动选择运行32位还是64位。
http://dl.google.com/android/ndk/android-ndk32-r10-darwin-x86_64.tar.bz2
http://download.qt.io/official_releases/gdb/osx/android-ndk-r10-darwin-x86_64-gdb.tar.bz2
http://dl.google.com/android/ndk/android-ndk-r9d-darwin-x86_64.tar.bz2
http://download.qt.io/official_releases/gdb/osx/android-ndk-r9d-darwin-x86_64-gdb.tar.bz2
或
http://dl.google.com/android/ndk/android-ndk32-r10-darwin-x86.tar.bz2
http://download.qt.io/official_releases/gdb/osx/android-ndk-r10-darwin-x86-gdb.tar.bz2
或
http://dl.google.com/android/ndk/android-ndk-r9d-darwin-x86.tar.bz2
http://download.qt.io/official_releases/gdb/osx/android-ndk-r9d-darwin-x86-gdb.tar.bz2
注:根据NDK的文档API介绍,所使用的API版本大于18,则才是全面支持的。如果在小于18系统上,则系统可能不支持部份API如openGL等
(android-ndk-r10/docs/Programmers_Guide/html/md_3__key__topics__libraries__s_t_a_b_l_e-_a_p_i_s.html)
2.Android-SDK-Tool下载与更新
SDKTools的官方格式为:android-sdk_r(x.y.z)-(system),x,y,z是版本号,system是系统环境,如下所示:
android-sdk_r22.6.2-macosx.zip
android-sdk_r23.0.2-macosx.zip
android-sdk_r22.6.2-windows.zip
在Qt5.5中,仅推荐使用android-sdk_r22.6.2-windows.zip和android-sdk_r22.6.2-macosx.zip两个版本,r21的版本,好像不支持了,更高的版本不推荐使用。
http://dl.google.com/android/android-sdk_r22.6.2-windows.zip
http://dl.google.com/android/android-sdk_r22.6.2-macosx.zip
以下图示为当前可单步调试的版本,请不要升级sdktools的版本,因为高版本的adb与gdb和gdbserver不兼容。

是否使用当前最新版本,就是对的呢?这答案在ADT集成环境即adt-bundle-windows-x86是正确的,但在Qt的环境中,就是可能不合适了。
这不合适是指:使用高版本的sdk是可以直接编译和部署应用的,但也许无法单步调试应用。这原因主要是以下造成的。
Qt的调试全过程,依赖的程序有哪些:
gcc:由ndk提供
androiddeployqt:由Qt5提供
gdb:由ndk提供。
gdbserver:由ndk提供
adb:由platform-tools提供,该工具是与sdktool的一起的。
ant:第三方提供。
而决定单步调试的上述程序有gcc/adb/gdbserver/gdb,而gcc/gdb/gdbserver都是由ndk提供,故兼容性是没有问题的。那不兼容的问题点主要集在adb。
为什么会造成不兼容呢?极可能是adb和gdbserver的通信协议造成的。虽然adb connect和adb -p 5037是完成了设备的连接,包括网络通信,但版本差异导致gdb的调试指令无法透传给gdbserver,最终导致无法启动手机的调试的应用程序,最终也就无法调试。
3.下载apache-ant,官网要求是大于1.8版本,本人实测版本为1.8.4和1.9.4均没有问题。
http://archive.apache.org/dist/ant/binaries/apache-ant-1.8.4-bin.zip
4.下载Qt5.5或者Qt5.4了。
http://download.qt.io/official_releases/qt/5.5/5.5.0/qt-opensource-mac-x64-android-ios-5.5.0.dmg
http://download.qt.io/official_releases/qt/5.5/5.5.0/qt-opensource-windows-x86-android-5.5.0.exe
注:qt5.5版本在调用qtwebview组件时,在退出进程时会崩溃。
http://download.qt.io/official_releases/qt/5.4/5.4.0/qt-opensource-windows-x86-android-5.4.0.exe,调用qtwebview组件时,退出进程不会崩溃也无其它异常。
http://download.qt.io/official_releases/qt/5.4/5.4.2/qt-opensource-windows-x86-android-5.4.2.exe
http://download.qt.io/official_releases/qt/5.4/5.4.2/qt-opensource-mac-x64-android-ios-5.4.2.dmg
5.JDK的版本,本人使用的JDK7u71版本。
http://download.oracle.com/otn-pub/java/jdk/7u71-b14/jdk-7u71-macosx-x64.dmg
http://download.oracle.com/otn-pub/java/jdk/7u71-b14/jdk-7u71-windows-i586.exe 如果会导致虚拟机启动故障,安装x64的版本。
http://download.oracle.com/otn-pub/java/jdk/7u71-b14/jdk-7u71-windows-x64.exe
6.在Window中需要安装一个USB driver,该usbdirver是sdk-tool中自带的,如果没有自带,可以从其它版本如r23中提取出来放置extras的googles目录下即可。
————-
Error: Target id ‘android–1’ is not valid. Use ‘android.bat list targets’ to get the target ids.
该类出错,是没有每指定android版本,因此会出错。
若出现qt for android 无法调试,则确保检查是否使用的是sdk-tool-r26.2版本。
————————————–
目前经验证,发现无法调试问题,原因是adb的版本,与gdb及gdbserver版本不兼容导致。qt的调试是需要通过adb进行通信的。
——————————–
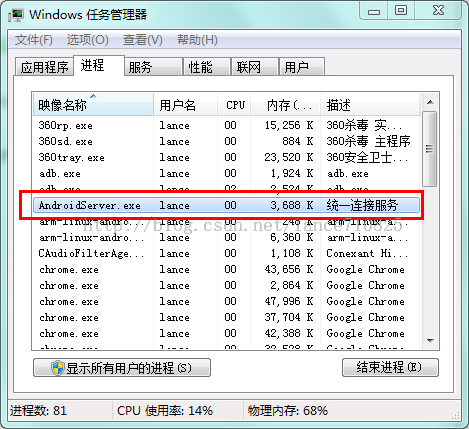
如果在调试时,提示”Waiting for debug socket connect”的问题,请检查是否存在进程AndroidServer的进程,像QQ或移动助手之类的工具,会自带这种工具。
当使用Qt Creater开发安卓应用时,使用调试器调试程序时一直出现:
“DEBUGGER: Waiting for debug socket connect” 和“DEBUGGER: go to sleep”,也就是说程序一直在等待Debug的socket连接。过了大概30秒,Qt Creater提示远程连接失败。
解决方法:
这个问题困扰了我很久,直到有一天我无意中在任务管理器中把“AndroidServer”的进程删除后,调试就没出现问题了。如图:
1.安装subversion服务。
Ubuntu:sudo apt-get install subversion
Centos:sudo yum install subversion
2.创建SVN仓库,如axfcms。
svnadmin create /svnRepos/axfcms
3.修改/svnRepos/conf目录下的所有文件。
A.修改svnserv.conf。命令如下:vim /svnRepo/axfcms/conf/svnserve.conf。
[general]

#匿名用户不可读

anon-access = none

#权限用户可写

auth-access = write

#密码文件为passwd

password-db = passwd

#权限文件为authz

authz-db = authz
B.添加访问用户:vim /svnRepo/axfcms/conf/passwd
[users]
# harry = harryssecret
# sally = sallyssecret
tone = 12345 #等号前是用户名,等号后是密码。
C.修改授权信息:vim /svnRepo/axfcms/conf/authz
[groups]
admin= tone
[/]
@admin = rw
*=r
4.启动服务
svnserve -d -T -r /svnRepo
5.随系统启动,在vim /etc/rc.local追加如下
svnserve -d -T -r /svnRepo/
6.客户端访问:
svn checkout svn://xxx.xxx.xxx.xxx/axfcms axfcms
1.列出当前目录下各子目录的磁盘占用:
ls|awk '$0'|xargs du -sh或du -h --max-depth=1
2.列出当前目录下文件的大小:
ls -lh或ll -h
3.磁盘占用:df -h
cd / && ls|awk '$0'|xargs du -sh
clear && df -h && cd / && du -h --max-depth=1
4.列出已经删除但依旧没有释放的文件。
lsof|grep deleted
例如要杀死phantomjs的父进程为1的进程。
ps -ef |grep phantomjs| awk ‘$3==1 {print $2}’ | xargs kill -9
使用时,可以拆解上述命令,观察其最终删除了那些进程,如下。
1.ps -ef |grep phantomjs
2.ps -ef |grep phantomjs| awk ‘$3==1 {print $2}’
1.首先安装scrapyd。
2.在爬虫scrapy.cfg文件中,清加如下列表:
[deploy:s158]  #冒号隔开。

url = http://192.168.1.158:6800/
[deploy:s161]
url = http://192.168.2.161:6800/
[deploy:s88]
url = http://10.199.3.88:6800/
3.在与scrapy.cfg同级目录下建立任意py文件,如depoy.py文件,在其添加如下代码。
# -*- coding: utf-8 -*-

import os
project = os.path.dirname(__file__)
project = os.path.basename(project)
hosts = ['s158', 's161', 's88']
for it in hosts:
command = 'scrapy deploy %s -p %s' %(it, project)
os.system(command)
———————————————-
sh脚本:

#!/bin/sh
# you should modify some parameter below.
project='webproxy'
# hosts' string are from scrapy.cfg file at the same directory.
hosts="s2 s254 s102"
# ---------------------------------------------
# code body.
path=$(dirname $(readlink -f $0))
prjdir="$path/$project"
if [ ! -d "$prjdir" ]; then
echo ""
echo "can't find the path like ${prjdir}."
echo "make sure the spiders were done in this path."
echo ""
exit
fi
echo ""
echo "----"
echo "ready to deploy '$project' to [$hosts]"
echo "----"
echo ""
read -p "Do you want to continue [Y/N]?" answer
case $answer in
Y | y)
echo ""
for it in $hosts
do
scrapy deploy $it -p $project
done
;;
*)
echo ""
echo "nothing to do, good bye!!"
;;
esac
echo ""
echo ""
1.下载:http://cdn.mysql.com/Downloads/MySQL-5.6/mysql-5.6.26-winx64.zip
2.安装mysql服务:mysqld –install mysql
3.启动数据库:net start mysql
4.停止数据库:net stop mysql
5.删除mysql服务:mysqld remove mysql