- 首先,对于一个web应用,其部署在web容器中,web容器提供其一个全局的上下文环境,这个上下文就是ServletContext,其为后面的spring IoC容器提供宿主环境;
- 其次,在web.xml中会提供有contextLoaderListener。在web容器启动时,会触发容器初始化事件,此时contextLoaderListener会监听到这个事件,其contextInitialized方法会被调用,在这个方法中,spring会初始化一个启动上下文,这个上下文被称为根上下文,即WebApplicationContext,这是一个接口类,确切的说,其实际的实现类是XmlWebApplicationContext。这个就是spring的IoC容器,其对应的Bean定义的配置由web.xml中的context-param标签指定。在这个IoC容器初始化完毕后,spring以WebApplicationContext.ROOTWEBAPPLICATIONCONTEXTATTRIBUTE为属性Key,将其存储到ServletContext中,便于获取;
- 再次,contextLoaderListener监听器初始化完毕后,开始初始化web.xml中配置的Servlet,这个servlet可以配置多个,以最常见的DispatcherServlet为例,这个servlet实际上是一个标准的前端控制器,用以转发、匹配、处理每个servlet请求。DispatcherServlet上下文在初始化的时候会建立自己的IoC上下文,用以持有spring mvc相关的bean。在建立DispatcherServlet自己的IoC上下文时,会利用WebApplicationContext.ROOTWEBAPPLICATIONCONTEXTATTRIBUTE先从ServletContext中获取之前的根上下文(即WebApplicationContext)作为自己上下文的parent上下文。有了这个parent上下文之后,再初始化自己持有的上下文。这个DispatcherServlet初始化自己上下文的工作在其initStrategies方法中可以看到,大概的工作就是初始化处理器映射、视图解析等。这个servlet自己持有的上下文默认实现类也是mlWebApplicationContext。初始化完毕后,spring以与servlet的名字相关(此处不是简单的以servlet名为Key,而是通过一些转换,具体可自行查看源码)的属性为属性Key,也将其存到ServletContext中,以便后续使用。这样每个servlet就持有自己的上下文,即拥有自己独立的bean空间,同时各个servlet共享相同的bean,即根上下文(第2步中初始化的上下文)定义的那些bean。
转:使用 @Repository、@Service、@Controller 和 @Component 将类标识为 Bean
使用 @Repository、@Service、@Controller 和 @Component 将类标识为 Bean
spring 自 2.0 版本开始,陆续引入了一些注解用于简化 Spring 的开发。@Repository 注解便属于最先引入的一批,它用于将数据访问层 (DAO 层 ) 的类标识为 Spring Bean。具体只需将该注解标注在 DAO 类上即可。同时,为了让 Spring 能够扫描类路径中的类并识别出 @Repository 注解,需要在 XML 配置文件中启用 Bean 的自动扫描功能,这可以通过 <context:component-scan/> 实现。如下所示:
// 首先使用 @Repository 将 DAO 类声明为 Bean
package bookstore.dao;
@Repository
public class UserDaoImpl implements UserDao{ …… }
// 其次,在 XML 配置文件中启动 Spring 的自动扫描功能
<beans … >
……
<context:component-scan base-package=”bookstore.dao” />
……
</beans>
如此,我们就不再需要在 XML 中显式使用 <bean/> 进行 Bean 的配置。Spring 在容器初始化时将自动扫描 base-package 指定的包及其子包下的所有 class 文件,所有标注了 @Repository 的类都将被注册为 Spring Bean。
为什么 @Repository 只能标注在 DAO 类上呢?这是因为该注解的作用不只是将类识别为 Bean,同时它还能将所标注的类中抛出的数据访问异常封装为 Spring 的数据访问异常类型。 Spring 本身提供了一个丰富的并且是与具体的数据访问技术无关的数据访问异常结构,用于封装不同的持久层框架抛出的异常,使得异常独立于底层的框架。
Spring 2.5 在 @Repository 的基础上增加了功能类似的额外三个注解:@Component、@Service、@Constroller,它们分别用于软件系统的不同层次:
@Component 是一个泛化的概念,仅仅表示一个组件 (Bean) ,可以作用在任何层次。
@Service 通常作用在业务层,但是目前该功能与 @Component 相同。
@Constroller 通常作用在控制层,但是目前该功能与 @Component 相同。
通过在类上使用 @Repository、@Component、@Service 和 @Constroller 注解,Spring 会自动创建相应的 BeanDefinition 对象,并注册到 ApplicationContext 中。这些类就成了 Spring 受管组件。这三个注解除了作用于不同软件层次的类,其使用方式与 @Repository 是完全相同的。
另外,除了上面的四个注解外,用户可以创建自定义的注解,然后在注解上标注 @Component,那么,该自定义注解便具有了与所 @Component 相同的功能。不过这个功能并不常用。
当一个 Bean 被自动检测到时,会根据那个扫描器的 BeanNameGenerator 策略生成它的 bean 名称。默认情况下,对于包含 name 属性的 @Component、@Repository、 @Service 和 @Controller,会把 name 取值作为 Bean 的名字。如果这个注解不包含 name 值或是其他被自定义过滤器发现的组件,默认 Bean 名称会是小写开头的非限定类名。如果你不想使用默认 bean 命名策略,可以提供一个自定义的命名策略。首先实现 BeanNameGenerator 接口,确认包含了一个默认的无参数构造方法。然后在配置扫描器时提供一个全限定类名,如下所示:
<beans …>
<context:component-scan
base-package=”a.b” name-generator=”a.SimpleNameGenerator”/>
</beans>
与通过 XML 配置的 Spring Bean 一样,通过上述注解标识的 Bean,其默认作用域是”singleton”,为了配合这四个注解,在标注 Bean 的同时能够指定 Bean 的作用域,Spring 2.5 引入了 @Scope 注解。使用该注解时只需提供作用域的名称就行了,如下所示:
@Scope(“prototype”)
@Repository
public class Demo { … }
如果你想提供一个自定义的作用域解析策略而不使用基于注解的方法,只需实现 ScopeMetadataResolver 接口,确认包含一个默认的没有参数的构造方法。然后在配置扫描器时提供全限定类名:
<context:component-scan base-package=”a.b”
scope-resolver=”footmark.SimpleScopeResolver” />
使用 @PostConstruct 和 @PreDestroy 指定生命周期回调方法
Spring Bean 是受 Spring IoC 容器管理,由容器进行初始化和销毁的(prototype 类型由容器初始化之后便不受容器管理),通常我们不需要关注容器对 Bean 的初始化和销毁操作,由 Spring 经过构造函数或者工厂方法创建的 Bean 就是已经初始化完成并立即可用的。然而在某些情况下,可能需要我们手工做一些额外的初始化或者销毁操作,这通常是针对一些资源的获取和释放操作。 Spring 1.x 为此提供了两种方式供用户指定执行生命周期回调的方法。
第一种方式是实现 Spring 提供的两个接口:InitializingBean 和 DisposableBean。如果希望在 Bean 初始化完成之后执行一些自定义操作,则可以让 Bean 实现 InitializingBean 接口,该接口包含一个 afterPropertiesSet() 方法,容器在为该 Bean 设置了属性之后,将自动调用该方法;如果 Bean 实现了 DisposableBean 接口,则容器在销毁该 Bean 之前,将调用该接口的 destroy() 方法。这种方式的缺点是,让 Bean 类实现 Spring 提供的接口,增加了代码与 Spring 框架的耦合度,因此不推荐使用。
第二种方式是在 XML 文件中使用 <bean> 的 init-method 和 destroy-method 属性指定初始化之后和销毁之前的回调方法,代码无需实现任何接口。这两个属性的取值是相应 Bean 类中的初始化和销毁方法,方法名任意,但是方法不能有参数。示例如下:
<bean id=”userService”
class=”bookstore.service.UserService”
init-method=”init” destroy-method=”destroy”>
…
</bean>
Spring 2.5 在保留以上两种方式的基础上,提供了对 JSR-250 的支持。JSR-250 规范定义了两个用于指定声明周期方法的注解:@PostConstruct 和 @PreDestroy。这两个注解使用非常简单,只需分别将他们标注于初始化之后执行的回调方法或者销毁之前执行的回调方法上。由于使用了注解,因此需 要配置相应的 Bean 后处理器,亦即在 XML 中增加如下一行:
<context:annotation-config />
比较上述三种指定生命周期回调方法的方式,第一种是不建议使用的,不但其用法不如后两种方式灵活,而且无形中增加了代码与框架的耦合度。后面两种方式开发者可以根据使用习惯选择其中一种,但是最好不要混合使用,以免增加维护的难度。
回页首
使用 @Required 进行 Bean 的依赖检查
依赖检查的作用是,判断给定 Bean 的相应 Setter 方法是否都在实例化的时候被调用了。而不是判断字段是否已经存在值了。Spring 进行依赖检查时,只会判断属性是否使用了 Setter 注入。如果某个属性没有使用 Setter 注入,即使是通过构造函数已经为该属性注入了值,Spring 仍然认为它没有执行注入,从而抛出异常。另外,Spring 只管是否通过 Setter 执行了注入,而对注入的值却没有任何要求,即使注入的 <null/>,Spring 也认为是执行了依赖注入。
<bean> 标签提供了 dependency-check 属性用于进行依赖检查。该属性的取值包括以下几种:
none — 默认不执行依赖检查。可以在 <beans> 标签上使用 default-dependency-check 属性改变默认值。
simple — 对原始基本类型和集合类型进行检查。
objects — 对复杂类型进行检查(除了 simple 所检查类型之外的其他类型)。
all — 对所有类型进行检查。
旧版本使用 dependency-check 在配置文件中设置,缺点是粒度较粗。使用 Spring2.0 提供的 @Required 注解,提供了更细粒度的控制。@Required 注解只能标注在 Setter 方法之上。因为依赖注入的本质是检查 Setter 方法是否被调用了,而不是真的去检查属性是否赋值了以及赋了什么样的值。如果将该注解标注在非 setXxxx() 类型的方法则被忽略。
为了让 Spring 能够处理该注解,需要激活相应的 Bean 后处理器。要激活该后处理器,只需在 XML 中增加如下一行即可。
<context:annotation-config/>
当某个被标注了 @Required 的 Setter 方法没有被调用,则 Spring 在解析的时候会抛出异常,以提醒开发者对相应属性进行设置。
使用 @Resource、@Autowired 和 @Qualifier 指定 Bean 的自动装配策略
自动装配是指,Spring 在装配 Bean 的时候,根据指定的自动装配规则,将某个 Bean 所需要引用类型的 Bean 注入进来。<bean> 元素提供了一个指定自动装配类型的 autowire 属性,该属性有如下选项:
no — 显式指定不使用自动装配。
byName — 如果存在一个和当前属性名字一致的 Bean,则使用该 Bean 进行注入。如果名称匹配但是类型不匹配,则抛出异常。如果没有匹配的类型,则什么也不做。
byType — 如果存在一个和当前属性类型一致的 Bean ( 相同类型或者子类型 ),则使用该 Bean 进行注入。byType 能够识别工厂方法,即能够识别 factory-method 的返回类型。如果存在多个类型一致的 Bean,则抛出异常。如果没有匹配的类型,则什么也不做。
constructor — 与 byType 类似,只不过它是针对构造函数注入而言的。如果当前没有与构造函数的参数类型匹配的 Bean,则抛出异常。使用该种装配模式时,优先匹配参数最多的构造函数。
autodetect — 根据 Bean 的自省机制决定采用 byType 还是 constructor 进行自动装配。如果 Bean 提供了默认的构造函数,则采用 byType;否则采用 constructor 进行自动装配。
当使用 byType 或者 constructor 类型的自动装配的时候,自动装配也支持引用类型的数组或者使用了泛型的集合,这样,Spring 就会检查容器中所有类型匹配的 Bean,组成集合或者数组后执行注入。对于使用了泛型的 Map 类型,如果键是 String 类型,则 Spring 也会自动执行装配,将所有类型匹配的 Bean 作为值,Bean 的名字作为键。
我们可以给 <beans> 增加 default-autowire 属性,设置默认的自动封装策略。默认值为”no”。如果使用自动装配的同时,也指定了 property 或者 constructor-arg 标签,则显式指定的值将覆盖自动装配的值。目前的自动封装不支持简单类型,比如基本类型、String、Class,以及它们的数组类型。
在按类型匹配的时候 ( 可能是 byType、constructor、autodetect),同一个类型可能存在多个 Bean,如果被注入的属性是数组、集合或者 Map,这可能没有问题,但是如果只是简单的引用类型,则会抛出异常。解决方法有如下几种:
取消该 Bean 的自动装配特性,使用显式的注入。我们可能不希望某个 Bean 被当作其他 Bean 执行自动封装时的候选对象,我们可以给该 <bean> 增加 autowire-candidate=”false”。(autowire-candidate 属性和 autowire 属性相互独立,互不相干。某个 Bean 可以将 autowire-candidate 设置为 false,同时使用 autowire 特性。) 另外,我们可以设置 <beans> 的 default-autowire-candidates 属性,可以在该属性中指定可以用于自动装配候选 Bean 的匹配模式,比如 default-autowire-candidates=”*serv,*dao”,这表示所有名字以 serv 或者 dao 结尾的 Bean 被列为候选,其他则忽略,相当于其他 Bean 都指定为 autowire-candidate=”false”,此时可以显式为 <bean> 指定 autowire-candidate=”true”。在 <bean> 上指定的设置要覆盖 <beans> 上指定的设置。
如果在多个类型相同的 Bean 中有首选的 Bean,那么可以将该 <bean> 的 primary 属性设置为 “true” ,这样自动装配时便优先使用该 Bean 进行装配。此时不能将 autowire-candidate 设为 false。
如果使用的是 Java 5 以上版本,可以使用注解进行更细粒度的控制。
使用 @Autowired 和 @Qualifier 注解执行自动装配
使用 @Autowired 注解进行装配,只能是根据类型进行匹配。@Autowired 注解可以用于 Setter 方法、构造函数、字段,甚至普通方法,前提是方法必须有至少一个参数。@Autowired 可以用于数组和使用泛型的集合类型。然后 Spring 会将容器中所有类型符合的 Bean 注入进来。@Autowired 标注作用于 Map 类型时,如果 Map 的 key 为 String 类型,则 Spring 会将容器中所有类型符合 Map 的 value 对应的类型的 Bean 增加进来,用 Bean 的 id 或 name 作为 Map 的 key。
@Autowired 标注作用于普通方法时,会产生一个副作用,就是在容器初始化该 Bean 实例的时候就会调用该方法。当然,前提是执行了自动装配,对于不满足装配条件的情况,该方法也不会被执行。
当标注了 @Autowired 后,自动注入不能满足,则会抛出异常。我们可以给 @Autowired 标注增加一个 required=false 属性,以改变这个行为。另外,每一个类中只能有一个构造函数的 @Autowired.required() 属性为 true。否则就出问题了。如果用 @Autowired 同时标注了多个构造函数,那么,Spring 将采用贪心算法匹配构造函数 ( 构造函数最长 )。
@Autowired 还有一个作用就是,如果将其标注在 BeanFactory 类型、ApplicationContext 类型、ResourceLoader 类型、ApplicationEventPublisher 类型、MessageSource 类型上,那么 Spring 会自动注入这些实现类的实例,不需要额外的操作。
当容器中存在多个 Bean 的类型与需要注入的相同时,注入将不能执行,我们可以给 @Autowired 增加一个候选值,做法是在 @Autowired 后面增加一个 @Qualifier 标注,提供一个 String 类型的值作为候选的 Bean 的名字。举例如下:
@Autowired(required=false)
@Qualifier(“ppp”)
public void setPerson(person p){}
@Qualifier 甚至可以作用于方法的参数 ( 对于方法只有一个参数的情况,我们可以将 @Qualifer 标注放置在方法声明上面,但是推荐放置在参数前面 ),举例如下:
@Autowired(required=false)
public void sayHello(@Qualifier(“ppp”)Person p,String name){}
我们可以在配置文件中指定某个 Bean 的 qualifier 名字,方法如下:
<bean id=”person” class=”footmark.spring.Person”>
<qualifier value=”ppp”/>
</bean>
如果没有明确指定 Bean 的 qualifier 名字,那么默认名字就是 Bean 的名字。通常,qualifier 应该是有业务含义的,例如 “domain”,”persistent” 等,而不应该是类似 “person” 方式。
我们还可以将 @Qualifier 标注在集合类型上,那么所有 qualifier 名字与指定值相同的 Bean 都将被注入进来。
最后,配置文件中需要指定每一个自定义注解的属性值。我们可以使用 <meta> 标签来代替 <qualifier/> 标签,如果 <meta> 标签和 <qualifier/> 标签同时出现,那么优先使用 <qualifier> 标签。如果没有 <qualifier> 标签,那么会用 <meta> 提供的键值对来封装 <qualifier> 标签。示例如下:
<bean class=”footmark.HelloWorld”>
<qualifier type=”MovieQualifier”>
<attribute key=”format” value=”VHS”/>
<attribute key=”genre” value=”Comedy”/>
</qualifier>
</bean>
<bean class=”footmark.HelloWorld”>
<meta key=”format” value=”DVD”/>
<meta key=”genre” value=”Action”/>
</bean>
@Autowired 注解对应的后处理注册与前面相似,只需在配置文件中增加如下一行即可:
<context:annotation-config/>
如果 @Autowired 注入的是 BeanFactory、ApplicationContext、ResourceLoader 等系统类型,那么则不需要 @Qualifier,此时即使提供了 @Qualifier 注解,也将会被忽略;而对于自定义类型的自动装配,如果使用了 @Qualifier 注解并且没有名字与之匹配的 Bean,则自动装配匹配失败。
使用 JSR-250 中的 @Resource 和 @Qualifier 注解
如果希望根据 name 执行自动装配,那么应该使用 JSR-250 提供的 @Resource 注解,而不应该使用 @Autowired 与 @Qualifier 的组合。
@Resource 使用 byName 的方式执行自动封装。@Resource 标注可以作用于带一个参数的 Setter 方法、字段,以及带一个参数的普通方法上。@Resource 注解有一个 name 属性,用于指定 Bean 在配置文件中对应的名字。如果没有指定 name 属性,那么默认值就是字段或者属性的名字。@Resource 和 @Qualifier 的配合虽然仍然成立,但是 @Qualifier 对于 @Resource 而言,几乎与 name 属性等效。
如果 @Resource 没有指定 name 属性,那么使用 byName 匹配失败后,会退而使用 byType 继续匹配,如果再失败,则抛出异常。在没有为 @Resource 注解显式指定 name 属性的前提下,如果将其标注在 BeanFactory 类型、ApplicationContext 类型、ResourceLoader 类型、ApplicationEventPublisher 类型、MessageSource 类型上,那么 Spring 会自动注入这些实现类的实例,不需要额外的操作。此时 name 属性不需要指定 ( 或者指定为””),否则注入失败;如果使用了 @Qualifier,则该注解将被忽略。而对于用户自定义类型的注入,@Qualifier 和 name 等价,并且不被忽略。
<bean> 的 primary 和 autowire-candidate 属性对 @Resource、@Autowired 仍然有效。
使用 @Configuration 和 @Bean 进行 Bean 的声明
虽然 2.0 版本发布以来,Spring 陆续提供了十多个注解,但是提供的这些注解只是为了在某些情况下简化 XML 的配置,并非要取代 XML 配置方式。这一点可以从 Spring IoC 容器的初始化类可以看出:ApplicationContext 接口的最常用的实现类是 ClassPathXmlApplicationContext 和 FileSystemXmlApplicationContext,以及面向 Portlet 的 XmlPortletApplicationContext 和面向 web 的 XmlWebApplicationContext,它们都是面向 XML 的。Spring 3.0 新增了另外两个实现类:AnnotationConfigApplicationContext 和 AnnotationConfigWebApplicationContext。从名字便可以看出,它们是为注解而生,直接依赖于注解作为容器配置信息来 源的 IoC 容器初始化类。由于 AnnotationConfigWebApplicationContext 是 AnnotationConfigApplicationContext 的 web 版本,其用法与后者相比几乎没有什么差别,因此本文将以 AnnotationConfigApplicationContext 为例进行讲解。
AnnotationConfigApplicationContext 搭配上 @Configuration 和 @Bean 注解,自此,XML 配置方式不再是 Spring IoC 容器的唯一配置方式。两者在一定范围内存在着竞争的关系,但是它们在大多数情况下还是相互协作的关系,两者的结合使得 Spring IoC 容器的配置更简单,更强大。
之前,我们将配置信息集中写在 XML 中,如今使用注解,配置信息的载体由 XML 文件转移到了 Java 类中。我们通常将用于存放配置信息的类的类名以 “Config” 结尾,比如 AppDaoConfig.java、AppServiceConfig.java 等等。我们需要在用于指定配置信息的类上加上 @Configuration 注解,以明确指出该类是 Bean 配置的信息源。并且 Spring 对标注 Configuration 的类有如下要求:
配置类不能是 final 的;
配置类不能是本地化的,亦即不能将配置类定义在其他类的方法内部;
配置类必须有一个无参构造函数。
AnnotationConfigApplicationContext 将配置类中标注了 @Bean 的方法的返回值识别为 Spring Bean,并注册到容器中,受 IoC 容器管理。@Bean 的作用等价于 XML 配置中的 <bean/> 标签。示例如下:
@Configuration
public class BookStoreDaoConfig{
@Bean
public UserDao userDao(){ return new UserDaoImpl();}
@Bean
public BookDao bookDao(){return new BookDaoImpl();}
}
Spring 在解析到以上文件时,将识别出标注 @Bean 的所有方法,执行之,并将方法的返回值 ( 这里是 UserDaoImpl 和 BookDaoImpl 对象 ) 注册到 IoC 容器中。默认情况下,Bean 的名字即为方法名。因此,与以上配置等价的 XML 配置如下:
<bean id=”userDao” class=”bookstore.dao.UserDaoImpl”/>
<bean id=”bookDao” class=”bookstore.dao.BookDaoImpl”/>
@Bean 具有以下四个属性:
name — 指定一个或者多个 Bean 的名字。这等价于 XML 配置中 <bean> 的 name 属性。
initMethod — 容器在初始化完 Bean 之后,会调用该属性指定的方法。这等价于 XML 配置中 <bean> 的 init-method 属性。
destroyMethod — 该属性与 initMethod 功能相似,在容器销毁 Bean 之前,会调用该属性指定的方法。这等价于 XML 配置中 <bean> 的 destroy-method 属性。
autowire — 指定 Bean 属性的自动装配策略,取值是 Autowire 类型的三个静态属性。Autowire.BY_NAME,Autowire.BY_TYPE,Autowire.NO。与 XML 配置中的 autowire 属性的取值相比,这里少了 constructor,这是因为 constructor 在这里已经没有意义了。
@Bean 没有直接提供指定作用域的属性,可以通过 @Scope 来实现该功能,关于 @Scope 的用法已在上文列举。
下面讲解基于注解的容器初始化。AnnotationConfigApplicationContext 提供了三个构造函数用于初始化容器。
AnnotationConfigApplicationContext():该构造函数初始化一个空容器,容器不包含任何 Bean 信息,需要在稍后通过调用其 register() 方法注册配置类,并调用 refresh() 方法刷新容器。
AnnotationConfigApplicationContext(Class<?>… annotatedClasses):这是最常用的构造函数,通过将涉及到的配置类传递给该构造函数,以实现将相应配置类中的 Bean 自动注册到容器中。
AnnotationConfigApplicationContext(String… basePackages):该构造函数会自动扫描以给定的包及其子包下的所有类,并自动识别所有的 Spring Bean,将其注册到容器中。它不但识别标注 @Configuration 的配置类并正确解析,而且同样能识别使用 @Repository、@Service、@Controller、@Component 标注的类。
除了使用上面第三种类型的构造函数让容器自动扫描 Bean 的配置信息以外,AnnotationConfigApplicationContext 还提供了 scan() 方法,其功能与上面也类似,该方法主要用在容器初始化之后动态增加 Bean 至容器中。调用了该方法以后,通常需要立即手动调用 refresh() 刷新容器,以让变更立即生效。
需要注意的是,AnnotationConfigApplicationContext 在解析配置类时,会将配置类自身注册为一个 Bean,因为 @Configuration 注解本身定义时被 @Component 标注了。因此可以说,一个 @Configuration 同时也是一个 @Component。大多数情况下,开发者用不到该 Bean,并且在理想情况下,该 Bean 应该是对开发者透明的。@Configuration 的定义如下所示:
@Target({ElementType.TYPE})
@Retention(RetentionPolicy.RUNTIME)
@Documented
@Component
public @interface Configuration {
String value() default “”;
}
在一般的项目中,为了结构清晰,通常会根据软件的模块或者结构定义多个 XML 配置文件,然后再定义一个入口的配置文件,该文件使用 <import/> 将其他的配置文件组织起来。最后只需将该文件传给 ClassPathXmlApplicationContext 的构造函数即可。针对基于注解的配置,Spring 也提供了类似的功能,只需定义一个入口配置类,并在该类上使用 @Import 注解引入其他的配置类即可,最后只需要将该入口类传递给 AnnotationConfigApplicationContext。具体示例如下:
@Configuration
@Import({BookStoreServiceConfig.class,BookStoreDaoConfig.class})
public class BookStoreConfig{ … }
混合使用 XML 与注解进行 Bean 的配置
设计 @Configuration 和 @Bean 的初衷,并不是为了完全取代 XML,而是为了在 XML 之外多一种可行的选择。由于 Spring 自发布以来,Spring 开发小组便不断简化 XML 配置,使得 XML 配置方式已经非常成熟,加上 Spring 2.0 以后出现了一系列命名空间的支持,使得 XML 配置方式成为了使用简单、功能强大的 Bean 定义方式。而且,XML 配置的一些高级功能目前还没有相关注解能够直接支持。因此,在目前的多数项目中,要么使用纯粹的 XML 配置方式进行 Bean 的配置,要么使用以注解为主,XML 为辅的配置方式进行 Bean 的配置。
之所以会出现两者共存的情况,主要归结为三个原因:其一,目前绝大多数采用 Spring 进行开发的项目,几乎都是基于 XML 配置方式的,Spring 在引入注解的同时,必须保证注解能够与 XML 和谐共存,这是前提;其二,由于注解引入较晚,因此功能也没有发展多年的 XML 强大,因此,对于复杂的配置,注解还很难独当一面,在一段时间内仍然需要 XML 的配合才能解决问题。除此之外,Spring 的 Bean 的配置方式与 Spring 核心模块之间是解耦的,因此,改变配置方式对 Spring 的框架自身是透明的。Spring 可以通过使用 Bean 后处理器 (BeanPostProcessor) 非常方便的增加对于注解的支持。这在技术实现上非常容易的事情。
要使用混合配置方式,首先需要判断以哪一种配置方式为主。对这个问题的不同回答将会直接影响到实现的方式。然而大可不必为此伤脑筋,因为不论是以 XML 为主,还是以注解为主,配置方式都是简单而且容易理解的。这里不存在错误的决定,因为仅仅是表现方式不一样。我们首先假设以 XML 配置为主的情况。
对于已经存在的大型项目,可能初期是以 XML 进行 Bean 配置的,后续逐渐加入了注解的支持,这时我们只需在 XML 配置文件中将被 @Configuration 标注的类定义为普通的 <bean>,同时注册处理注解的 Bean 后处理器即可。示例如下:
// 假设存在如下的 @Configuration 类:
package bookstore.config;
import bookstore.dao.*;
@Configuration
public class MyConfig{
@Bean
public UserDao userDao(){
return new UserDaoImpl();
}
}
此时,只需在 XML 中作如下声明即可:
<beans … >
……
<context:annotation-config />
<bean class=”demo.config.MyConfig”/>
</beans>
由于启用了针对注解的 Bean 后处理器,因此在 ApplicationContext 解析到 MyConfig 类时,会发现该类标注了 @Configuration 注解,随后便会处理该类中标注 @Bean 的方法,将这些方法的返回值注册为容器总的 Bean。
对于以上的方式,如果存在多个标注了 @Configuration 的类,则需要在 XML 文件中逐一列出。另一种方式是使用前面提到的自动扫描功能,配置如下:
<context:component-scan base-package=”bookstore.config” />
如此,Spring 将扫描所有 demo.config 包及其子包中的类,识别所有标记了 @Component、@Controller、@Service、@Repository 注解的类,由于 @Configuration 注解本身也用 @Component 标注了,Spring 将能够识别出 @Configuration 标注类并正确解析之。
对于以注解为中心的配置方式,只需使用 @ImportResource 注解引入存在的 XML 即可,如下所示:
@Configuration
@ImportResource(“classpath:/bookstore/config/spring-beans.xml”)
public class MyConfig{
……
}
// 容器的初始化过程和纯粹的以配置为中心的方式一致:
AnnotationConfigApplicationContext ctx =
new AnnotationConfigApplicationContext(MyConfig.class);
……
结束语
从 2.0 版本开始,Spring 的每一次更新都会提供更多新的注解供开发者使用。这满足了注解爱好者的胃口。但是正如前面所说,Spring 提供更多的注解并不是为了有朝一日取代 XML 配置方式,而是为了给开发者多一种选择。两种声明 Bean 的方式各有特色,XML 方式更加灵活,并且发展的相对成熟,这种配置方式为大多数 Spring 开发者熟悉;注解方式使用起来非常简洁,但是尚处于发展阶段。我们很难说两种配置方式孰优孰劣,但是如果能够灵活搭配两种方式,一定能够进一步提升开发效 率。
ThreadLocal的作用场景(无琐)
在某些场景中,利用线程自身的Local信息,为每个线程的创建自已副本,会是一个避免多线程竞琐的一个优化。以下是ThreadLocal的源码。
private void set(ThreadLocal key, Object value) {

    // We don't use a fast path as with get() because it is at
    // least as common to use set() to create new entries as
    // it is to replace existing ones, in which case, a fast
    // path would fail more often than not.

    Entry[] tab = table;
    int len = tab.length;
    int i = key.threadLocalHashCode & (len-1);

    for (Entry e = tab[i];
         e != null;
         e = tab[i = nextIndex(i, len)]) {
        ThreadLocal k = e.get();

        if (k == key) {
            e.value = value; //多次调用ThreadLocal.set(this,val)是一个覆盖作用。
            return;
        }

        if (k == null) {
            replaceStaleEntry(key, value, i);
            return;
        }
    }

    tab[i] = new Entry(key, value);
    int sz = ++size;
    if (!cleanSomeSlots(i, sz) && sz >= threshold)
        rehash();
}

public void set(T value) {
    Thread t = Thread.currentThread();
    ThreadLocalMap map = getMap(t);
    if (map != null)
        map.set(this, value);
    else
        createMap(t, value);
}
ThreadLocal local = new ThreadLocal();
local.get();
local.set();
local.remove();
J2EE常用插件和国内镜像
默认情况下是jar包形式,需要修改为war包形式时,才能被tomcat插件调用使用。
war
alimaven
aliyun maven
http://maven.aliyun.com/nexus/content/groups/public/
net-cn
Human Readable Name for this Mirror.
http://maven.net.cn/content/groups/public/
repo2
Human Readable Name for this Mirror.
http://repo2.maven.org/maven2/
CN
OSChina Central
http://maven.oschina.net/content/groups/public/
nexus
Team Nexus Repository
http://192.168.1.178:8081/nexus/content/groups/public
org.apache.maven.plugins
maven-compiler-plugin
3.3
1.7
1.7
UTF-8
src\main\webapp\WEB-INF\lib
org.apache.maven.plugins
maven-surefire-plugin
2.15
true
org.apache.maven.plugins
maven-war-plugin
2.4
WebContent 在WebContent目录下,一般有META-INF和WEB-INF两个目录。
true //设置为True时,在编译的过程中,如果没有查找到WebContent\WEB-INF\web.xml文件,则会报错。
org.apache.maven.plugins
maven-jar-plugin
2.4
org.apache.tomcat.maven
tomcat7-maven-plugin
2.1
8080
/
UTF-8
tomcat7
org.eclipse.jetty
jetty-maven-plugin
9.2.11.v20150529
10
/
org.wildfly.plugins
wildfly-maven-plugin
1.1.0.Alpha5
127.0.0.1
9990
admin
admin
spring4ajax.war
beanmap的注入
在学习SmartFrame框架时,发现一段IOC控制的代码有点意思,于是摘下来。
public class IocHelper {

    static {
        try {
            // 获取并遍历所有的 Bean 类
            Map, Object> beanMap = BeanHelper.getBeanMap();
            for (Map.Entry, Object> beanEntry : beanMap.entrySet()) {
                // 获取 Bean 类与 Bean 实例
                Class beanClass = beanEntry.getKey();
                Object beanInstance = beanEntry.getValue();
                // 获取 Bean 类中所有的字段(不包括父类中的方法)
                Field[] beanFields = beanClass.getDeclaredFields();
                if (ArrayUtil.isNotEmpty(beanFields)) {
                    // 遍历所有的 Bean 字段
                    for (Field beanField : beanFields) {
                        // 判断当前 Bean 字段是否带有 Inject 注解
                        if (beanField.isAnnotationPresent(Inject.class)) {
                            // 获取 Bean 字段对应的接口
                            Class interfaceClass = beanField.getType();
                            // 获取 Bean 字段对应的实现类
                            Class implementClass = findImplementClass(interfaceClass);
                            // 若存在实现类,则执行以下代码
                            if (implementClass != null) {
                                // 从 Bean Map 中获取该实现类对应的实现类实例
                                Object implementInstance = beanMap.get(implementClass);
                                // 设置该 Bean 字段的值
                                if (implementInstance != null) {
                                    beanField.setAccessible(true); // 将字段设置为 public
                                    beanField.set(beanInstance, implementInstance); // 设置字段初始值
                                } else {
                                    throw new InitializationError("依赖注入失败!类名:" + beanClass.getSimpleName() + ",字段名:" + interfaceClass.getSimpleName());
                                }
                            }
                        }
                    }
                }
            }
        } catch (Exception e) {
            throw new InitializationError("初始化 IocHelper 出错!", e);
        }
    }

    /**
     * 查找实现类
     */
    public static Class findImplementClass(Class interfaceClass) {
        Class implementClass = interfaceClass;
        // 判断接口上是否标注了 Impl 注解
        if (interfaceClass.isAnnotationPresent(Impl.class)) {
            // 获取强制指定的实现类
            implementClass = interfaceClass.getAnnotation(Impl.class).value();
        } else {
            // 获取该接口所有的实现类
            List> implementClassList = ClassHelper.getClassListBySuper(interfaceClass);
            if (CollectionUtil.isNotEmpty(implementClassList)) {
                // 获取第一个实现类
                implementClass = implementClassList.get(0);
            }
        }
        // 返回实现类对象
        return implementClass;
    }
}
搭建zookeeper伪集群
1.在~/cluster/zookeeper目录下,安装3份zookeeper程序副本,分别命名为server1,server2,server3
2.执行以下命令。
cp server1/conf/zoo_sample.cfg server1/conf/zoo.cfg
3.在zoo.cfg文件中添加如下命令
tickTime=2000
initLimit=10
syncLimit=5
dataDir=/home/abc/cluster/zookeeper/data/server1/data
dataLogDir=/home/abc/cluster/zookeeper/data/server1/log
clientPort=2181
server.1=localhost:2888:3888
server.2=localhost:2889:3889
server.3=localhost:2890:3890
4.因为是伪集群,故另外两份必须如下设置。
tickTime=2000
initLimit=10
syncLimit=5
dataDir=/home/abc/cluster/zookeeper/data/server2/data
dataLogDir=/home/abc/cluster/zookeeper/data/server2/log
clientPort=2182
server.1=localhost:2888:3888
server.2=localhost:2889:3889
server.3=localhost:2890:3890
tickTime=2000
initLimit=10
syncLimit=5
dataDir=/home/abc/cluster/zookeeper/data/server3/data
dataLogDir=/home/abc/cluster/zookeeper/data/server3/log
clientPort=2183
server.1=localhost:2888:3888
server.2=localhost:2889:3889
server.3=localhost:2890:3890
5.执行余下这些命令
mkdir -p /home/abc/cluster/zookeeper/data/server1/data
mkdir -p /home/abc/cluster/zookeeper/data/server2/data
mkdir -p /home/abc/cluster/zookeeper/data/server3/data
echo "1" > /home/abc/cluster/zookeeper/data/server1/data/myid
echo "2" > /home/abc/cluster/zookeeper/data/server2/data/myid
echo "3" > /home/abc/cluster/zookeeper/data/server3/data/myid
6.启动集群
cd ~/cluster/zookeeper
server1/bin/zkServer.sh start
server2/bin/zkServer.sh start
server3/bin/zkServer.sh start
原来一直误会了四层和七层的含义。
四层负载均衡指的是负载均衡设备通过报文中的目标IP地址和端口负载均衡算法,选择到达目的的内部服务器;
七层负载均衡,也被称为“内容交换”,指的是负载均衡设备通过报文中的应用层信息(URL、HTTP头部等信息)和负载均衡算法,选择到达目的的内部服务器。
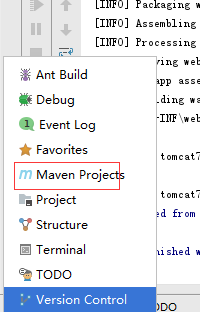
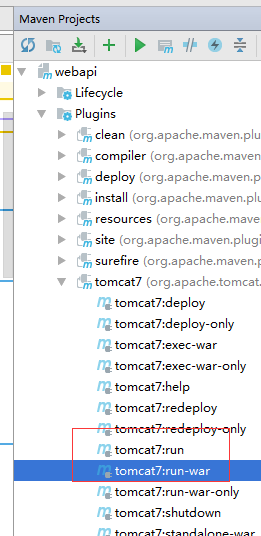
在IDEA中使用Tomcat调试Web项目
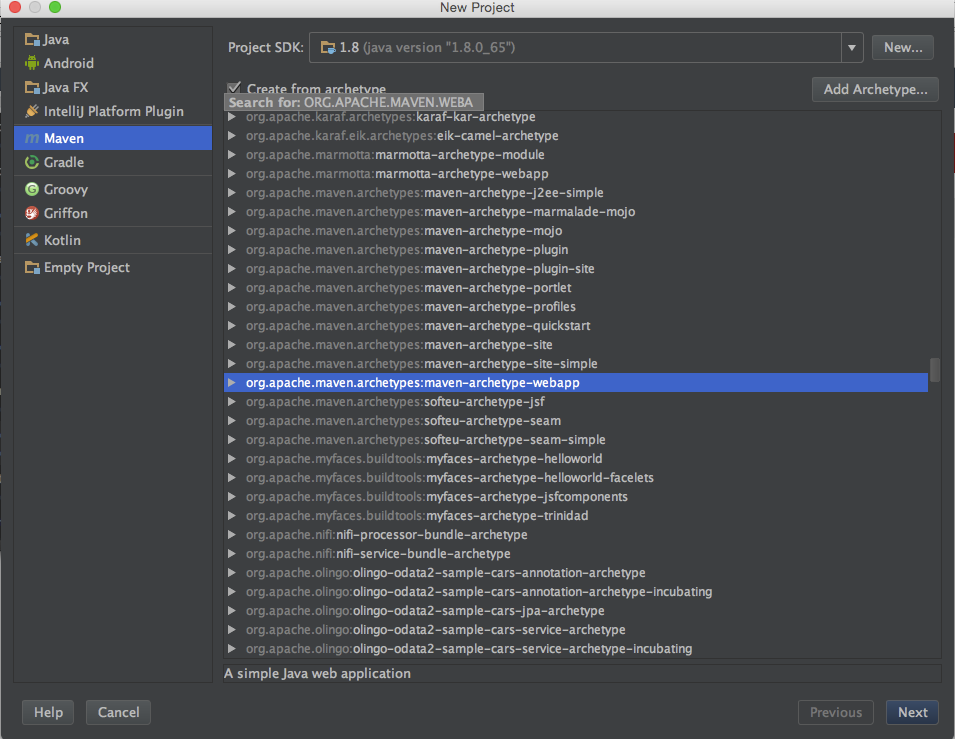
1.创建项目使用org.apache.maven.archetype:maven-archetype-webapp 如下。
2.在pom.xml中加入Tomcat7的插件
   webapi


            org.apache.tomcat.maven
            tomcat7-maven-plugin
            2.1

                8080
                /
                UTF-8
                tomcat7
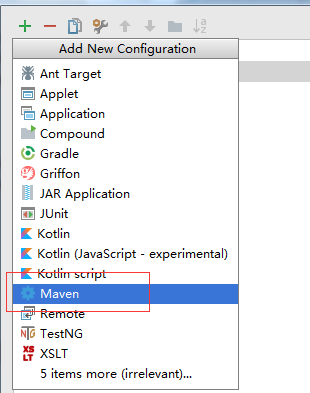
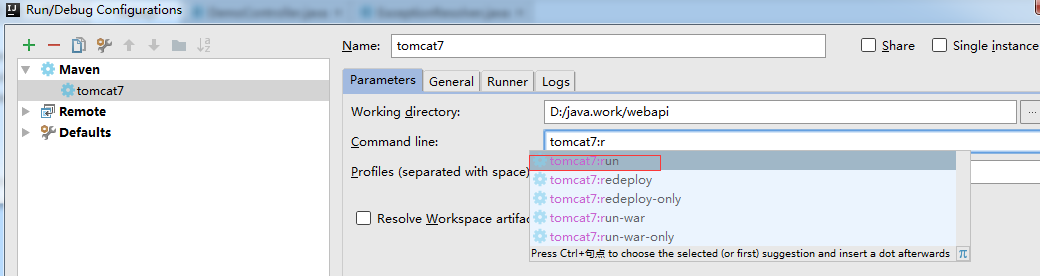
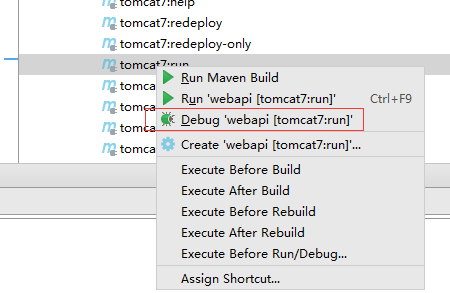
3.在配置中的命令行中选择,tomcat7:run项。
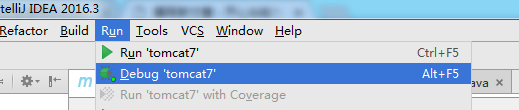
4.在run菜单中启用调试。
5.其它方式调试
proxy代理工具
具有MOCK数据功能的代理Proxy工具如下:
1.http://anyproxy.io/cn/这个是阿里的开源,最大特色是支持非桌面服务器部署。
2.fiddler
zkclient和curator开源
开源的两个zookeeper的客户端,简化了程序员的开发工具。
开源客户端,原生api的不足
连接的创建是异步的,需要开发人员自行编码实现等待
连接没有自动的超时重连机制
Zk本身没提供序列化机制,需要开发人员自行指定,从而实现数据的序列化和反序列化
Watcher注册一次只会生效一次,需要不断的重复注册
Watcher的使用方式不符合java本身的术语,如果采用监听器方式,更容易理解
不支持递归创建树形节点
开源客户端—ZkClient介绍
Github上一个开源的zk客户端,由datameer的工程师Stefan Groschupf和Peter Voss一起开发
– 解决session会话超时重连
– Watcher反复注册
– 简化开发api
– 还有…..
– https://github.com/sgroschupf/zkclient
开源客户端—Curator介绍
1. 使用CuratorFrameworkFactory工厂的两个静态方法创建客户端
a) static CuratorFramework newClient(String connectString, int sessionTimeoutMs, int connectionTimeoutMs,
RetryPolicy retryPolicy)
b) static CuratorFramework newClient(String connectString, RetryPolicy retryPolicy)
2. Start()方法启动
参数说明
connectString 分开的ip:port对
retryPolicy 重试策略,默认四种:Exponential BackoffRetry,RetryNTimes ,RetryOneTime,
RetryUntilElapsed
sessionTimeoutMs 会话超时时间,单位为毫秒,默认60000ms
connectionTimeoutMs 连接创建超时时间,单位为毫秒,默认是15000ms