conn = new Mongo("mongodb://wps_credit:2f25da558f6e79c452a61bea4a8d762f@10.100.2.216:27017,10.100.2.217:27017,10.100.2.218/wps_credit?maxPoolSize=300&replicaSet=kae-mongo-test42");
db = conn.getDB("wps_credit");

var t1 = new Date();
printjson(db.getCollectionNames());

var t2 = new Date().getTime();
printjson(t1, t2, t2 - t1);
Telnet服务安装
yum install telnet-server -y
yum list|grep telnet

开启服务
systemctl start telnet.socket

GITEE码云域名解析绑定
最近GITEE码云域名被停止解析。只能绑hosts了
212.64.62.174 gitee.com
Ubuntu14.04的Qt编译环境
报错When executing step “Make”
sudo apt-get install build-essential
mongodb脚本执行
1.编写脚本:job.js,内容如下:
conn = new Mongo("mongodb://abc:b=abc@10.0.1.183:27017,10.0.1.184:27017/wps_credit?maxPoolSize=300&replicaSet=c45134ec-6a5f-461e-8745-7081b46b0d87");
db = conn.getDB("abc");

var result = db.transaction_5.find().limit(10);
while(result.hasNext()) {
    printjson(result.next());
}
var tm = new Date();
printjson(db.transaction_6.count());
db.transaction_6.remove({});
printjson(db.transaction_7.count());
db.transaction_7.remove({});
printjson(db.transaction_8.count());
db.transaction_8.remove({});

var t2 = new Date().getTime() - t1;
printjson(t2);
2.执行它
mongo -nodb job.js
mongodb主从数据库同步
简单点说,就是从库都是新的mongodb,通过主从切换完成空间的清理。
————————-
1)先删除数据,remove不会阻塞住整个db;
找业务不忙的时间操作。
db.collection1.remove({})
db.collection2.remove({})
…
2)然后,secondary上的数据重新同步,这样secondary删除的空间就释放了。
同步完之后进行一次主从切换,Secondary升级为Primary
3)新Secondary再同样进行重新同步数据,同样释放空间了
4)drop掉需要清理的空表
db.collection1.drop()
db.collection2.drop()
…
VC2017的运行时库提取
如果你是用Visual Studio 2015和2017来编写C或C++程序,那么就已经是基于UCRT的。
为了方便提取运行时库,请安装EveryThing搜索工具。
工具下载地址:https://www.voidtools.com/zh-cn/downloads/
以VC2017运行时库为例。
VC2017运行时库【UCRT库】包括以下几种文件。
Microsoft.VC141.CRT:
1.在EveryThing的输入界面搜索:Microsoft.VC141.CRT
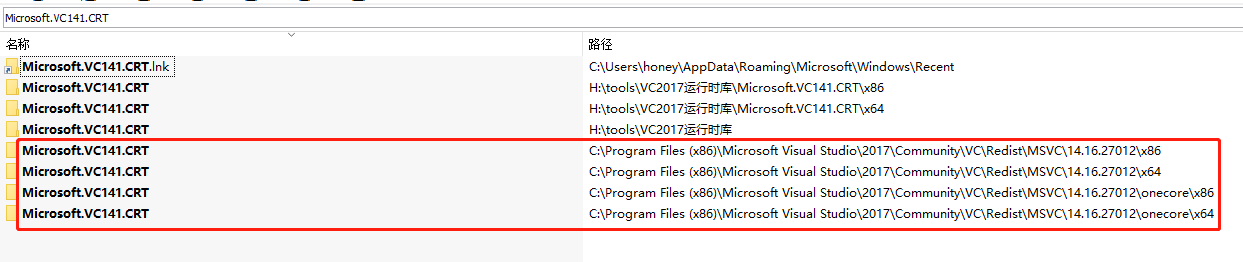
2.再搜索ucrt,在Redist的子目录下,才是正常的UWP或ucrt库,文件一般是41个。

kafka容器化部署
1.参考https://github.com/wurstmeister/kafka-docker的实现。
2.参考https://github.com/simplesteph/kafka-stack-docker-compose
3.基于上述两个参考,实现以下的部署文件。
version: '3.1'

services:
  zoo1:
    image: zookeeper:3.4.9
    hostname: zoo1
    ports:
      - "2181:2181"
    environment:
        ZOO_MY_ID: 1
        ZOO_PORT: 2181
        ZOO_SERVERS: server.1=zoo1:2888:3888 server.2=zoo2:2888:3888 server.3=zoo3:2888:3888
    volumes:
      - ./zk-multiple-kafka-multiple/zoo1/data:/data
      - ./zk-multiple-kafka-multiple/zoo1/datalog:/datalog

  zoo2:
    image: zookeeper:3.4.9
    hostname: zoo2
    ports:
      - "2182:2182"
    environment:
        ZOO_MY_ID: 2
        ZOO_PORT: 2182
        ZOO_SERVERS: server.1=zoo1:2888:3888 server.2=zoo2:2888:3888 server.3=zoo3:2888:3888
    volumes:
      - ./zk-multiple-kafka-multiple/zoo2/data:/data
      - ./zk-multiple-kafka-multiple/zoo2/datalog:/datalog

  zoo3:
    image: zookeeper:3.4.9
    hostname: zoo3
    ports:
      - "2183:2183"
    environment:
        ZOO_MY_ID: 3
        ZOO_PORT: 2183
        ZOO_SERVERS: server.1=zoo1:2888:3888 server.2=zoo2:2888:3888 server.3=zoo3:2888:3888
    volumes:
      - ./zk-multiple-kafka-multiple/zoo3/data:/data
      - ./zk-multiple-kafka-multiple/zoo3/datalog:/datalog


  kafka1:
    image: wurstmeister/kafka:2.12-2.0.1
    container_name: kafka1
    hostname: kafka1
    ports:
      - "9092:9092"
      - "1099:1099"
    environment:
      KAFKA_ZOOKEEPER_CONNECT: "zoo1:2181,zoo2:2182,zoo3:2183"
      KAFKA_BROKER_ID: 1
      KAFKA_LOG4J_LOGGERS: "kafka.controller=INFO,kafka.producer.async.DefaultEventHandler=INFO,state.change.logger=INFO"
      KAFKA_AUTO_CREATE_TOPICS_ENABLE: "true"
      KAFKA_LISTENERS: PLAINTEXT://:9092
      KAFKA_ADVERTISED_LISTENERS: PLAINTEXT://192.168.10.100:9092
      KAFKA_OFFSETS_TOPIC_REPLICATION_FACTOR: 3
      KAFKA_DEFAULT_REPLICATION_FACTOR: 3
      KAFKA_JMX_OPTS: "-Dcom.sun.management.jmxremote -Dcom.sun.management.jmxremote.authenticate=false -Dcom.sun.management.jmxremote.ssl=false -Djava.rmi.server.hostname=127.0.0.1 -Dcom.sun.management.jmxremote.rmi.port=1099"
      JMX_PORT: 1099
    volumes:
      - ./zk-multiple-kafka-multiple/kafka1:/kafka
      - /var/run/docker.sock:/var/run/docker.sock
    depends_on:
      - zoo1
      - zoo2
      - zoo3

  kafka2:
    image: wurstmeister/kafka:2.12-2.0.1
    container_name: kafka2
    hostname: kafka2
    ports:
      - "9093:9092"
      - "2099:1099"
    environment:
      KAFKA_ZOOKEEPER_CONNECT: "zoo1:2181,zoo2:2182,zoo3:2183"
      KAFKA_BROKER_ID: 2
      KAFKA_LOG4J_LOGGERS: "kafka.controller=INFO,kafka.producer.async.DefaultEventHandler=INFO,state.change.logger=INFO"
      KAFKA_AUTO_CREATE_TOPICS_ENABLE: "true"
      KAFKA_LISTENERS: PLAINTEXT://:9092
      KAFKA_ADVERTISED_LISTENERS: PLAINTEXT://192.168.10.100:9093
      KAFKA_OFFSETS_TOPIC_REPLICATION_FACTOR: 3
      KAFKA_DEFAULT_REPLICATION_FACTOR: 3
      KAFKA_JMX_OPTS: "-Dcom.sun.management.jmxremote -Dcom.sun.management.jmxremote.authenticate=false -Dcom.sun.management.jmxremote.ssl=false -Djava.rmi.server.hostname=127.0.0.1 -Dcom.sun.management.jmxremote.rmi.port=1099"
      JMX_PORT: 1099
    volumes:
      - ./zk-multiple-kafka-multiple/kafka2:/kafka
      - /var/run/docker.sock:/var/run/docker.sock
    depends_on:
      - zoo1
      - zoo2
      - zoo3

  kafka3:
    image: wurstmeister/kafka:2.12-2.0.1
    container_name: kafka3
    hostname: kafka3
    ports:
      - "9094:9092"
      - "3099:1099"
    environment:
      KAFKA_ZOOKEEPER_CONNECT: "zoo1:2181,zoo2:2182,zoo3:2183"
      KAFKA_BROKER_ID: 3
      KAFKA_LOG4J_LOGGERS: "kafka.controller=INFO,kafka.producer.async.DefaultEventHandler=INFO,state.change.logger=INFO"
      KAFKA_AUTO_CREATE_TOPICS_ENABLE: "true"
      KAFKA_LISTENERS: PLAINTEXT://:9092
      KAFKA_ADVERTISED_LISTENERS: PLAINTEXT://192.168.10.100:9094
      KAFKA_OFFSETS_TOPIC_REPLICATION_FACTOR: 3
      KAFKA_DEFAULT_REPLICATION_FACTOR: 3
      KAFKA_JMX_OPTS: "-Dcom.sun.management.jmxremote -Dcom.sun.management.jmxremote.authenticate=false -Dcom.sun.management.jmxremote.ssl=false -Djava.rmi.server.hostname=127.0.0.1 -Dcom.sun.management.jmxremote.rmi.port=1099"
      JMX_PORT: 1099
    volumes:
      - ./zk-multiple-kafka-multiple/kafka3:/kafka
      - /var/run/docker.sock:/var/run/docker.sock
    depends_on:
      - zoo1
      - zoo2
      - zoo3

  manager:
    image: hlebalbau/kafka-manager:2.0.0.2
    hostname: manager
    ports:
      - "9000:9000"
    environment:
      ZK_HOSTS: "zoo1:2181,zoo2:2182,zoo3:2183"
      APPLICATION_SECRET: "random-secret"
      KAFKA_MANAGER_AUTH_ENABLED: "true"
      KAFKA_MANAGER_USERNAME: "abc"
      KAFKA_MANAGER_PASSWORD: "123"
    command: -Dpidfile.path=/dev/null
4.测试文件
基于https://github.com/segmentio/kafka-go库的示范,实现如下:
package kaf

import (
	"context"
	"fmt"
	"github.com/segmentio/kafka-go"
	"log"
	"time"
)

func LeaderProduce() {
	topic := "my-topic"
	partition := 0

	conn, err := kafka.DialLeader(context.Background(), "tcp", "localhost:9092", topic, partition)
	if err != nil {
		log.Fatal(err)
	}
	conn.SetWriteDeadline(time.Now().Add(10 * time.Second))
	conn.WriteMessages(
		kafka.Message{Value: []byte(fmt.Sprint("one!", time.Now()))},
		kafka.Message{Value: []byte(fmt.Sprint("two!", time.Now()))},
		kafka.Message{Value: []byte(fmt.Sprint("three!", time.Now()))},
	)

	conn.Close()
}

func LeaderConsumer() {
	topic := "my-topic"
	partition := 0

	conn, _ := kafka.DialLeader(context.Background(), "tcp", "localhost:9092", topic, partition)

	conn.SetReadDeadline(time.Now().Add(10 * time.Second))
	batch := conn.ReadBatch(10e3, 1e6) // fetch 10KB min, 1MB max
	for {
		msg, err := batch.ReadMessage()
		if err != nil {
			break
		}
		fmt.Println(string(msg.Value))
	}

	batch.Close()
	conn.Close()
}

func ClusterProduce(port int) {
	// make a writer that produces to topic-A, using the least-bytes distribution
	w := kafka.NewWriter(kafka.WriterConfig{
		Brokers:  []string{"localhost:9092", "localhost:9093", "localhost:9094"},
		Topic:    "topic-A",
		Balancer: &kafka.LeastBytes{},
	})

	err := w.WriteMessages(context.Background(),
		kafka.Message{
			Key:   []byte("Key-A"),
			Value: []byte(fmt.Sprint("Hello World!", time.Now())),
		},
		kafka.Message{
			Key:   []byte("Key-B"),
			Value: []byte(fmt.Sprint("One!", time.Now())),
		},
	)
	if err != nil {
		fmt.Println(port, "error", err)
	}

	w.Close()
}

func clusterConsume(port int) {
	// make a new reader that consumes from topic-A
	r := kafka.NewReader(kafka.ReaderConfig{
		Brokers:  []string{"localhost:9092", "localhost:9093", "localhost:9094"},
		GroupID:  "consumer-group-id",
		Topic:    "topic-A",
		MinBytes: 1024 * 10, // 10KB
		MaxBytes: 10e6,      // 10MB
	})

	for {
		m, err := r.ReadMessage(context.Background())
		if err != nil {
			fmt.Println(port, "error.....", err)
			time.Sleep(time.Second * 10)
			continue
		}
		fmt.Printf("%v--message at topic/partition/offset %v/%v/%v: %s = %s\n", port, m.Topic, m.Partition, m.Offset, string(m.Key), string(m.Value))
		// time.Sleep(time.Second)
	}

	r.Close()
}
YUM安装PHP7的开发环境
第一步:安装remi源
yum install epel-release -y
或rpm -Uvh http://dl.fedoraproject.org/pub/epel/epel-release-latest-7.noarch.rpm
rpm -Uvh http://rpms.remirepo.net/enterprise/remi-release-7.rpm
或yum install http://rpms.famillecollet.com/enterprise/remi-release-7.rpm
第二步:配置php7.2仓库
yum -y install yum-utils
yum-config-manager –enable remi-php72 #yum -y install yum-utils
第三步:安装PHP
yum install php 因为上一步remi配置,所以这里会指向php72
第四步:安装扩展组件
yum install php php72-php-opcache php72-php-ldap php72-php-odbc php72-php-pear php72-php-xml php72-php-xmlrpc php72-php-soap curl curl-devel php72-php-mbstring php72-php-mysqlnd php72-php-fpm php72-php-gd php72-php-xdebug php72-php-pecl-mysql php72-php-pecl-memcached php72-php-pecl-memcache php72-php-pecl-redis
第五步:安装php-fpm
yum install php72-php-fpm
systemctl restart php72-php-fpm #启动php-fpm服务
netstat -tunlp|grep 9000 #查看9000端口是否正常启动了
php的配置文件及组件的安装位置
/etc/opt/remi/php72
/etc/opt/remi/php72/php-fpm.d/*.conf
—————————
安装xdebug
搜索相应库:yum search php|grep xdebug
yum install php72-php-pecl-xdebug
CentOS 7 provides PHP version 5.4 in its official repository

Command to install the EPEL repository configuration package:
    yum install https://dl.fedoraproject.org/pub/epel/epel-release-latest-7.noarch.rpm

Command to install the Remi repository configuration package:
    yum install https://rpms.remirepo.net/enterprise/remi-release-7.rpm

Command to install the yum-utils package (for the yum-config-manager command):
    yum install yum-utils

You want a single version which means replacing base packages from the distribution

Packages have the same name than the base repository, ie php-*

Some common dependencies are available in remi-safe repository, which is enabled by default

PHP version 7.2 packages are available for CentOS 7 in remi-php72 repository

Command to enable the repository:
    yum-config-manager --enable remi-php72

If the priorities plugin is enabled, ensure remi-php72 have higher priority (a lower value) than base and updates

Command to upgrade (the repository only provides PHP):
    yum update

Command to install additional packages:
    yum install php-xxx

Command to install testing packages:
    yum --enablerepo=remi-php72-test install php-xxx

Command to check the installed version and available extensions:
    php --version
    php --modules
ZooKeeper的容器化配置
docker pull zookeeper
https://github.com/getwingm/kafka-stack-docker-compose
version: '3.1'

services:
  zoo1:
    image: zookeeper
    restart: always
    hostname: zoo1
    ports:
      - 2181:2181
    environment:
      ZOO_MY_ID: 1
      ZOO_SERVERS: server.1=0.0.0.0:2888:3888;2181 server.2=zoo2:2888:3888;2181 server.3=zoo3:2888:3888;2181

  zoo2:
    image: zookeeper
    restart: always
    hostname: zoo2
    ports:
      - 2182:2181
    environment:
      ZOO_MY_ID: 2
      ZOO_SERVERS: server.1=zoo1:2888:3888;2181 server.2=0.0.0.0:2888:3888;2181 server.3=zoo3:2888:3888;2181

  zoo3:
    image: zookeeper
    restart: always
    hostname: zoo3
    ports:
      - 2183:2181
    environment:
      ZOO_MY_ID: 3
      ZOO_SERVERS: server.1=zoo1:2888:3888;2181 server.2=zoo2:2888:3888;2181 server.3=0.0.0.0:2888:3888;2181