Mongo后台建唯一索引
db.orders.ensureIndex({userid:1,reqid:1},{unique:true,background:true})
备分数据库
mongodump -h 10.0.1.106 –port 27017 -u root -p xxxxxxx -d abc_gold -o /data/backup/abc_gold –authenticationDatabase admin
数据恢复
mongorestore -h 10.0.1.107 –port 27017 -u root -p yyyyyyyyy -d abc_gold /data/backup/abc_gold –drop –authenticationDatabase admin
Centos历史版本下载
http://mirror.nsc.liu.se/centos-store/
pika编译及运行
1.基于https://github.com/Qihoo360/pika/的v3.1.1版本,定制出适合业务要求的功能改进版。
https://github.com/kxtry/pika是在v3.2.7基础上,新增了incrbyrange(key,val,min, max)及hincrbyrange(key,val,min, max)这两个命令。
2.官方提供的编译是直接基于docker的编译。
编译Dockerfile文件。
应该修改Dockerfile的Centos版本为FROM centos:7.5.1804
docker build -t pika .
3.提取编译后结果,也可以直接用该容器运行应用
运行应用:
docker run pika:latest bash -c "./bin/pika -c ./conf/pika.conf"
也可提取相关应用至宿主机运行。
docker cp 容器名:/pika/output ./  #docker cp ce4541cc4627:/pika/output ./
4.提取出来的应用,在宿主机上运行,需要安装相关依赖。
安装epel源。
rpm -ivh https://mirrors.ustc.edu.cn/epel/epel-release-latest-7.noarch.rpm
安装glog和protobuf的动态连接库。
sudo yum install -y glog protobuf  #编译时,对应的是glog-devel 和protobuf-devel
如果仍然无法运行,则执行strace ./pika或ldd pika来检查缺少哪些动态库。
5. 运行:
docker run pika:latest bash -c "./bin/pika -c ./conf/pika.conf"
6. 运行脚本run-app.sh
#!/bin/sh

# crontab -e
# */1 * * * * sh /data/scripts/run-app.sh start

path_current=`pwd`
path_script=$(cd "$(dirname "$0")"; pwd)
path_data=$path_script/data
logfile=$path_data/check.log
mode=$1

name=pika

app_process=`ps -ef | grep "$name"| grep -v grep`

if [ ! -d $path_data ];then
   mkdir -p $path_data
fi

echo `date` >> $logfile
echo "ready to check...." >> $logfile
case "$mode" in
   'install')
      if [ ! -f $path_script/.envok ]; then
         rpm -ivh https://mirrors.ustc.edu.cn/epel/epel-release-latest-7.noarch.rpm
         yum install -y glog protobuf && touch $path_script/.envok
      fi
      if [ ! -f $path_script/conf/pika.conf ]; then
         mkdir -p $path_data && /bin/cp -rf $path_script/pika.conf.template $path_script/conf/pika.conf && echo "$path_script/conf/pika.conf" | xargs /bin/sed -i "s#{{path_current}}#$path_data#g"
      fi
      ;;
   'start')
      echo "$app_process" >> $logfile
      echo "it's ready to start op...."
      if test -n "$app_process"; then
         echo ""
         echo "$app_process"
         echo ""
      else
         cd $path_script
         nohup $path_script/bin/$name -c $path_script/conf/${name}.conf > $path_data/info.txt 2>&1 &
         echo "success to restart $name" >> $logfile
         cd $path_current
      fi
      echo 'success to start.'
      ;;
   'stop')
      echo "it's ready to check process..."
      if test -n "$app_process"; then
         echo "had find app process informaton"
         echo $app_process | awk '{print ($2)}' | xargs kill -3
      fi
      echo 'success to kill.'
      ;;
   *)
      basename=`basename "$0"`
      echo "Usage: $basename  {install|start|stop}  [ server options ]"
      exit 1
      ;;
esac
exit 1
7.原默认配置脚本pika.conf.template
# Pika port
port : 9221
# Thread Number
thread-num : 50
# Thread Pool Size
thread-pool-size : 100
# Sync Thread Number
sync-thread-num : 10
# Pika log path
log-path : {{path_current}}/log/
# Pika db path
db-path : {{path_current}}/db/
# Pika write-buffer-size
write-buffer-size : 268435456
# Pika timeout
timeout : 60
# Requirepass
requirepass : abc123
# Masterauth
masterauth : abc123
# Userpass
userpass : abc123
# User Blacklist
userblacklist :
# if this option is set to 'classic', that means pika support multiple DB, in
# this mode, option databases enable
# if this option is set to 'sharding', that means pika support multiple Table, you
# can specify partition num for each table, in this mode, option table-list enable
# Pika instance mode [classic | sharding]
instance-mode : classic
# Set the number of databases. The default database is DB 0, you can select
# a different one on a per-connection basis using SELECT  where
# dbid is a number between 0 and 'databases' - 1, limited in [1, 8]
databases : 1
# Table list
table-list : table1:1,table2:1
# Dump Prefix
dump-prefix :
# daemonize  [yes | no]
daemonize : yes
# Dump Path
dump-path : {{path_current}}/dump/
# Expire-dump-days
dump-expire : 0
# pidfile Path
pidfile : {{path_current}}/pika.pid
# Max Connection
maxclients : 20000
# the per file size of sst to compact, defalut is 2M
target-file-size-base : 20971520
# Expire-logs-days
expire-logs-days : 7
# Expire-logs-nums
expire-logs-nums : 10
# Root-connection-num
root-connection-num : 2
# Slowlog-write-errorlog
slowlog-write-errorlog : no
# Slowlog-log-slower-than
slowlog-log-slower-than : 10000
# Slowlog-max-len
slowlog-max-len : 128
# Pika db sync path
db-sync-path : {{path_current}}/dbsync/
# db sync speed(MB) max is set to 1024MB, min is set to 0, and if below 0 or above 1024, the value will be adjust to 1024
db-sync-speed : -1
# The slave priority
slave-priority : 100
# network interface
#network-interface : eth1
# replication
#slaveof : master-ip:master-port

# CronTask, format 1: start-end/ratio, like 02-04/60, pika will check to schedule compaction between 2 to 4 o'clock everyday
#                   if the freesize/disksize > 60%.
#           format 2: week/start-end/ratio, like 3/02-04/60, pika will check to schedule compaction between 2 to 4 o'clock
#                   every wednesday, if the freesize/disksize > 60%.
#           NOTICE: if compact-interval is set, compact-cron will be mask and disable.
#
#compact-cron : 3/02-04/60

# Compact-interval, format: interval/ratio, like 6/60, pika will check to schedule compaction every 6 hours,
#                           if the freesize/disksize > 60%. NOTICE:compact-interval is prior than compact-cron;
#compact-interval :

# server-id for hub
server-id : 1

###################
## Critical Settings
###################
# write_binlog  [yes | no]
write-binlog : yes
# binlog file size: default is 100M,  limited in [1K, 2G]
binlog-file-size : 104857600
# Automatically triggers a small compaction according statistics
# Use the cache to store up to 'max-cache-statistic-keys' keys
# if 'max-cache-statistic-keys' set to '0', that means turn off the statistics function
# it also doesn't automatically trigger a small compact feature
max-cache-statistic-keys : 0
# When 'delete' or 'overwrite' a specific multi-data structure key 'small-compaction-threshold' times,
# a small compact is triggered automatically, default is 5000, limited in [1, 100000]
small-compaction-threshold : 5000
# If the total size of all live memtables of all the DBs exceeds
# the limit, a flush will be triggered in the next DB to which the next write
# is issued.
max-write-buffer-size :  10737418240
# Compression
compression : snappy
# max-background-flushes: default is 1, limited in [1, 4]
max-background-flushes : 1
# max-background-compactions: default is 2, limited in [1, 8]
max-background-compactions : 2
# max-cache-files default is 5000
max-cache-files : 5000
# max_bytes_for_level_multiplier: default is 10, you can change it to 5
max-bytes-for-level-multiplier : 10
# BlockBasedTable block_size, default 4k
# block-size: 4096
# block LRU cache, default 8M, 0 to disable
# block-cache: 8388608
# whether the block cache is shared among the RocksDB instances, default is per CF
# share-block-cache: no
# whether or not index and filter blocks is stored in block cache
# cache-index-and-filter-blocks: no
# when set to yes, bloomfilter of the last level will not be built
# optimize-filters-for-hits: no
# https://github.com/facebook/rocksdb/wiki/Leveled-Compaction#levels-target-size
# level-compaction-dynamic-level-bytes: no
8.目录结构如下:
Top
 |--->bin
 |--->conf
 |--->tool
pika.conf.template
run-app.sh
mgo慢查2
1)如果只是查看,可以直接登录mongodb,查询
mongo -authenticationDatabase admin -u ksc_admin -p xxxx –authenticationMechanism SCRAM-SHA-1
>use local
> db.oplog.rs.find({ ts : { $lt : Timestamp(1546401000, 1), $gt : Timestamp(1546399200, 1) } })
其中Timestamp是时间戳,与日期时间格式转化可以使用 https://tool.lu/timestamp
2)提取到文件,json格式
编辑一个.js文件如下:
vi aa.js
var c = db.oplog.rs.find({ ts : { $lt : Timestamp(1546401000, 1), $gt : Timestamp(1546399200, 1) } })
while(c.hasNext()) {
printjson(c.next());
}
使用mongo shell执行这个文件,结果写到文件result.js
mongo 10.81.5.45:27017/local -authenticationDatabase admin -u ksc_admin -p xxxx –authenticationMechanism SCRAM-SHA-1 aa.js> result.js
这样这段时间产生的oplog就以json格式写到了result.js文件里,可以使用vi查看
提取对应时间段的oplog看看
MongoDB复制集正确的连接方式
mongodb://user:password@host1:port1,host2:port2/database?authSource=admin[&option1][&option2][&option3]…
举例如下:
mongodb://username:password@10.0.0.1:27017,10.0.0.2:27017/dbname?authSource=admin&replicaSet=”xxxxxxxxxxxxxxxxxxx”&readPreference=secondaryPreferred
username:password –用户名,密码
host:port需要把主从都写上,用逗号隔开 都写上、都写上、都写上
dbname: 数据库名
authSource=admin 通过admin库对登录的用户名和密码进行认证
可选项:
replicaSet=”xxxxxxxxxxxxxxxxxxx” 复制集的名称,在我们云数据库上指 实例ID, 可以写上
readPreference=secondaryPreferred 设置读写分离
mongodb慢查询
通过 db.system.profile.find() 查看当前所有的慢查询日志,这个需要use db,然后查db下的慢查询
查询当前时间段最慢的一条
db.system.profile.find().limit(1).sort({ millis : -1 }).pretty()
查看最近的一条:
db.system.profile.find().sort({$natural: -1}).limit(1)
查看最老的一条:
db.system.profile.find().sort({$natural: 1}).limit(1)
查询某个时间段的慢查询
切换到对应的数据库下:
var c = db.system.profile.find({ ts : { $gt : ISODate(“2019-02-15T00:00:00.197Z”), $lt : ISODate(“2019-02-23T08:43:02.197Z”) } })
while(c.hasNext()) {
printjson(c.next());
}
sparksql的操作实践
KMR
1.登录KMR
2.切换致spark帐号【su – spark】
3.进入spark-shell的命令行操作界面
spark-shell --master=yarn
4.常见命令如下
spark.sql("create external table bhabc(`userid` bigint,`id` int,`date` string,`count` bigint,`opcnt` int,`start` int,`end` int) partitioned by (dt string) row format delimited fields terminated by ','  stored as sequencefile location '/data/behavior/bh_abc_dev'").show
spark.sql("show tables").show
spark.sql("show databases").show
spark.sql("show tables").show
spark.sql("show partitions bhwps").show
spark.sql("alter table bhwps add partition(dt='2019-05-21')").show
spark.sql("select * from bhwps where dt between '2019-05-15' and '2019-05-31' order by `count` desc").show
spark.sql("alter table bhwps add partition(dt='2019-06-22') partition(dt='2019-06-23')").show增加多个分区
spark.sql("msck repair table bhwps").show 修复分区就是重新同步hdfs上的分区信息。
spark.sql("show partitions bhraw").show(100,false) 可以显示超过20个记录。
5.常见问题:
》目录权限问题
可以用hdfs dfs -chown -r /path来修改目录权限。
清理垃圾桶
hdfs dfs -expunge
普通用户也可重启nginx
1.修改nginx.conf为abc:root启动
  user  abc abc;  #以普通用户启,但实际上是master为root,worker进程是abc。
或
  user abc root;
2.修改nginx
chown root nginx #nginx必须是root用户拥有者。
chmod a+s nginx  #把x属性改为s属性。
ll nginx
-rwsr-sr-x 1 root root 2030760 Mar  5 11:52 nginx

阿里云Docker私人专属镜像加速
vim /etc/docker/daemon.json
切换镜像源,如果仍然失败或提示其它异常,可考虑调用如下命令清理缓存。
docker system prune -a -f
以下是公开的:在K8S中,无法完成安装,通常是镜像下载失败,则可以调整一下以下的顺序,确保它可以完成。
{“registry-mirrors”: [“http://f1361db2.m.daocloud.io”,”https://mirror.ccs.tencentyun.com”,”https://registry.cn-hangzhou.aliyuncs.com”]}
以下是我本人的:
https://cr.console.aliyun.com/cn-hangzhou/instances/mirrors
{
“bip”:”192.168.55.1/24″,
“registry-mirrors”: [“https://2na48vbddcw.mirror.aliyuncs.com”]
}
把我常用的字母移除到只有8个字母。
sudo systemctl daemon-reload
sudo systemctl restart docker
HIVE的sequenceFile的操作常用命令
sequencefile是一组Key和Value的健值对。在实际中HIVE创建表时,key是没有无意义的。它只根据value的格式进行切换数据。
0.登录容器并连接上hive
docker-compose -f docker-compose-hive.yml exec hive-server  bash
/opt/hive/bin/beeline -u jdbc:hive2://localhost:10000
1.建表
create external table sfgz(
     `idx` string,
     `userid` string,
     `flag` string,
     `count` string,
     `value` string,
     `memo` string)
  partitioned by (dt string)
  row format delimited fields terminated by ','
  stored as sequencefile
  location '/user/sfgz';
2.分区加载
方法一:
hadoop fs -mkdir -p /user/sfgz/dt=2010-05-06/
hadoop fs -put /tools/mytest.txt.sf /user/sfgz/dt=2019-05-17
hadoop fs -put /tools/mytest.txt.sf /user/sfgz/dt=2010-05-04
这样是无法直接被hive所识别的,必须用alter table partition的命令把相应的分区表加入至数据库中,才能正常访问。
方法二,加载完就可以直接查询的:
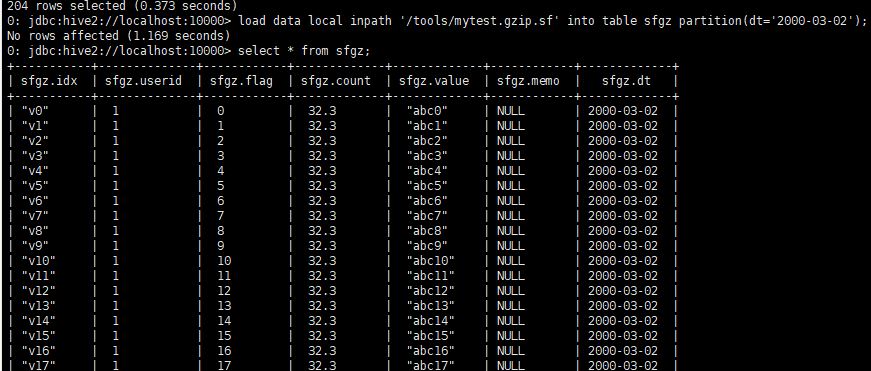
load data local inpath ‘/tools/mytest.txt.sf’ into table sfgz partition(dt=’2009-03-01′);这种方法是可以直接查询了。
load data local inpath ‘/tools/mytest.gzip.sf’ into table sfgz partition(dt=’2000-03-02′);
3. 检查分区信息:
show partitions sfgz;
4. 添加分区
alter table sfgz add partition(dt=’2000-03-03′);
5. 插入一条记录:
insert into sfgz partition(dt='2019-05-16')values('idx3','uid6','5','6','34.7','uid3test2');
6. 统计指令:
select count(*) from sfgz; 在KMR中不支持这种方式。
select count(idx) from sfgz; 在KMR中只支持这种方式。
6. 其它常见命令
show databases;
use database;
whow tables;
select * from sfgz where dt=’2000-03-03′;
msck repair table sfgz; 分区修复指令:
docker-hive的操作验试
1.下载docker镜像库:https://github.com/big-data-europe/docker-hive.git,并安装它。
2.修改其docker-compose.yml文件,为每个容器增加上映射。
version: "3"

services:
  namenode:
    image: bde2020/hadoop-namenode:2.0.0-hadoop2.7.4-java8
    volumes:
      - /data/namenode:/hadoop/dfs/name
      - /data/tools:/tools
    environment:
      - CLUSTER_NAME=test
    env_file:
      - ./hadoop-hive.env
    ports:
      - "50070:50070"
  datanode:
    image: bde2020/hadoop-datanode:2.0.0-hadoop2.7.4-java8
    volumes:
      - /data/datanode:/hadoop/dfs/data
      - /data/tools:/tools
    env_file:
      - ./hadoop-hive.env
    environment:
      SERVICE_PRECONDITION: "namenode:50070"
    ports:
      - "50075:50075"
  hive-server:
    image: bde2020/hive:2.3.2-postgresql-metastore
    volumes:
      - /data/tools:/tools
    env_file:
      - ./hadoop-hive.env
    environment:
      HIVE_CORE_CONF_javax_jdo_option_ConnectionURL: "jdbc:postgresql://hive-metastore/metastore"
      SERVICE_PRECONDITION: "hive-metastore:9083"
    ports:
      - "10000:10000"
  hive-metastore:
    image: bde2020/hive:2.3.2-postgresql-metastore
    volumes:
      - /data/tools:/tools
    env_file:
      - ./hadoop-hive.env
    command: /opt/hive/bin/hive --service metastore
    environment:
      SERVICE_PRECONDITION: "namenode:50070 datanode:50075 hive-metastore-postgresql:5432"
    ports:
      - "9083:9083"
  hive-metastore-postgresql:
    image: bde2020/hive-metastore-postgresql:2.3.0
    volumes:
      - /data/tools:/tools

  presto-coordinator:
    image: shawnzhu/prestodb:0.181
    volumes:
      - /data/tools:/tools
    ports:
      - "8080:8080"
2.创建测试文本
1,xiaoming,book-TV-code,beijing:chaoyang-shagnhai:pudong
2,lilei,book-code,nanjing:jiangning-taiwan:taibei
3,lihua,music-book,heilongjiang:haerbin
3,lihua,music-book,heilongjiang2:haerbin2
3,lihua,music-book,heilongjiang3:haerbin3
3.启动并连接HIVE服务。
docker-compose up -d
docker-compose exec hive-server bash
/opt/hive/bin/beeline -u jdbc:hive2://localhost:10000

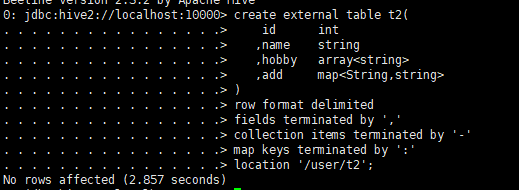
4.创建外部表
create external table t2(
    id      int
   ,name    string
   ,hobby   array
   ,add     map
)
row format delimited
fields terminated by ','
collection items terminated by '-'
map keys terminated by ':'
location '/user/t2'
5.文件上传到上步骤中的目录内。
方法1:在HIVE的beeline终端中采用:
load data local inpath ‘/tools/example.txt’ overwrite into table t2; 删除已经存在的所有文件,然后写入新的文件。
load data local inpath ‘/tools/example.txt’ into table t2; 在目录中加入新的文件【差异在overwrite】。
方法2:用hadoop fs -put的文件上传功能。
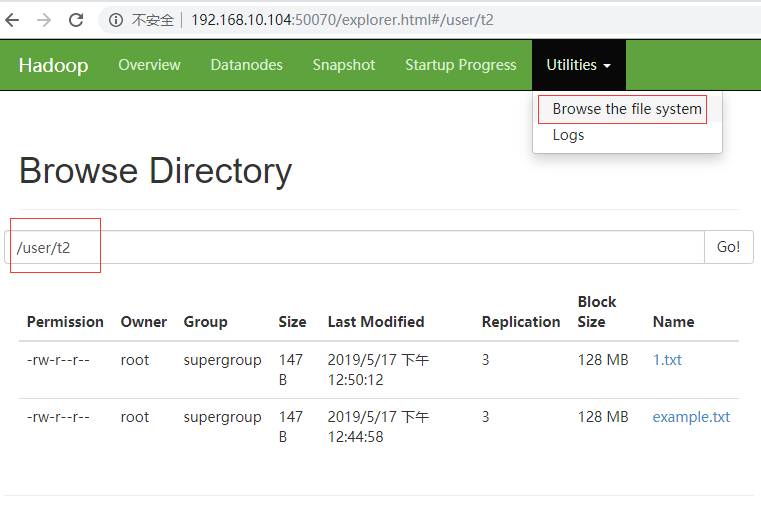
hadoop fs -put /tools/example.txt /user/t2 文件名不改变。
hadoop fs -put /tools/example.txt /user/t2/1.txt 文件名为1.txt
6.在HIVE命令行中验证
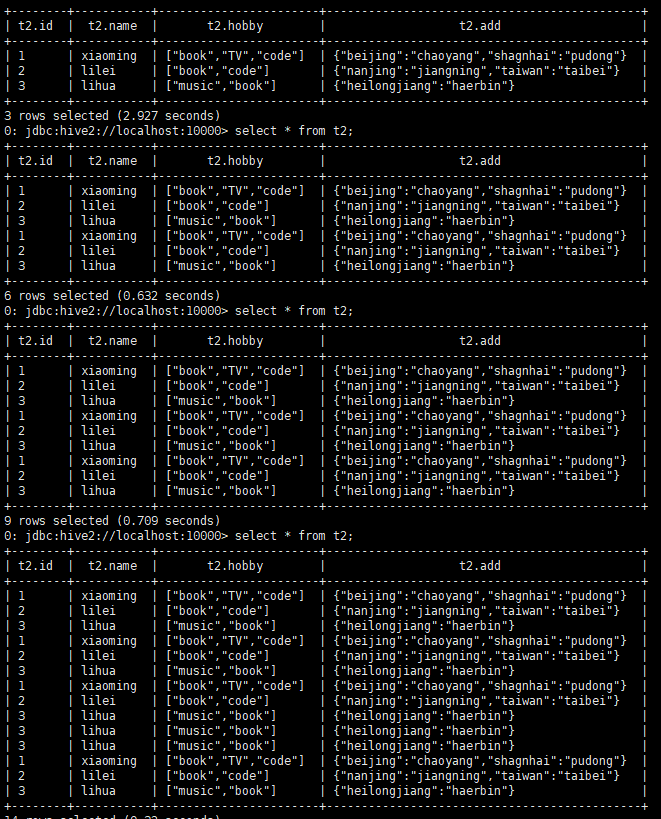
select * from t2; 上传一次文件,执行一次。
7.在hadoop的文件管理器,也可以浏览到新上传的文件。
同一个文件中的记录是会自动作去重处理的。
——————————————-
如果是sequencefile呢?
1.检验sequencefile的内容。
hadoop fs -Dfs.default.name=file:/// -text /tools/mytest.gzip.sf 废弃的
hadoop fs -Dfs.defaultFS=file:/// -text /tools/mytest.txt.sf

实际内容是:
2.建表
  create external table sfgz(
     `idx` string,
     `userid` string,
     `flag` string,
     `count` string,
     `value` string,
     `memo` string)
  partitioned by (dt string)
  row format delimited fields terminated by ','
  stored as sequencefile
  location '/user/sfgz';
3.上传文件
方法一:
hadoop fs -mkdir -p /user/sfgz/dt=2010-05-06/
hadoop fs -put /tools/mytest.txt.sf /user/sfgz/dt=2019-05-17
hadoop fs -put /tools/mytest.txt.sf /user/sfgz/dt=2010-05-04
这种方法,还需要人为Reload一下才行,其reload指令是:
方法二:
load data local inpath '/tools/mytest.txt.sf' into table sfgz partition(dt='2009-03-01');这种方法是可以直接查询了。
load data local inpath '/tools/mytest.gzip.sf' into table sfgz partition(dt='2000-03-02');