直接安装json-color-token插件,即可以实现颜色小方块的显示。
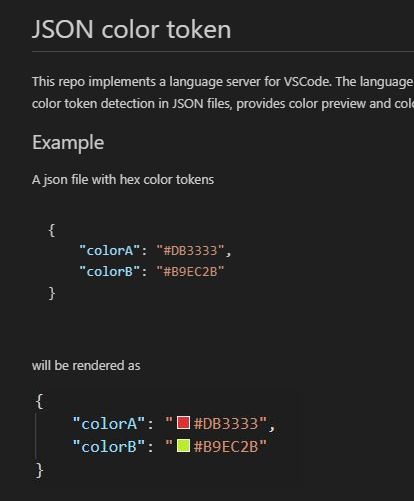
直接安装json-color-token插件,即可以实现颜色小方块的显示。
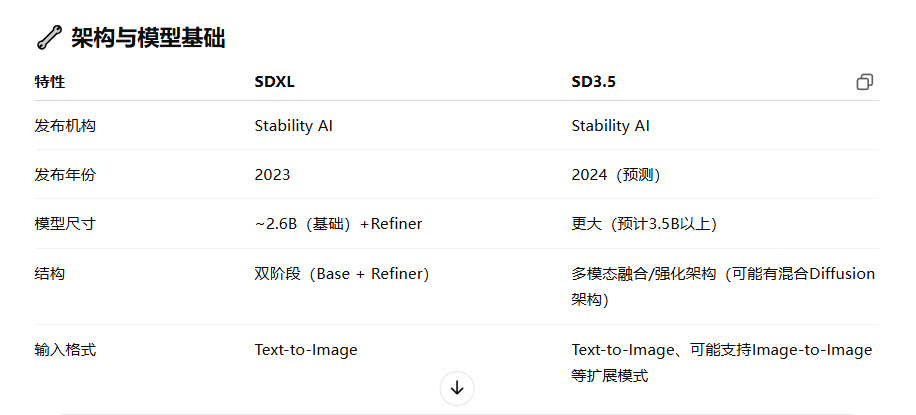
针对显卡性能,如我卡为16G,故不选择HiDream的模型
如何选择例子学习
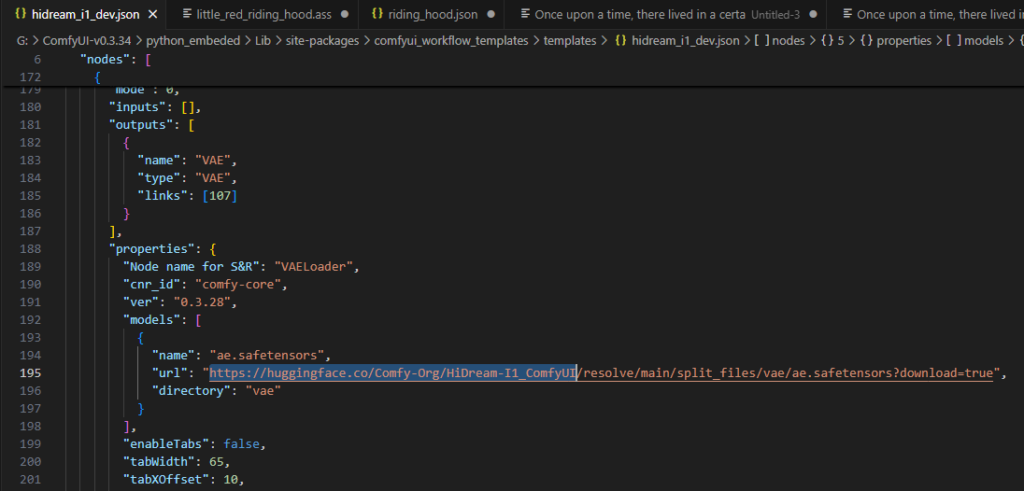
学习ComfyUI的例子时,通常情况下,如果模型不存在,它会给一下下载网址的下载提示,但如果不提示呢?如何去哪里下载呢?请看以下信息
在模型地址中,每个工作流程均附带了相关模型的下载地址:
G:\ComfyUI-v0.3.34\python_embeded\Lib\site-packages\comfyui_workflow_templates\templates

XDG_CACHE_HOME=F:\bigmodel-cache
HF_HOME	%XDG_CACHE_HOME%\huggingface
TRANSFORMERS_CACHE	%HF_HOME%\transformers
HF_DATASETS_CACHE	%HF_HOME%\datasets
HF_TOKENIZERS_CACHE	%HF_HOME%\tokenizers
TORCH_HOME	%XDG_CACHE_HOME%\torch
DIFFUSERS_CACHE	%HF_HOME%\diffusers
OLLAMA_MODELS %XDG_CACHE_HOME%\ollamapip和conda的其都具体包管理的能力,但其区别有如下:
1.conda是强依赖,而pip是弱依赖。故conda方式安装组件时,它会替换pip的组件,而pip则不会替换已经安装的组件,除非你显式指定版本。
2.conda在创建虚拟环境的同时,可指定该虚拟环境的python版本,则pip是无法指定其它python版本的。
3.在编译环境上,conda相对pip更完善,在windows中,这编译环境的集成能力会是明显的优势。
综上所述,最佳的建议如下:
采用conda创建最基本的虚拟环境后,利用pip再安装其它依赖,尽量后续交替使用pip安装依赖包。
初始化一个通用的编译工具链虚拟环境。
#创建一个python版本为3.10的虚拟环境。
conda create -n xxxx python=3.10xy
pip install --upgrade pip setuptools wheel
# python.exe -m pip install --upgrade pip setuptools wheel
#创建通用编译工具链环境,这样可以安全构建本地环境没有的软件包,如果系统安装了VS2019则会将vs2019加入环境等。
conda install -c conda-forge compilers cmake ninja cython pybind11
#在windows中因为环境设置因素,可能找不到工具链,如如下:
call "C:\Program Files (x86)\Microsoft Visual Studio\2019\Community\VC\Auxiliary\Build\vcvarsall.bat" x64
——————————————————
经大量测试表明,conda模式,只适合RTX40系列旧显卡,不适合RTX50系列及更新显卡。
原因是pip和conda的包管理其机制不相同,会出一些奇怪问题,如下描述
1.当前conda原生包对RTX50系列,最新只支持到12.4,不能解决本人5060Ti的问题。
2.用conda安装或更新某个组件时,会出现把pip先前安装的包替换成其它版本,从而产生新问题。
3.用pip安装或更新的组件,会覆盖conda的包,有时也会产生新问题,导致异常问题。
venv 简单轻便,适合纯 Python 项目;conda 强大灵活,是科学计算和跨平台开发的首选。
Miniconda 是最小化版本,只带了基本的 conda 和 python 环境,其他库需要你按需安装.
https://repo.anaconda.com/miniconda/
https://repo.anaconda.com/miniconda/Miniconda3-py39_25.3.1-1-Windows-x86_64.exe
#据说是不需要安装该项的,因pytorch已经包含了它,可以先跳过这步骤,继续操作后续步骤后,再根据实际情况分析,是否有必要安装该工具。
https://developer.nvidia.com/cuda-toolkit 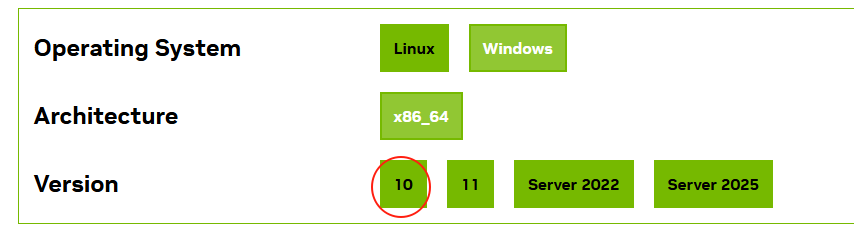
如果是RTX50系列新卡,目前conda的软件源中的pytorch是没有适配的,故必须至https://pytorch.org/其官网,了解其应该如何安装。
pip3 install torch torchvision torchaudio --index-url https://download.pytorch.org/whl/cu128 #对于本的5060Ti的显卡,只有这种方式能正确安装,其它方式均失败,并报不兼容错误。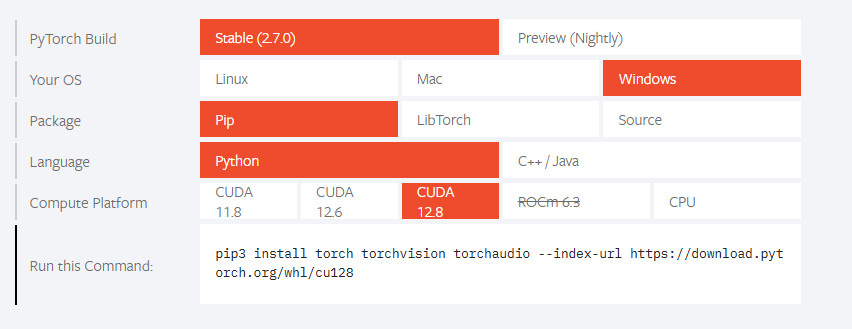
conda create --name tortoise python=3.9 numba inflect
conda activate tortoise
conda install pytorch torchvision torchaudio pytorch-cuda=12.1 -c pytorch -c nvidia #RTX40系列的显卡,可以使用这种方式安装。
pip3 install torch torchvision torchaudio --index-url https://download.pytorch.org/whl/cu128 #RTX50系列的显卡,正确安装方式。
python -c "import torch; print(torch.version.cuda); print(torch.cuda.is_available()); print(torch.cuda.get_device_name(0))"在项目初始阶段开启全局代理很重要,因为某些库在深层处会联外网,从而导致失败。
在项目初始阶段开启全局代理很重要,因为某些库在深层处会联外网,从而导致失败。
在项目初始阶段开启全局代理很重要,因为某些库在深层处会联外网,从而导致失败。
由于机器学习及大模型很多库都是国外的,尤其是模型文件如huggingface时,采用全局代理省去很多事。
以上是中科院的conda的镜像,像阿里云及清华等均无法打开或不提供相应服务,故添加需慎重。有时这些加速镜也极不靠谱。极不靠谱极不靠谱极不靠谱极不靠谱极不靠谱极不靠谱极不靠谱极不靠谱极不靠谱极不靠谱极不靠谱极不靠谱极不靠谱极不靠谱极不靠谱极不靠谱极不靠谱
conda config --add channels https://mirrors.ustc.edu.cn/anaconda/pkgs/main/
conda config --add channels https://mirrors.ustc.edu.cn/anaconda/cloud/conda-forge/
conda config --add channels https://mirrors.ustc.edu.cn/anaconda/cloud/bioconda/

conda config --set show_channel_urls yes
conda config --show channels
conda config --show-sources
conda config --remove channels https://mirrors.aliyun.com/anaconda/pkgs/pro
发现在开发TTS过程中,无法利用GPU加速,经检查报错如下:
python -c "import torch; print(torch.version.cuda); print(torch.cuda.is_available()); print(torch.cuda.get_device_name(0))"
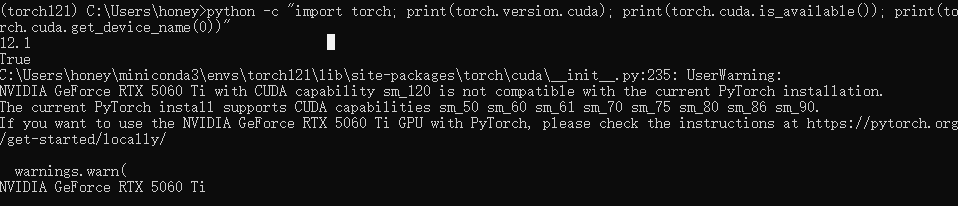
12.1
True
C:\Users\honey\miniconda3\envs\torch121\lib\site-packages\torch\cuda\__init__.py:235: UserWarning:
NVIDIA GeForce RTX 5060 Ti with CUDA capability sm_120 is not compatible with the current PyTorch installation.
The current PyTorch install supports CUDA capabilities sm_50 sm_60 sm_61 sm_70 sm_75 sm_80 sm_86 sm_90.
If you want to use the NVIDIA GeForce RTX 5060 Ti GPU with PyTorch, please check the instructions at https://pytorch.org/get-started/locally/

  warnings.warn(
NVIDIA GeForce RTX 5060 Ti

(torch121)
解决过程如下:
下载最新的CUDA Toolkit 12.9
https://developer.nvidia.com/cuda-toolkit
下载成功后如下目录所示。CUDA的工具包有3G以上,而对应的驱动程序也才800M大小。

ubuntu-24.04的版本,其python3默认版本是3.12.3,在AI和深度学习的环境中,支持不太好,在系统中将python3版本降级,也挻麻烦的。故此不建议,采用这个版本作为研发学习及生产使用。
ubuntu-20.04的版本,其python3默认版本是3.8.x,太老了,很多AI如transformer的新特性均在3.10以上开发,需也兼容3.8但,仍不建议,采用这个版本作为研发学习及生产使用
ubuntu-22.04的python3版本是3.10.x,是深度学习和AI支持度最高的版本。
wsl --export Ubuntu-20.04 h:\tools\hyperv\ubuntu-20.04.vhdx --format vhd
#支持3种格式导出,但目前所测试的结果是tar和tar.gz都是遍历磁盘文件逐个文件导出及压缩的,其效率极低如时间很长,且好像导出时会报错。
#vhd是直接拷贝原虚拟机文件,故效率最高。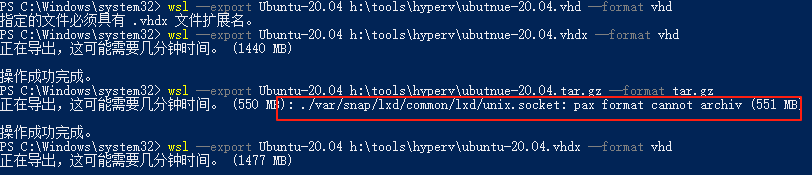
二、恢复虚拟机
有两种方式导入
wsl --import-in-place forai F:\hyperv\forai\forai.vhdx
wsl --import-in-place U20.04 F:\hyperv\ubuntu-20.04\ubuntu-20.04.vhdx  #其中U20.04是当前不存在虚拟机名称,否则会导入失败。
wsl --import MyU f:\hyperv\MyU F:\hyperv\ubuntu-20.04\ubuntu-20.04.vhdx --version 2 --vhd #必须指定为WSL2和其格式vhd,否则会报失败。
wsl --set-default forai
wsl --set-default MyU #将MyU设置成默认启动虚拟机
wsl --manage forai --set-default-user abc
wsl --manage MyU --set-default-user abc #新导入的虚拟机默认是root帐号,故需要设置一个新帐号
三、启动虚拟机
wsl -d U20.04 #启动某个虚拟机
wsl -l -v #查看是否为运行状态
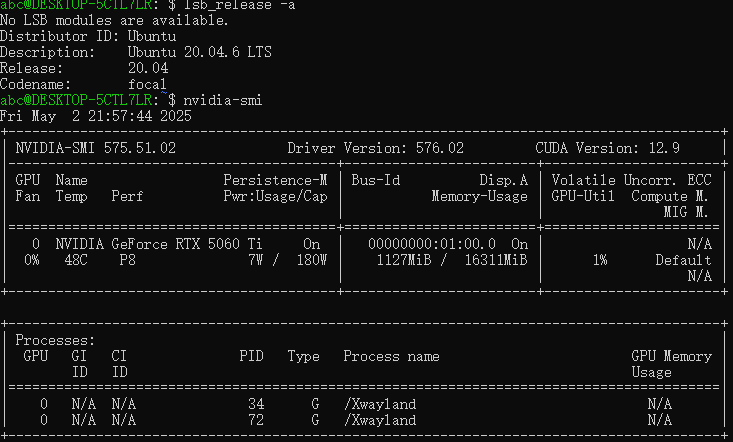
lsb_release -a #检查ubuntu的具体版本四、关闭虚拟机
wsl --shutdown #关闭所有虚拟机
wsl --terminate MyU  #指定名称即可
五、卸载并删除虚拟机
wsl --uninstall MyU #反安装虚拟机,但虚拟机还是存在的,只是无法运行了。
wsl --unregister MyU #卸载及删除虚拟主机
其它异常:
提示需要更新内核组件时,需要执行wsl –update

WSL常用命令
经确认WSL2中的Ubuntu20.4和Ubuntu24.5均已经默认带上了nvidia-smi的驱动。
此外,这两个操作系统的源更新地址,均指向archive.ubuntu.com这意味你无需担心无法使用源的问题。
ubuntu-24.04的版本,其python3默认版本是3.12.3,在AI和深度学习的环境中,支持不太好,在系统中将python3版本降级,也挻麻烦的。故此不建议,采用这个版本作为研发学习及生产使用。
ubuntu-20.04的版本,其python3默认版本是3.8.x,太老了,很多AI如transformer的新特性均在3.10以上开发,需也兼容3.8但,仍不建议,采用这个版本作为研发学习及生产使用
ubuntu-22.04的python3版本是3.10.x,是深度学习和AI支持度最高的版本。

如果安装ubuntu不成功,则可以先手动反注册一下。然后应该可以了
wsl –unregister Ubuntu-24.04
msdn.itell.you已经没有更新最新的windows系统了,但在以下网址却有迅雷下载的种子。
https://bbs.kafan.cn/thread-2220135-1-1.html
文件名:zh-cn_windows_10_consumer_editions_version_22h2_updated_march_2025_x64_dvd_fefab0a7.iso
SHA256:28307d66b6f95d208e152c4856fecbbd02bc518f9c9c2a34c6474978d368bad9
文件大小:6.69GB
发布时间:2025-03-18
ED2K链接:ed2k://|file|zh-cn_windows_10_consumer_editions_version_22h2_updated_march_2025_x64_dvd_fefab0a7.iso|7188094976|87BDAD10931A74E3C2CF7A5EF5E1536D|/
BT链接:magnet:?xt=urn:btih:d3b4a16ae248e2fd87b67bc95f4ba0806a60e6c3&dn=zh-cn_windows_10_consumer_editions_version_22h2_updated_march_2025_x64_dvd_fefab0a7.iso&xl=7188094976
文件名:zh-cn_windows_10_consumer_editions_version_22h2_updated_feb_2025_x64_dvd_16fa7261.iso
SHA256:d9c7d81a88410995d2c0003795d64829e89282cfc6bac665652a9070cf4fa8d9
文件大小:6.69GB
发布时间:2025-02-18
ED2K链接:ed2k://|file|zh-cn_windows_10_consumer_editions_version_22h2_updated_feb_2025_x64_dvd_16fa7261.iso|7182641152|6FF10540756D6C3ABADBC75CE1E1F021|/
BT链接:magnet:?xt=urn:btih:1d28086b6762c70f21b13b103d943595ea99b8c9&dn=zh-cn_windows_10_consumer_editions_version_22h2_updated_feb_2025_x64_dvd_16fa7261.iso&xl=7182641152
文件名:zh-cn_windows_10_consumer_editions_version_22h2_updated_jan_2025_x64_dvd_45152214.iso
SHA256:50491a61015a3243c282a827f3c6cac07f0030526747624cac90e1e70bc86242
文件大小:6.69GB
发布时间:2025-01-21
ED2K链接:ed2k://|file|zh-cn_windows_10_consumer_editions_version_22h2_updated_jan_2025_x64_dvd_45152214.iso|7180709888|622AFCFA2EC88C5460A17BD1353348EA|/
BT链接:magnet:?xt=urn:btih:ce522a8b61a4092071b34cabe36d02486c621411&dn=zh-cn_windows_10_consumer_editions_version_22h2_updated_jan_2025_x64_dvd_45152214.iso&xl=7180709888
文件名:zh-cn_windows_10_consumer_editions_version_22h2_updated_dec_2024_x64_dvd_52d3c74b.iso
SHA256:dc26559a06cfbc0ad15244a68cedd24dab3a0f406328560bfda9323e536dea59
文件大小:6.68GB
发布时间:2024-12-17
ED2K链接:ed2k://|file|zh-cn_windows_10_consumer_editions_version_22h2_updated_dec_2024_x64_dvd_52d3c74b.iso|7168671744|5758FD2724932A5E952BA0BE5BA18B80|/
BT链接:magnet:?xt=urn:btih:cdd789ef4f84cf1c97107645f47ed96f9a46533d&dn=zh-cn_windows_10_consumer_editions_version_22h2_updated_dec_2024_x64_dvd_52d3c74b.iso&xl=7168671744
文件名:zh-cn_windows_10_consumer_editions_version_22h2_updated_nov_2024_x64_dvd_3eeacab9.iso
SHA256:c0c4bf1c431e1dbcc734dbd0f20532a2472cf2d1abd428706860434034112462
文件大小:6.68GB
发布时间:2024-11-19
ED2K链接:ed2k://|file|zh-cn_windows_10_consumer_editions_version_22h2_updated_nov_2024_x64_dvd_3eeacab9.iso|7170504704|8FE1D32FF353EFA3137EA40CAF31A8A7|/
BT链接:magnet:?xt=urn:btih:d72b83eade5a945586b15ab0a2c4e3dd165f4c54&dn=zh-cn_windows_10_consumer_editions_version_22h2_updated_nov_2024_x64_dvd_3eeacab9.iso&xl=7170504704
文件名:zh-cn_windows_10_consumer_editions_version_22h2_updated_oct_2024_x64_dvd_d0cfb2e9.iso
SHA256:1db6a58f941fb9310d963ca8b1ab59dd73846f6d9978854843e6c2ecce10ddfc
文件大小:6.67GB
发布时间:2024-10-15
ED2K链接:ed2k://|file|zh-cn_windows_10_consumer_editions_version_22h2_updated_oct_2024_x64_dvd_d0cfb2e9.iso|7167156224|CFF635F6DCD2011100864BDFD3CAF429|/
BT链接:magnet:?xt=urn:btih:f5001d461ae74a2833b0cbe6d768b06f436443bc&dn=zh-cn_windows_10_consumer_editions_version_22h2_updated_oct_2024_x64_dvd_d0cfb2e9.iso&xl=7167156224
首先启动虚拟机或者启动双系统中的ubuntu,打开终端,输入下面的指令。
wget http://fishros.com/install -O fishros && . fishros参考:https://zhuanlan.zhihu.com/p/639237347