@echo off
pushd %~dp0
set now=%date:~0,4%%date:~5,2%%date:~8,2%_%time:~0,2%%time:~3,2%%time:~6,2%
set now=%now: =0%
echo %now%
set path_current=%~dp0
set path=%path%;%path_current%;%path_current%\wpt

set path_result=%path_current%\result
if not exist %path_result% (md "%path_result%")

set path_backup=%path_result%\backup
if not exist %path_backup% (md "%path_backup%")
set path_word=%path_result%\wps
if not exist %path_word% (md "%path_word%")
set path_et=%path_result%\et
if not exist %path_et% (md "%path_et%")
set path_ppt=%path_result%\_ppt
if not exist %path__ppt% (md "%path__ppt%")

set path_word_result=%path_result%\preread_word.txt
set path_ppt_result=%path_result%\preread_ppt.txt
set path_et_result=%path_result%\preread_et.txt

set path_test=%~1
if not exist %path_test%\wpstest.exe (
    echo "the path is wrong......"
    echo "can not find the wpstest.exe by that path."
    goto :exit
)
set softnode=SOFTWARE
IF "%PROCESSOR_ARCHITECTURE%"=="AMD64" set softnode=SOFTWARE\WOW6432Node
reg query "HKLM\%softnode%\kxtry\test\6.0\Common\res">nul 2>nul && call :registry_clear

if not exist %path_word_result% (
    echo "ready to do wps preread info."
    pushd %path_word%
    call :dokswpt /kxtry /wps /runactions="sleep,10|closeapp" %path_current%/1.docx
    popd
    copy /Y %path_word%\prereaddata_%now%.txt %path_word_result% > nul 2>nul
) else if not exist %path_ppt_result% (
    echo "ready to do _ppt preread info."
    pushd %path__ppt%
    call :dokswpt /kxtry /_ppt /runactions="sleep,10|closeapp"  %path_current%/1.pptx
    popd
    copy /Y %path__ppt%\prereaddata_%now%.txt %path__ppt_result% > nul 2>nul
) else if not exist %path_et_result% (
    echo "ready to do et preread info."
    pushd %path_et%
    call :dokswpt /kxtry /et /runactions="sleep,10|closeapp"  %path_current%/1.xlsx
    popd
    copy /Y %path_et%\prereaddata_%now%.txt %path_et_result% > nul 2>nul
) else (
    echo "all job was finished."
)

echo "finish all..."
goto :exit

rem -------------
:registry_clear
echo "remove the preRead's infomation from registry."
reg export "HKEY_LOCAL_MACHINE\%softnode%\kxtry\test\6.0\Common\Res" %path_backup%\backup_%now%.reg /y
reg delete "HKEY_LOCAL_MACHINE\%softnode%\kxtry\test\6.0\Common\Res">nul 2>nul /f
reg delete "HKEY_CURRENT_USER\Software\kxtry\test\6.0\Common\Res" >nul 2>nul /f
goto :exit


rem --------
:dokswpt
xperf -stop app_session -d app_tmp.etl
xperf -stop -d base_tmp.etl
if exist app_tmp.etl (del app_tmp.etl)
if exist base_tmp.etl (del base_tmp.etl)

echo "open session.."
xperf -start -on Base
xperf -start app_session -on CA80A0D7-6CA2-4F62-B22D-D0F88D79AE4B
echo "%path_test%\wpstest.exe" %*
call "%path_test%\wpstest.exe" %*

xperf -stop app_session -d  app_tmp.etl
xperf -stop -d base_tmp.etl
xperf -merge base_tmp.etl app_tmp.etl kxtry_%now%.etl

xperf -tle -i kxtry_%now%.etl -o hardfaults_%now%.csv -a hardfault -file -bytes
xperf -tle -i kxtry_%now%.etl -o time_%now%.csv -a dumper -provider {CA80A0D7-6CA2-4F62-B22D-D0F88D79AE4B}
xperf -tle -i kxtry_%now%.etl -o pagefaults_%now%.csv -a dumper -provider {3D6FA8D3-FE05-11D0-9DDA-00C04FD7BA7C}
hardpage.py wpstest time_%now%.csv pagefaults_%now%.csv _%now%
goto :exit

rem ---------------
:exit
echo "exit now..."
popd
月度归档:2018年06月
预读处理
// FileOverlap.cpp : Defines the entry point for the console application.
//

#include "stdafx.h"
#include

int cbCount = 0;
BOOL printfDetail = FALSE;
int loop_count = 200;
int successCount = 0;
int failedCount = 0;

#define COMPUTE_TIME(fun)  \
{ \
	DWORD begin = GetTickCount();\
	fun;\
	DWORD end = GetTickCount();\
	printf("\r\n %s: loopCount:%d - cbCount:%d - successCount:%d - timeUsed:%d", #fun, loop_count, cbCount, successCount, end - begin);\
}


void CALLBACK MyFileIOCompletionRoutine(DWORD dwErrorCode,  DWORD dwNumberOfBytesTransfered, LPOVERLAPPED lpOverlapped)
{
	if(printfDetail) {
		printf("\r\ndwErrorCode:%d - dwNumber:%d - offset:%d", dwErrorCode, dwNumberOfBytesTransfered, lpOverlapped->Offset);
	}
	cbCount++;
	if(dwNumberOfBytesTransfered > 0) {
		successCount++;
	}
}

void useReadFileEx(LPCTSTR file)
{
	HANDLE hFile = CreateFile(file, GENERIC_READ,
		FILE_SHARE_READ | FILE_SHARE_WRITE | FILE_SHARE_DELETE, NULL, OPEN_EXISTING, FILE_FLAG_SEQUENTIAL_SCAN | FILE_FLAG_OVERLAPPED, NULL);
	if(hFile == INVALID_HANDLE_VALUE) {
		printf("bad file");
		return;
	}

	OVERLAPPED overlap = {0};
	const DWORD dwStepSize = static_cast(1024 * 1024 * 1);
	const DWORD dwReadSize = dwStepSize - 3072;
	LPVOID buffer = ::VirtualAlloc( NULL, dwStepSize, MEM_COMMIT, PAGE_READWRITE);
	for(int i = 0; i < loop_count; i++)
	{
		overlap.Offset = (i % 1024) * dwStepSize;
		::ReadFileEx(hFile, buffer, dwReadSize, &overlap, MyFileIOCompletionRoutine);
	}
	if(printfDetail){
		printf("\r\nready wait.....");
	}
	while(loop_count >  cbCount){
		SleepEx(0, TRUE);
	}
	::VirtualFree(buffer, 0, MEM_RELEASE);
	::CloseHandle(hFile);
	if(printfDetail){
		printf("\r\nuseReadFileEx:cbCount:%d ", cbCount);
	}
}

void useReadFile(LPCTSTR file)
{
	HANDLE hFile = CreateFile(file, GENERIC_READ,
		FILE_SHARE_READ | FILE_SHARE_WRITE | FILE_SHARE_DELETE, NULL, OPEN_EXISTING, FILE_FLAG_SEQUENTIAL_SCAN | FILE_FLAG_OVERLAPPED, NULL);
	if(hFile == INVALID_HANDLE_VALUE) {
		printf("bad file");
		return;
	}
	DWORD len = 0;
	OVERLAPPED overlap = {0};
	const DWORD dwStepSize = static_cast(1024 * 1024 * 1);
	const DWORD dwReadSize = dwStepSize - 3072;
	LPVOID buffer = ::VirtualAlloc( NULL, dwStepSize, MEM_COMMIT, PAGE_READWRITE);
	for(int i = 0; i < loop_count; i++) {
		overlap.Offset = (i % 1024) * dwStepSize;
		if(!::ReadFile(hFile, buffer, dwReadSize, &len, &overlap)) {
			if(GetLastError() == ERROR_IO_PENDING) {
				GetOverlappedResult(hFile, &overlap, &len, TRUE);
			}
		}
	}
	::VirtualFree(buffer, 0, MEM_RELEASE);
	::CloseHandle(hFile);
}

void useMoreReadFileEx(TCHAR (*files)[MAX_PATH], int count)
{
#if 1
	for(int i = 0; i < count; i++) {
		useReadFileEx(files[i]);
	}
#else
	OVERLAPPED overlap = {0};
	const DWORD dwStepSize = static_cast(1024 * 1024 * 1);
	const DWORD dwReadSize = dwStepSize - 3072;
	LPVOID buffer = ::VirtualAlloc( NULL, dwStepSize, MEM_COMMIT, PAGE_READWRITE);
	for(int j = 0; j < count; j++) {
		HANDLE hFile = CreateFile(files[j], GENERIC_READ,
			FILE_SHARE_READ | FILE_SHARE_WRITE | FILE_SHARE_DELETE, NULL, OPEN_EXISTING, FILE_FLAG_SEQUENTIAL_SCAN | FILE_FLAG_OVERLAPPED, NULL);
		if(hFile == INVALID_HANDLE_VALUE) {
			printf("bad file");
			return;
		}
		for(int i = 0; i < loop_count; i++)
		{
			overlap.Offset = (i % 1024) * dwStepSize;
			::ReadFileEx(hFile, buffer, dwReadSize, &overlap, MyFileIOCompletionRoutine);
		}
	}
	SleepEx(0, TRUE);
#endif
}

void useMoreReadFile(TCHAR (*files)[MAX_PATH], int count)
{
	for(int i = 0; i < count; i++) {
		useReadFile(files[i]);
	}
}

int _tmain(int argc, _TCHAR* argv[])
{
	TCHAR path[MAX_PATH] = _T("c:\\package.zip");
	TCHAR files[10][MAX_PATH];
	int fileCount = 1;
	if(argc < 3) {
		printf("\r\nexample1: 1024 c:\1.zip");
		printf("\r\nexample1: 1024 c:\1.zip 1");
		printf("\r\nexample1: 1024 c:\1.zip 1 2");
		printf("\r\nexample2: 200 c:\cc|1.zip,2.zip");
		printf("\r\nexample2: 200 c:\cc|1.zip,2.zip 1");
		printf("\r\nexample2: 1024 c:\cc|1.zip,2.zip 1 2");
		return 0;
	}
	loop_count = _ttoi(argv[1]);
	_tcscpy(path, argv[2]);
	if(argc >= 3) {
		TCHAR *pmain = _tcstok(path, _T("|"));
		if(pmain != NULL) {
			TCHAR *pfile = _tcstok(NULL,  _T(","));
			int i = 0;
			for(i = 0; i < 10 && pfile != NULL; i++) {
				_stprintf(files[i], _T("%s\\%s"), pmain, pfile);
				pfile = _tcstok(NULL,  _T(","));
			}
			fileCount = i;
		}
	}

	if(argc > 3) {
		printfDetail = argc > 4;
		if(fileCount > 1) {
			COMPUTE_TIME(useMoreReadFileEx(files, fileCount));
		}else{
			COMPUTE_TIME(useReadFileEx(path));
		}
	}else if(argc == 3) {
		if(fileCount > 1) {
			COMPUTE_TIME(useMoreReadFile(files, fileCount));
		}else{
			COMPUTE_TIME(useReadFile(path));
		}
	}
	getchar();
	return 0;
}
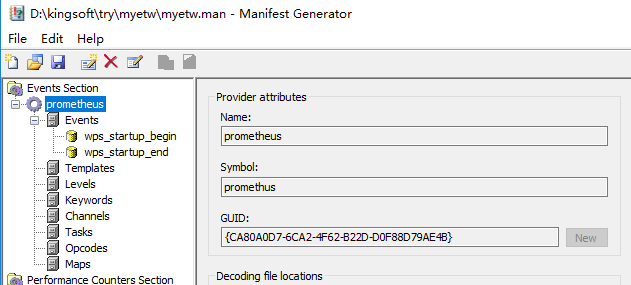
etw的信息提取
https://docs.microsoft.com/en-us/windows-hardware/test/wpt/xperf-actions
xperf -tle –i myetw.etl -o providers.csv -a dumper -provider {CA80A0D7-6CA2-4F62-B22D-D0F88D79AE4B}
https://docs.microsoft.com/en-us/windows-hardware/test/weg/instrumenting-your-code-with-etw
Copy your component to the location that was specified in your manifest by the resourceFileName attribute:

xcopy /y MyProviderBinary.exe %temp%

Register the providers:

wevtutil um etwmanifest.man
wetvutil im etwmanifest.man

Verify that the provider is visible:

logman query providers

Your provider name/GUID will appear in the list.
1.Start tracing:
  xperf -start MySession -on MyEventProvider -f MySession.etl
  # In that command line, -start gives the event collection session a name, and -on tells ETW that you want to collect events from your provider in this session. (There can be multiple -on arguments.)
2.Execute your workload.
3.Stop tracing:
  xperf -stop MySession
@echo off
echo "clean session.."
xperf -stop app_session -d app_tmp.etl
xperf -stop -d base_tmp.etl
if exist app_tmp.etl (del app_tmp.etl)
if exist base_tmp.etl (del base_tmp.etl)

echo "open session.."
set now=%date:~0,4%%date:~5,2%%date:~8,2%_%time:~0,2%%time:~3,2%%time:~6,2%
set now=%now: =0%
echo %now%
xperf -start -on Base
xperf -start app_session -on CA80A0D7-6CA2-4F62-B22D-D0F88D79AE4B

echo "请启动prometheus应用。"

timeout 100

xperf -stop app_session -d  app_tmp.etl
xperf -stop -d base_tmp.etl
xperf -merge base_tmp.etl app_tmp.etl prometheus_%now%.etl

xperf -tle -i abc_%now%.etl -o hardfaults_%now%.csv -a hardfault -file -bytes
xperf -tle -i abc_%now%.etl -o time_%now%.csv -a dumper -provider {CA80A0D7-6CA2-4F62-B22D-D0F88D79AE4B}
xperf -tle -i abc_%now%.etl -o pagefaults_%now%.csv -a dumper -provider {3D6FA8D3-FE05-11D0-9DDA-00C04FD7BA7C}
rem start wpa.exe abc_%now%.etl
如何跟踪进程的缺页中断【ETW】
———————提取缺页中断的详细信息———————
xperf -tle –i mytrace.etl -o pagefaults.csv -a dumper –provider {3d6fa8d3-fe05-11do-9dda-00c04fd7ba7c} -range time1 time2
例如:
xperf -tle -i Trace.06-18-2018.17-30-42.etl -o pagefaults.csv -a dumper -provider {3d6fa8d3-fe05-11d0-9dda-00c04fd7ba7c} -range 56 68888 #不能是浮点数,以毫秒为单位。
xperf -tle -i Trace.06-18-2018.17-30-42.etl -o pagefaults.csv -a dumper -provider {3d6fa8d3-fe05-11d0-9dda-00c04fd7ba7c} 不设时间,也可以。
#{3d6fa8d3-fe05-11d0-9dda-00c04fd7ba7c}是缺页中断的Provider,它是不变的。
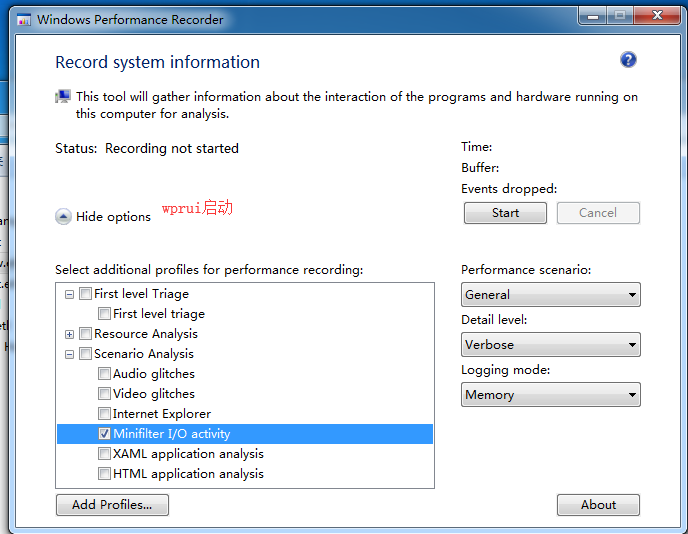
———————第一种方法——————————–
1.以超级管理员打开wprui,这个UI工具是对xpref的一个友好UI管理,特别是内置的优化场景方面,已经足够我们使用。
2.展开【moreOption】选项,选择【ScenarioAnalysis】->【Minifilter I/O activity】。
3.点击开始,然后启动应用,最后停止并保存etl文件,再使用wpa打开,即可以。
———————第二种方法———————————-
1.以超级管理员打开cmd命令行,一定要能正确调用xperf、wpa、wprui等性能检查的命令才行。建议直接用超级管理员打开,vc20xx的命令行如:
Visual Studio Command Prompt (2010)
2.打开xperf的监控命令。
xperf -start -on base
base是一个场景,该场景是包括HARD_FAULTS的检测的。
可以用xperf -providers k检查各检测组。如下所示:
Kernel Groups:
       Base           : PROC_THREAD+LOADER+DISK_IO+HARD_FAULTS+PROFILE+MEMINFO+MEMINFO_WS
       Diag           : PROC_THREAD+LOADER+DISK_IO+HARD_FAULTS+DPC+INTERRUPT+CSWITCH+PERF_COUNTER+COMPACT_CSWITCH
       DiagEasy       : PROC_THREAD+LOADER+DISK_IO+HARD_FAULTS+DPC+INTERRUPT+CSWITCH+PERF_COUNTER
       Latency        : PROC_THREAD+LOADER+DISK_IO+HARD_FAULTS+DPC+INTERRUPT+CSWITCH+PROFILE
       FileIO         : PROC_THREAD+LOADER+DISK_IO+HARD_FAULTS+FILE_IO+FILE_IO_INIT
       IOTrace        : PROC_THREAD+LOADER+DISK_IO+HARD_FAULTS+CSWITCH
       ResumeTrace    : PROC_THREAD+LOADER+DISK_IO+HARD_FAULTS+PROFILE+POWER
       SysProf        : PROC_THREAD+LOADER+PROFILE
       ResidentSet    : PROC_THREAD+LOADER+DISK_IO+HARD_FAULTS+MEMORY+MEMINFO+VAMAP+SESSION+VIRT_ALLOC
       ReferenceSet   : PROC_THREAD+LOADER+HARD_FAULTS+MEMORY+FOOTPRINT+VIRT_ALLOC+MEMINFO+VAMAP+SESSION+REFSET+MEMINFO_WS
       Network        : PROC_THREAD+LOADER+NETWORKTRACE
3.启动你要监控的进程如wps或某一棋牌游戏。
4.停止xperf的监控
xperf -stop –d trace.etl #后面的名字随便叫。
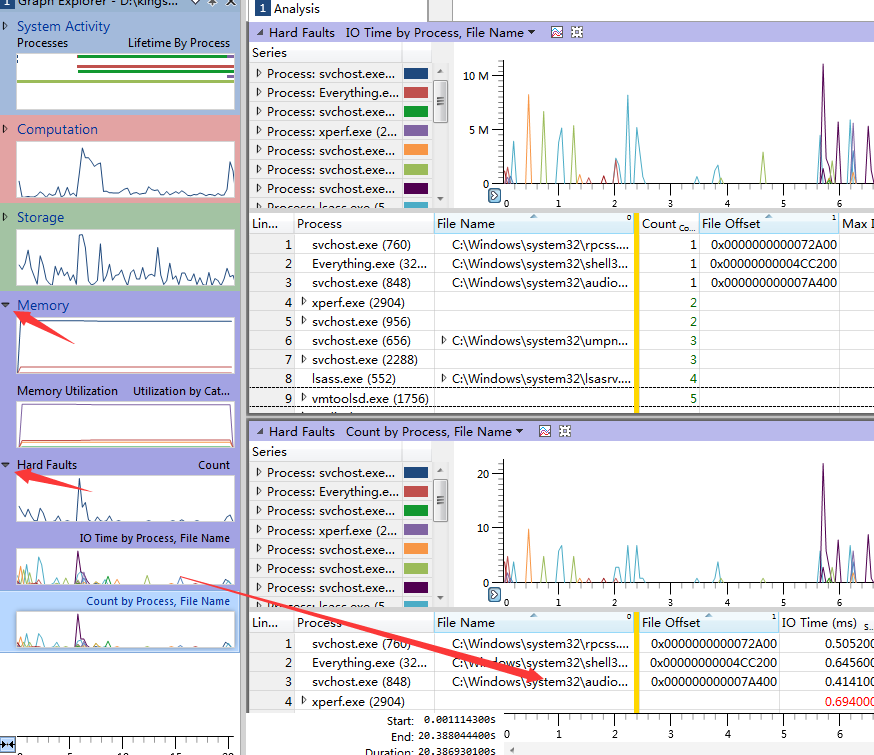
5.使用wpa打开trace.etl,正常情况下会显示【SystemActivity】,【Computation】,【Storage】,【Memory】4个图表,其HARD_FAULTS的相关信息,隐藏在【Memory】子图表下。
6.展开Memory子项或双周Memory的标题栏,正常情下会展示3个图表,其中一个是【HardFaults】。
7.HardFaults有3个子项,分别是【count】、【IO by Process】、【Count by Process】,可以在进程列表中选择【FilterToSelection】【ClearSelection】进行只显示或取消显示当前进程。
wordpress的docker配置
1.安装docker环境
yum install docker
2.安装docker-compose,不要直接使用yum的方式安装,因为yum的方式版本较低,且与系统可能存在兼容问题。
curl -L https://github.com/docker/compose/releases/download/1.21.2/docker-compose-$(uname -s)-$(uname -m) -o /usr/local/bin/docker-compose
3.软件配置
docker-compose.yml文件配置如下:
version: '3.1'

services:
  mysql:
    image: mysql:5.5.60
    restart: always
    environment:
      MYSQL_ROOT_PASSWORD: abc123
    # links:
    ports:
      - 13306:3306
    volumes:
      - /etc/localtime:/etc/localtime:ro
      - /etc/timezone:/etc/timezone:ro
      - /opt/mysql/data:/var/lib/mysql

  php:
    image: wordpress:php7.1-fpm
    restart: always
    ports:
      - 9000:9000
    links:
      - mysql:mysql
    depends_on:
      - mysql
    volumes:
      - /etc/localtime:/etc/localtime:ro
      - /etc/timezone:/etc/timezone:ro
      - /opt/wwwroot:/home/wwwroot
      - /opt/wwwlogs:/home/wwwlogs
    # php-fpm运行的用户为www-data,需要将wwwroot的权限为[chmod a+w ]


  nginx:
    image: nginx
    restart: always
    ports:
      - 80:80
    links:
      - mysql
      - php
    depends_on:
      - mysql
      - php
    volumes:
      - /etc/localtime:/etc/localtime:ro
      - /etc/timezone:/etc/timezone:ro
      - /opt/nginx/conf/nginx.conf:/etc/nginx/nginx.conf:ro
      - /opt/nginx/conf/fastcgi.conf:/etc/nginx/fastcgi.conf:ro
      - /opt/nginx/conf/vhost:/etc/nginx/vhost:ro
      - /opt/wwwroot:/home/wwwroot
      - /opt/wwwlogs:/home/wwwlogs
/opt/nginx/conf/nginx.conf的配置如下:
user root root;

worker_processes auto;

error_log  /home/wwwlogs/nginx_error.log  crit;

pid        /home/wwwlogs/nginx.pid;

#Specifies the value for maximum file descriptors that can be opened by this process.
worker_rlimit_nofile 51200;

events
    {
        use epoll;
        worker_connections 51200;
        multi_accept on;
    }

http
    {
        include       mime.types;
        default_type  application/octet-stream;

        server_names_hash_bucket_size 128;
        client_header_buffer_size 32k;
        large_client_header_buffers 4 32k;
        client_max_body_size 50m;

        sendfile   on;
        tcp_nopush on;

        keepalive_timeout 60;

        tcp_nodelay on;

        fastcgi_connect_timeout 300;
        fastcgi_send_timeout 300;
        fastcgi_read_timeout 300;
        fastcgi_buffer_size 64k;
        fastcgi_buffers 4 64k;
        fastcgi_busy_buffers_size 128k;
        fastcgi_temp_file_write_size 256k;

        gzip on;
        gzip_min_length  1k;
        gzip_buffers     4 16k;
        gzip_http_version 1.1;
        gzip_comp_level 2;
        gzip_types     text/plain application/javascript application/x-javascript text/javascript text/css application/xml application/xml+rss;
        gzip_vary on;
        gzip_proxied   expired no-cache no-store private auth;
        gzip_disable   "MSIE [1-6]\.";

        #limit_conn_zone $binary_remote_addr zone=perip:10m;
        ##If enable limit_conn_zone,add "limit_conn perip 10;" to server section.

        server_tokens off;
        access_log off;

  	include vhost/*.conf;
}
/opt/nginx/conf/vhost/kxtry.com.conf的配置如下,它是放置在nginx.conf同级的vhost目录下。
server
{
        listen 80;
        server_name kxtry.com www.kxtry.com www.czysheng.com czysheng.com;
        index index.html index.htm index.php;
        root /home/wwwroot/kxtry.com;


        location ~ \.php {
		fastcgi_pass  php:9000;
                fastcgi_index index.php;
                include fastcgi.conf;
                set $real_script_name $fastcgi_script_name;
                if ($fastcgi_script_name ~ "^(.+?\.php)(/.+)$") {
                        set $real_script_name $1;
                        set $path_info $2;
                }
                fastcgi_param SCRIPT_FILENAME $document_root$real_script_name;
                fastcgi_param SCRIPT_NAME $real_script_name;
                fastcgi_param PATH_INFO $path_info;
		fastcgi_param IS_DEVELOPMENT '1';
		#develop and test environment
        }

	location / {
        	if (-f $request_filename/index.html){
            		rewrite (.*) $1/index.html break;
        	}
        	if (-f $request_filename/index.php){
            		rewrite (.*) $1/index.php;
       		}
        	if (!-f $request_filename){
            		rewrite (.*) /index.php;
        	}
	}


        access_log /home/wwwlogs/kxtry.com.log;
}
与nginx.conf同级的fastcgi.conf文件配置
fastcgi_param  SCRIPT_FILENAME    $document_root$fastcgi_script_name;
fastcgi_param  QUERY_STRING       $query_string;
fastcgi_param  REQUEST_METHOD     $request_method;
fastcgi_param  CONTENT_TYPE       $content_type;
fastcgi_param  CONTENT_LENGTH     $content_length;

fastcgi_param  SCRIPT_NAME        $fastcgi_script_name;
fastcgi_param  REQUEST_URI        $request_uri;
fastcgi_param  DOCUMENT_URI       $document_uri;
fastcgi_param  DOCUMENT_ROOT      $document_root;
fastcgi_param  SERVER_PROTOCOL    $server_protocol;
fastcgi_param  REQUEST_SCHEME     $scheme;
fastcgi_param  HTTPS              $https if_not_empty;

fastcgi_param  GATEWAY_INTERFACE  CGI/1.1;
fastcgi_param  SERVER_SOFTWARE    nginx/$nginx_version;

fastcgi_param  REMOTE_ADDR        $remote_addr;
fastcgi_param  REMOTE_PORT        $remote_port;
fastcgi_param  SERVER_ADDR        $server_addr;
fastcgi_param  SERVER_PORT        $server_port;
fastcgi_param  SERVER_NAME        $server_name;

# PHP only, required if PHP was built with --enable-force-cgi-redirect
fastcgi_param  REDIRECT_STATUS    200;
fastcgi_param PHP_ADMIN_VALUE "open_basedir=$document_root/:/tmp/:/proc/";
—————————-
无法上传或保存图片的原因是目录权限问题。
原php的用户为www-data,而映射到dock中都是root权限,故需要修改/wwwroot的权限为
chmod a+w kxtry.com -R
或者chown www-data:www-data kxtry.com -R
vue的directive的两种实现方式
引入第三方js组件的正确姿势是采用vue.directive的方式,而其它方式如下,
//以下方式引入第三方组件,会出现两次绘制对,也即在调试过程中可能会出现一些奇怪的问题,不建议使用这种方法。
export default {
   mounted: function () {
      this.$nextTick(function () {
         // todo: editor = CodeMirror.fromTextArea(document.getElementById('editor');
      }
   }
}
第一种,直接在app.js中添加指令如下:
Vue.directive('drag', {
    inserted:function(el){
        el.onmousedown=function(e){
            let l=e.clientX-el.offsetLeft;
            let t=e.clientY-el.offsetTop;
            document.onmousemove=function(e){
                el.style.left=e.clientX-l+'px';
                el.style.top=e.clientY-t+'px';
            };
            el.onmouseup=function(){
                document.onmousemove=null;
                el.onmouseup=null;
            }
        }
    }
})
new Vue({
  el:'#app'
});
第二种,直接在vue的组件中添加如下
vue的测试页面
element的demo测试,可以方便地测试其组件。
http://element-cn.eleme.io/#/zh-CN/component/installation
快捷入口
https://jsfiddle.net/hzfpyvg6/14/

http://panjiachen.github.io/vue-element-admin/#/dashboard

VUE的多页面开发
请参考这个教程
https://github.com/Plortinus/vue-multiple-pages