https://dev.mysql.com/doc/refman/5.7/en/resetting-permissions.html
月度归档:2017年02月
jdk环境变量配置
备忘:
export JAVA_HOME=/jdk1.8.0_211
export JRE_HOME=/jdk1.8.0_211/jre
export CLASS_PATH=.:$JAVA_HOME/lib/dt.jar:$JAVA_HOME/lib/tools.jar:$JRE_HOME/lib
export PATH=$JAVA_HOME/bin:$JRE_HOME/bin:$PATH
安装Elasticsearch&Kibana&X-Pack
1.下载文件:
https://artifacts.elastic.co/downloads/elasticsearch/elasticsearch-5.2.0.tar.gz
https://artifacts.elastic.co/downloads/kibana/kibana-5.2.0-linux-x86_64.tar.gz
https://artifacts.elastic.co/downloads/logstash/logstash-5.2.0.tar.gz
https://artifacts.elastic.co/downloads/packs/x-pack/x-pack-5.2.0.zip
https://artifacts.elastic.co/downloads/beats/heartbeat/heartbeat-5.2.0-linux-x86_64.tar.gz
https://artifacts.elastic.co/downloads/beats/filebeat/filebeat-5.2.0-linux-x86_64.tar.gz
https://artifacts.elastic.co/downloads/beats/packetbeat/packetbeat-5.2.0-linux-x86_64.tar.gz
2.分别解压elasticsearch\kibana\logstash后,各自执行以下命令安装xpack。
bin/elasticsearch-plugin install file:///path/to/file/x-pack-5.2.0.zip
bin/kibana-plugin install file:///path/to/file/x-pack-5.2.0.zip
bin/logstash-plugin install file:///path/to/file/x-pack-5.2.0.zip
卸载命令
bin/elasticsearch-plugin remove x-pack
bin/kibana-plugin remove x-pack
bin/logstash-plugin remove x-pack
3.启动相应应用
bin/elasticsearch
bin/kibana
bin/logstash
4.登录相关后台
----------------------------
kibana的后台:
http://localhost:5601
帐号与密码
Username: elastic Password: changeme
------------------------------
elasticsearch的restfullAPI
http://localhost:9200
-----------------------
logstash的后台
参考文档:
https://www.elastic.co/start
https://www.elastic.co/guide/en/x-pack/current/xpack-introduction.html
https://www.elastic.co/guide/en/x-pack/current/installing-xpack.html
solr快速入门
1.下载合适的solr版本。当前官网最新版本是6.4.1,但经验证,6.4.1版本在其管理后台中操作dataimport时,会显示空白页。故本人不建议使用最新版本进行学习和应用开发。经验证,其5.5.3版本的各项功能是可以正常工作的。
下载5.5.3版本,快捷路径是:https://mirrors.tuna.tsinghua.edu.cn/apache/lucene/solr
http://lucene.apache.org/solr/mirrors-solr-latest-redir.html
选择任意一个镜像,在进入镜像后,选择parent目录。
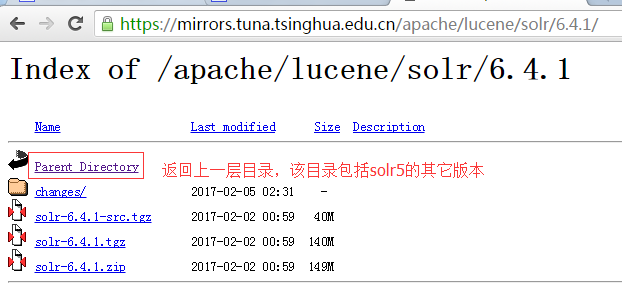
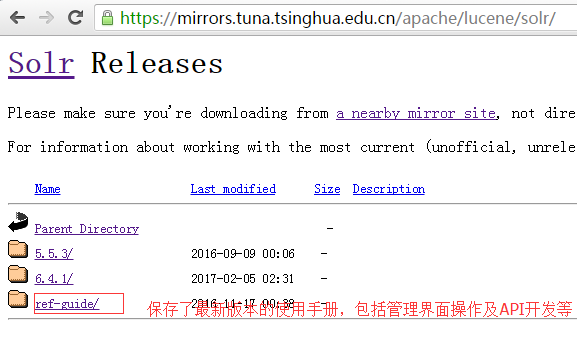
选择5.5.3的版本:https://mirrors.tuna.tsinghua.edu.cn/apache/lucene/solr/5.5.3/
https://mirrors.tuna.tsinghua.edu.cn/apache/lucene/solr/5.5.3/solr-5.5.3.zip
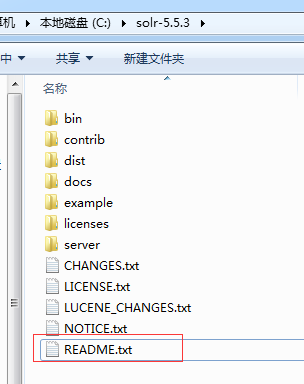
2.如下是其目录结构,初学者,应该习惯阅读Readme.txt文件,该文件记录了一些基本使用操作,很方便学习。
3.内置了几个例子,需要使用特殊命令开启,初学者应该每个例子都体验一下。
bin/solr -e  where  is one of:
    cloud        : SolrCloud example
    dih          : Data Import Handler (rdbms, mail, rss, tika)
    schemaless   : Schema-less example (schema is inferred from data during indexing)
    techproducts : Kitchen sink example providing comprehensive examples of Solr features
4.体验dih例子。
bin/solr -e dih
5.打开管理后台页面:
在实际测试过程中,发现在window中,dataimport等一些相关操作,会失败。只有linux的才会成功,具体原因没有去分析。
http://mysql.mvware.com:8983/solr/

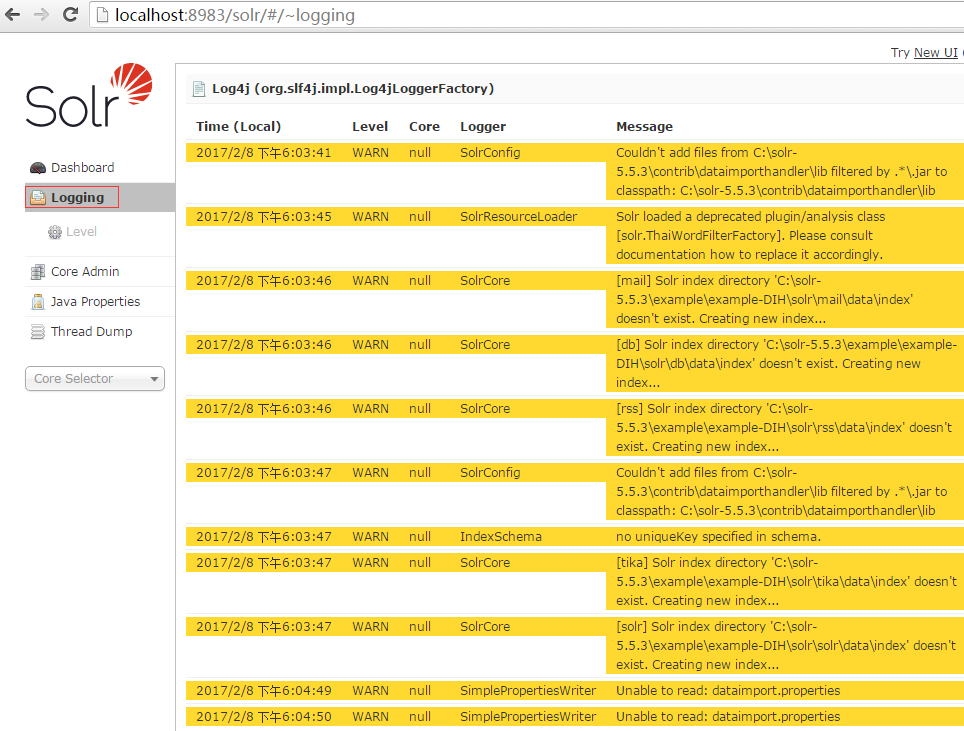
6.logging界面,当执行dataimport或其它操作,如果有错误或执行失败,可以检查该日志信息。
7.在CoreSelector中选择solr项,并选择dataimport项.

8.在dataimport项中,调试你的配置文件,经过该步骤,已经可以在query项和schemabrowser项中查询到相关记录了。
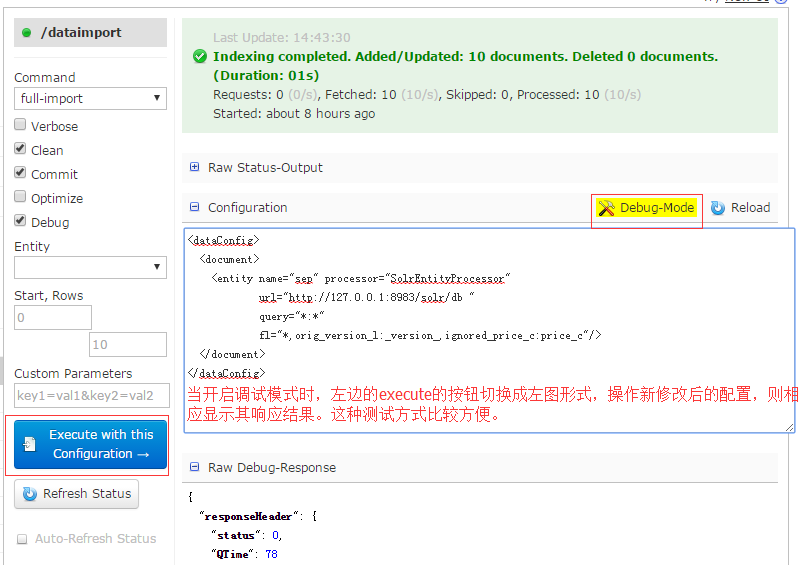
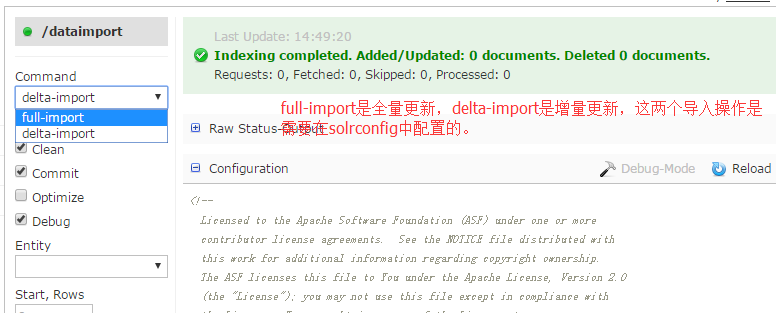
9.在dataimport项中,执行全量更新和增量更新,dataimport项是需要在solrconfig.xml中配置的。
solrconfig.xml中的requestHandler配置
solr-data-config.xml
solr-data-config.xml中的配置
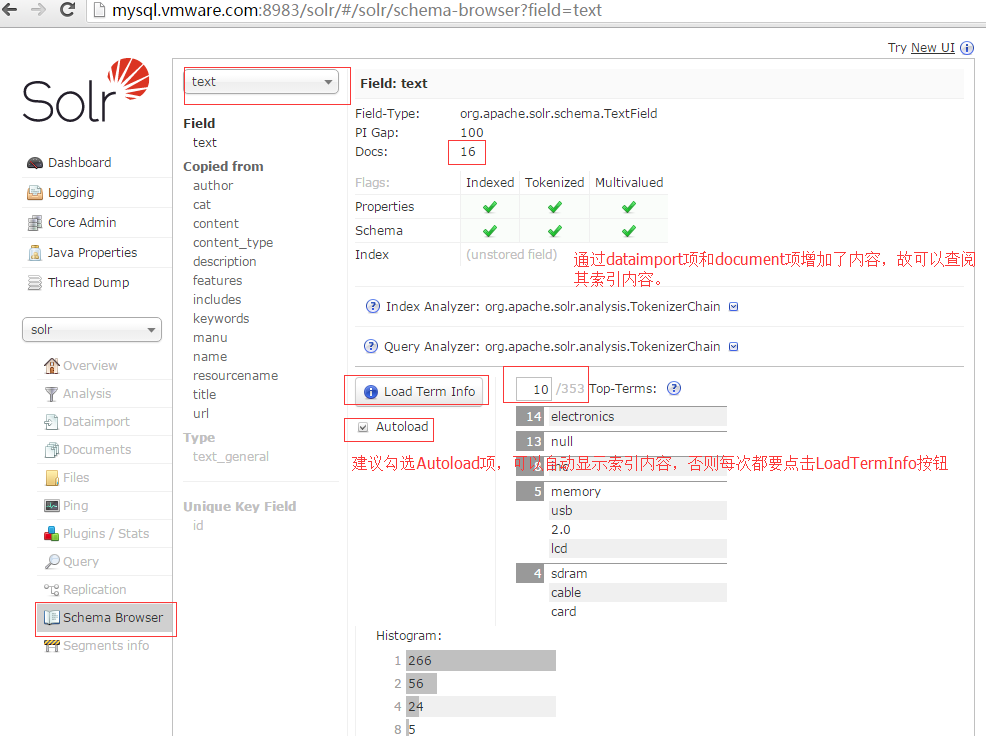
10.浏览schemabrowser中的各个schema项,在solr6.x版本中,增加了schema的增删项,更方便从零搭建core项。
11.通过documents项,增加数据记录,通过schemabrowser或manage-schema.xml配置文件中可知道当前的schema有如下:。
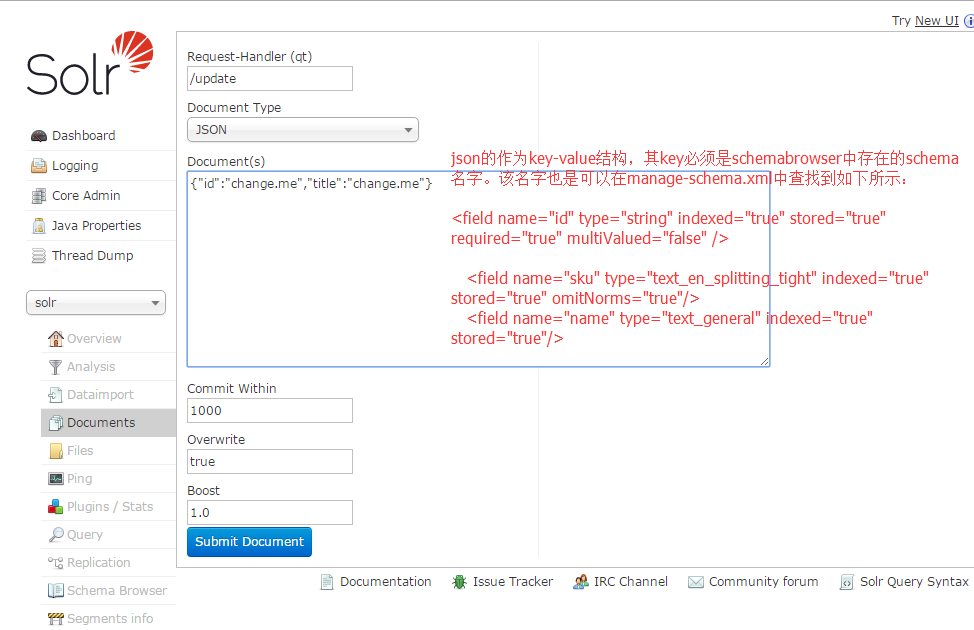
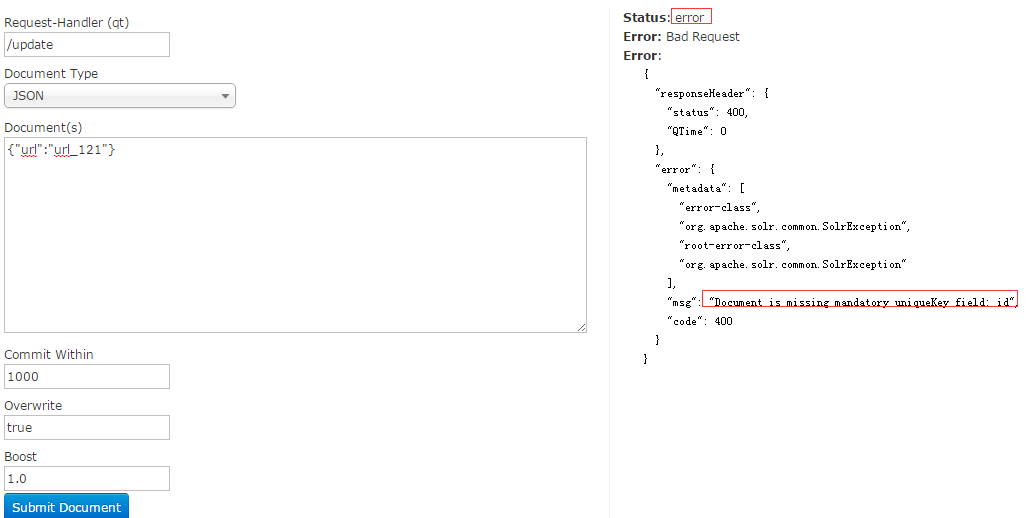
在DocumentType选择JSON项,然后输入内容如下,并点击submit按钮提交:
{"id":12345, "author":"author_121","text":"text_121", "title":"title_1121"}
{"id":22345, "url":"url_121"}
如果执行成功,则提示如下:
Status: success
Response:
{
  "responseHeader": {
    "status": 0,
    "QTime": 2
  }
}
如果出错呢?也会有相应的错误提示,可依据提示进行修改输入项内容。
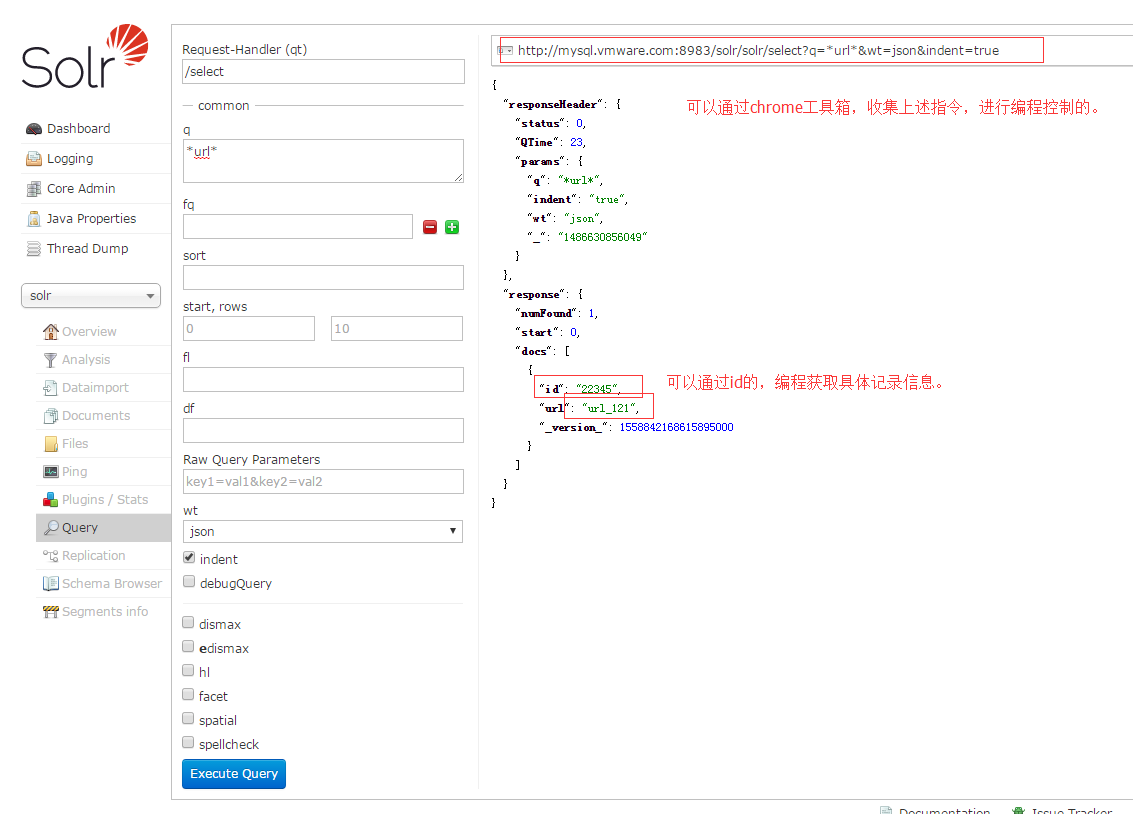
12.通过query项,进行查找刚才的输入项。
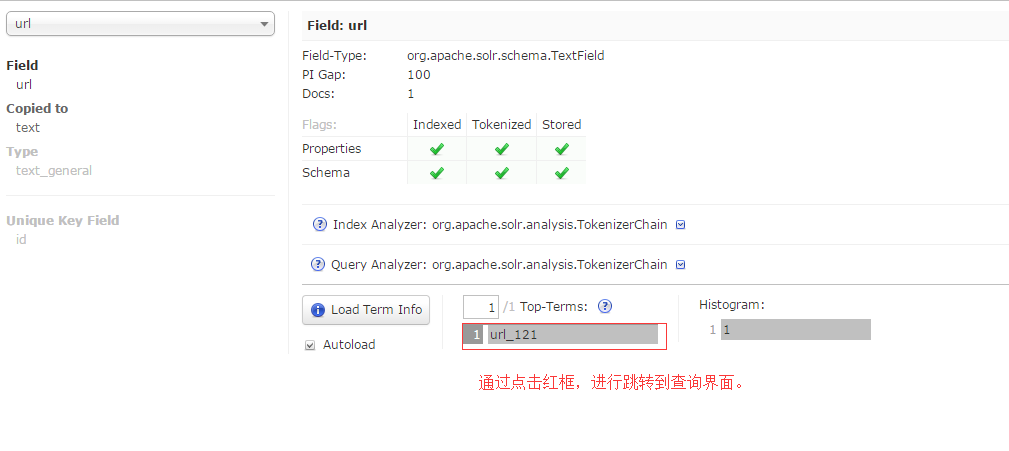
13.也可以通schemabrowser中的记录,快速跳转搜索的内容。
Dubbo的客户端负载均衡关键过程
String applicationConfig = "consumer-applicationContext.xml";
ApplicationContext context = new ClassPathXmlApplicationContext(applicationConfig);
UserInfoService userInfoService = (UserInfoService) context.getBean("userInfoService");
//负载均衡的处理是一个典型的懒加载模式,只有在第一次调用接口时,才进行负载均衡的处理。
System.out.println(userInfoService.sayHello("zhangsan"));
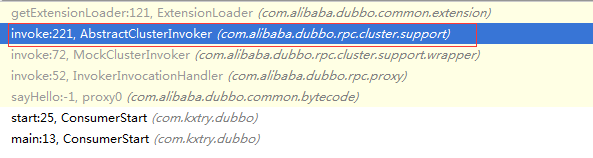
1.在进入sayHello的调用时,堆栈信息和帧代码如下
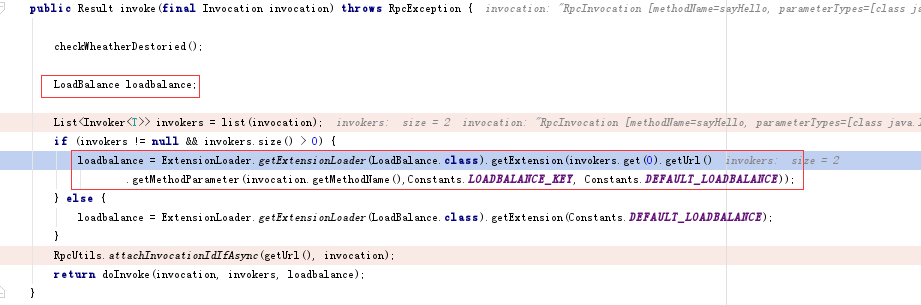
其中Constants.LOADBALANCE_KEY的值是“loadbalance”,而Constants.DEFAULT_LOADBALANCE的值是“random”,每个接口(reference)均可以灵活配置一个均衡方式,默认不配置的情况下都是random的。
不配置loadbalance时,是random的模式。
2.假如当前的loadbalance设置了leastactive时,它是如何把名字和类LeastActiveLoadBalance的实例关联起来呢?
3.首先它在com.alibaba.dubbo.rpc.cluster.loadbalance目录下实现了4种均衡方式,如下:
ConsistentHashLoadBalance:一致哈希
LeastActiveLoadBalance:最久不使用
RandomLoadBalance:随机
RoundRobinLoadBalance:顺序循环
注:上1点中的loadbalance返回的则是上述的其中一个均衡策略类实例。
4.其它dubbo实现了一套类似spi的服务加载机制如下:
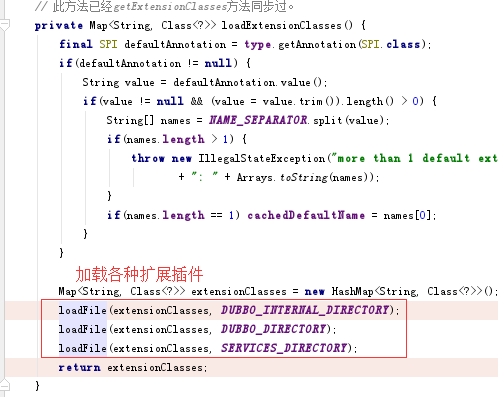

private void loadFile(Map> extensionClasses, String dir) {
        String fileName = dir + type.getName();
        try {
            Enumeration urls;
            ClassLoader classLoader = findClassLoader();
            if (classLoader != null) {
                urls = classLoader.getResources(fileName);
            } else {
                urls = ClassLoader.getSystemResources(fileName);
            }
            if (urls != null) {
                while (urls.hasMoreElements()) {
                    java.net.URL url = urls.nextElement();
                    try {
                        BufferedReader reader = new BufferedReader(new InputStreamReader(url.openStream(), "utf-8"));
                        try {
                            String line = null;
                            while ((line = reader.readLine()) != null) {
                                final int ci = line.indexOf('#');
                                if (ci >= 0) line = line.substring(0, ci);
                                line = line.trim();
                                if (line.length() > 0) {
                                    try {
                                        String name = null;
                                        int i = line.indexOf('=');
                                        if (i > 0) {
                                            name = line.substring(0, i).trim();
                                            line = line.substring(i + 1).trim();
                                        }
                                        if (line.length() > 0) {
                                            Class clazz = Class.forName(line, true, classLoader);
                                            if (! type.isAssignableFrom(clazz)) {
                                                throw new IllegalStateException("Error when load extension class(interface: " +
                                                        type + ", class line: " + clazz.getName() + "), class "
                                                        + clazz.getName() + "is not subtype of interface.");
                                            }
                                            if (clazz.isAnnotationPresent(Adaptive.class)) {
                                                if(cachedAdaptiveClass == null) {
                                                    cachedAdaptiveClass = clazz;
                                                } else if (! cachedAdaptiveClass.equals(clazz)) {
                                                    throw new IllegalStateException("More than 1 adaptive class found: "
                                                            + cachedAdaptiveClass.getClass().getName()
                                                            + ", " + clazz.getClass().getName());
                                                }
                                            } else {
                                                try {
                                                    clazz.getConstructor(type);
                                                    Set> wrappers = cachedWrapperClasses;
                                                    if (wrappers == null) {
                                                        cachedWrapperClasses = new ConcurrentHashSet>();
                                                        wrappers = cachedWrapperClasses;
                                                    }
                                                    wrappers.add(clazz);
                                                } catch (NoSuchMethodException e) {
                                                    clazz.getConstructor();
                                                    if (name == null || name.length() == 0) {
                                                        name = findAnnotationName(clazz);
                                                        if (name == null || name.length() == 0) {
                                                            if (clazz.getSimpleName().length() > type.getSimpleName().length()
                                                                    && clazz.getSimpleName().endsWith(type.getSimpleName())) {
                                                                name = clazz.getSimpleName().substring(0, clazz.getSimpleName().length() - type.getSimpleName().length()).toLowerCase();
                                                            } else {
                                                                throw new IllegalStateException("No such extension name for the class " + clazz.getName() + " in the config " + url);
                                                            }
                                                        }
                                                    }
                                                    String[] names = NAME_SEPARATOR.split(name);
                                                    if (names != null && names.length > 0) {
                                                        Activate activate = clazz.getAnnotation(Activate.class);
                                                        if (activate != null) {
                                                            cachedActivates.put(names[0], activate);
                                                        }
                                                        for (String n : names) {
                                                            if (! cachedNames.containsKey(clazz)) {
                                                                cachedNames.put(clazz, n);
                                                            }
                                                            Class c = extensionClasses.get(n);
                                                            if (c == null) {
                                                                extensionClasses.put(n, clazz);
                                                            } else if (c != clazz) {
                                                                throw new IllegalStateException("Duplicate extension " + type.getName() + " name " + n + " on " + c.getName() + " and " + clazz.getName());
                                                            }
                                                        }
                                                    }
                                                }
                                            }
                                        }
                                    } catch (Throwable t) {
                                        IllegalStateException e = new IllegalStateException("Failed to load extension class(interface: " + type + ", class line: " + line + ") in " + url + ", cause: " + t.getMessage(), t);
                                        exceptions.put(line, e);
                                    }
                                }
                            } // end of while read lines
                        } finally {
                            reader.close();
                        }
                    } catch (Throwable t) {
                        logger.error("Exception when load extension class(interface: " +
                                            type + ", class file: " + url + ") in " + url, t);
                    }
                } // end of while urls
            }
        } catch (Throwable t) {
            logger.error("Exception when load extension class(interface: " +
                    type + ", description file: " + fileName + ").", t);
        }
    }
5.每个均衡策略类均实现了select接口,通过该接口从多个可用的后端服务中返回其中一个服务。
Invoker select(List> invokers, URL url, Invocation invocation) throws RpcException;