月度归档:2023年08月

远程的虚拟显示器

一、配置方法
1)安装软件
通过终端安装虚拟显示器软件,Ubuntu20.4可以用:

$ sudo apt-get install xserver-xorg-core-hwe-18.04
$ sudo apt-get install xserver-xorg-video-dummy

2)添加配置文件
在 /usr/share/X11/xorg.conf.d/ 中添加 xorg.conf 文件。
编辑 /usr/share/X11/xorg.conf.d/xorg.conf文件,内容如下:

Section "Monitor"
  Identifier "Monitor0"
  HorizSync 28.0-80.0
  VertRefresh 48.0-75.0
  Modeline "1920x1080_60.00" 172.80 1920 2040 2248 2576 1080 1081 1084 1118 -HSync +Vsync
EndSection
Section "Device"
  Identifier "Card0"
  Driver "dummy"
  VideoRam 256000
EndSection
Section "Screen"
  DefaultDepth 24
  Identifier "Screen0"
  Device "Card0"
  Monitor "Monitor0"
  SubSection "Display"
    Depth 24
    Modes "1920x1080_60.00"
  EndSubSection
EndSection

3)重启
重启计算机后,默认使用虚拟显示器。
使用向日葵或teamviewer实现远程连接即可

注意:如果需要再用显示器,需要删除或者重命名“xorg.conf”文件
https://cloud.tencent.com/developer/article/2120963

The selected directory is not a validhome for Go SDK

GoLang2019.3.4是目前最好的版本,其自带了visualstudio的keymap,而从2020版本开始,visualstudio.keymap需要手动安装,此外更高版本在界面风格上也改变较大。但功能使用并没有什么区别。

GoLang2019.3.x和GoLang2020.1.1均支持jetbrains-agent.jar的终身破解,而更新的版本则不再支持该破解。


GoLang2019.3.x和GoLang2020.1.1报上述错误时,其实新版本的GoSDK的zversion.go缺少了一个版本。按如下修改

首先定位至GoSDK目录。

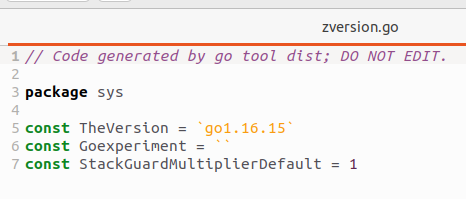
接着修改:/go-1.19.12/src/runtime/internal/sys/zversion.go文件,添加如下一行的版本标识。

const TheVersion = `go1.19.12`
Go-SDK1.16.15版本
后来高版本都取消了TheVersion的参数,故若想Golang2019.3.4版本也支持高版本,则需要在该文件中添加TheVersion的参数,这样才能正确使用。

WooCommerce的版本兼容确认

因为Wordpress官方安装插件时,只会显示最新版本的插件,并提示相关信息说:与你的当前的版本不兼容。

我们并不希望升级Wordpress版本,同时也希望安装相应的插件怎么办呢?

打开https://github.com/woocommerce/woocommerce开源仓库。

必须下载woocommerce.zip的压缩包,才会有readme.txt的文件。

随便下载一个release的版本,查看readme.txt文件内容,如下描述:

Ubuntu22.04安装PHP版本

摘:https://devpress.csdn.net/linux/62ee9179c6770329307f3ca0.html

安装多个 PHP 版本的最简单方法是使用来自 Debian 开发人员 Ondřej Surý 的 PPA。要添加此 PPA,请在终端中运行以下命令。如果要从 PPA 安装软件,则需要 software-properties-common 包。它会自动安装在 Ubuntu 桌面上,但可能会在您的 Ubuntu 服务器上丢失。

sudo apt install software-properties-common
sudo add-apt-repository ppa:ondrej/php
sudo apt update

SURY 存储库包含 PHP 8.1、8.0、7.4、7.3、7.2、7.1、7.0 和 PHP 5.6。由于 PHP 的最新稳定版本是 8.0,但许多网站仍然需要 PHP 7。您可以在系统上安装任何所需的 PHP 版本。

安装PHP8.1

sudo apt-get install php8.1 php8.1-fpm
sudo apt-get install php8.1-mysql php8.1-mbstring php8.1-xml php8.1-gd php8.1-curl

安装 PHP 7.2:

现在您可以通过执行以下命令在 Ubuntu 上安装PHP7.2:

sudo apt-get install php7.2 php7.2-fpm
sudo apt-get install php7.2-mysql php7.2-mbstring php7.2-xml php7.2-gd php7.2-curl

如果您在 Ubuntu 22.04 上安装了多个 PHP 版本,您可以选择将其中一个版本设为默认 PHP 版本。

要列出可用版本,请运行以下命令:

sudo update-alternatives --config php

第 5 步:卸载 PHP 版本

如果不再需要任何 PHP 版本,可以将其从系统中删除。这将释放磁盘空间以及系统安全性。

要卸载任何 PHP 版本,请运行以下命令:

sudo apt-get remove php5.6
sudo apt-get remove php5.6-*

CMake文件安装方式

install(FILES ${CMAKE_CURRENT_SOURCE_DIR}/*.h ${CMAKE_CURRENT_SOURCE_DIR}/*.h DESTINATION include)
install(DIRECTORY Common OS_Common RTSPClient RTSPServer Sock Util  DESTINATION include PATTERN *.cpp EXCLUDE)
install(TARGETS ${PROJECT_NAME} DESTINATION lib RUNTIME DESTINATION bin)