月度归档:2016年12月

fastxml.json的序列化

专门分析一下fastxml.json的序列化,偶有所得,截图如下:


另一个示例

public class User {
    public interface WithoutPasswordView {};
    public interface WithPasswordView extends WithoutPasswordView {};

    private String username;
    private String password;

    public User() {
    }

    public User(String username, String password) {
        this.username = username;
        this.password = password;
    }

    @JsonView(WithoutPasswordView.class)
    public String getUsername() {
        return this.username;
    }

    @JsonView(WithPasswordView.class)
    public String getPassword() {
        return this.password;
    }

    public static void main(String[] args) throws IOException {
        ObjectMapper objectMapper = new ObjectMapper();
        //创建对象
        User user = new User("isea533","123456");
        //序列化
        ByteArrayOutputStream bos = new ByteArrayOutputStream();
        objectMapper.writerWithView(User.WithoutPasswordView.class).writeValue(bos, user);
        System.out.println(bos.toString());

        bos.reset();
        objectMapper.writerWithView(User.WithPasswordView.class).writeValue(bos, user);
        System.out.println(bos.toString());
    }
}

输出结果

{"username":"isea533"}
{"username":"isea533","password":"123456"}
        
	
		com.fasterxml.jackson.core
		jackson-core
		${jackson.version}


		com.fasterxml.jackson.core
		jackson-databind
		${jackson.version}
	

@EnableWebMvc在做什么?


如红框所示,在构建beanmap的列表过程中,会主动加载该类,构建默认bean列表。在DelegatingWebMvcConfiguration中,会建立以下默认bean列表。
HandlerMapping:
Bean: requestMappingHandlerMapping
Bean: viewControllerHandlerMapping
Bean: beanNameHandlerMapping
Bean: resourceHandlerMapping
Bean: defaultServletHandlerMapping
HandlerAdapter:
Bean: requestMappingHandlerAdapter
Bean: httpRequestHandlerAdapter
Bean: simpleControllerHandlerAdapter
ExceptionResolver
Bean: handlerExceptionResolver
Other:
Bean: mvcConversionService
Bean: mvcValidator
以上bean也是可以通过基于WebMvcConfigurationSupport派生新配置类来进行高级的修改上述bean的配置。

@Configuration
@EnableWebMvc
//@ComponentScan(basePackages = "web.api.module", useDefaultFilters = false, includeFilters = {
//        @ComponentScan.Filter(type = FilterType.ANNOTATION, value = {Controller.class})
//})
@ComponentScan("web.api.module.*")
@Import({ SecurityConfig.class })
public class WebConfig extends WebMvcConfigurationSupport {
	
	private static final Logger logger = Logger.getLogger(WebConfig.class);

	public WebConfig(){

	}

	@Bean
	public ViewResolver viewResolver() {
		logger.info("ViewResolver");
		InternalResourceViewResolver viewResolver = new InternalResourceViewResolver();
		viewResolver.setPrefix("/WEB-INF/views/");
		viewResolver.setSuffix(".jsp");
		return viewResolver;
	}

    @Bean
    public MessageSource messageSource() {
    	logger.info("MessageSource");
    	ResourceBundleMessageSource messageSource = new ResourceBundleMessageSource();
    	messageSource.setBasename("config.messages.messages");
    	
    	return messageSource;
    }

    @Bean
    public HandlerAdapter servletHandlerAdapter(){
    	logger.info("HandlerAdapter");
    	return new SimpleServletHandlerAdapter();
    }

    @Bean
    public LocaleChangeInterceptor localeChangeInterceptor(){
    	logger.info("LocaleChangeInterceptor");
    	return new LocaleChangeInterceptor();
    }

    @Bean(name="localeResolver")
    public CookieLocaleResolver cookieLocaleResolver(){
    	logger.info("CookieLocaleResolver");
    	return new CookieLocaleResolver();
    }

	@Bean
	public CsrfIntercepter initializingCsrfInterceptor(){
		logger.info("CsrfIntercepter");
		return new CsrfIntercepter();
	}
    
    /**                                                          
    * 描述 : <注册自定义拦截器>. 
*

<使用方法说明>

* @return */ @Bean public LoginCheckInterceptor initializingInterceptor(){ logger.info("LoginCheckInterceptor"); return new LoginCheckInterceptor(); } /** * 描述 : .
*

<这个比较奇怪,理论上应该是不需要的>

* @return */ @Bean public RequestMappingHandlerMapping requestMappingHandlerMapping() { logger.info("RequestMappingHandlerMapping"); return super.requestMappingHandlerMapping(); } @Override protected void addInterceptors(InterceptorRegistry registry) { // TODO Auto-generated method stub logger.info("addInterceptors start"); registry.addInterceptor(localeChangeInterceptor()); registry.addInterceptor(initializingInterceptor()); // registry.addInterceptor(initializingCsrfInterceptor()); logger.info("addInterceptors end"); } @Bean public HandlerMapping resourceHandlerMapping() { logger.info("HandlerMapping"); return super.resourceHandlerMapping(); } /** * 描述 : <资源访问处理器>.
*

<可以在jsp中使用/static/**的方式访问/WEB-INF/static/下的内容>

* @param registry */ @Override protected void addResourceHandlers(ResourceHandlerRegistry registry) { logger.info("addResourceHandlers"); registry.addResourceHandler("/static/**").addResourceLocations("/WEB-INF/static/"); } /** * 描述 : <异常处理器>.
*

<系统运行时遇到指定的异常将会跳转到指定的页面>

* @return */ @Bean(name="exceptionResolver") public ExceptionResolver simpleMappingExceptionResolver(){ logger.info("ExceptionResolver"); ExceptionResolver simpleMappingExceptionResolver= new ExceptionResolver(); simpleMappingExceptionResolver.setDefaultErrorView("common_error"); simpleMappingExceptionResolver.setExceptionAttribute("exception"); Properties properties = new Properties(); properties.setProperty("java.lang.RuntimeException", "common_error"); simpleMappingExceptionResolver.setExceptionMappings(properties); return simpleMappingExceptionResolver; } /** * 描述 : .
*

<这个比较奇怪,理论上应该是不需要的>

* @return */ @Bean public RequestMappingHandlerAdapter requestMappingHandlerAdapter() { logger.info("RequestMappingHandlerAdapter"); return super.requestMappingHandlerAdapter(); } @Override protected ConfigurableWebBindingInitializer getConfigurableWebBindingInitializer() { logger.info("ConfigurableWebBindingInitializer"); ConfigurableWebBindingInitializer initializer = super.getConfigurableWebBindingInitializer(); return initializer; } }

Hibernate的Entity等同于YII的Model

每个Entity是数据表的一行记录。

public class Main {
    private static final SessionFactory ourSessionFactory;

    static {
        try {
            Configuration configuration = new Configuration();
            //"hibernate.cfg.xml"
            configuration.configure("hibernate.cfg.xml");
            ourSessionFactory = configuration.buildSessionFactory();
        } catch (Throwable ex) {
            throw new ExceptionInInitializerError(ex);
        }
    }

    public static Session getSession() throws HibernateException {
        return ourSessionFactory.openSession();
    }

    public static void main(final String[] args) throws Exception {
        final Session session = getSession();
        try {
            System.out.println("querying all the managed entities...");
            final Map metadataMap = session.getSessionFactory().getAllClassMetadata();
            for (Object key : metadataMap.keySet()) {
                final ClassMetadata classMetadata = (ClassMetadata) metadataMap.get(key);
                final String entityName = classMetadata.getEntityName();
                final Query query = session.createQuery("from " + entityName);
                System.out.println("executing: " + query.getQueryString());
                List list = query.list();
                //列表查询回来的所有记录,观察后续的list变量吧。
                for (Object o : list) {
                    System.out.println("  " + o);
                }
            }
        } finally {
            session.close();
        }
    }
}

CGLib代理模式

CGLib是采用字节码方式注入到程序中的,这种方式就像C++中的Detour库注入汇编代码,从而达到监控函数运行的效果。由于CGLib是采用继承的关系,故它不能代理final类。以下是测试代码。
CglibProxy.java

import org.springframework.cglib.proxy.Enhancer;
import org.springframework.cglib.proxy.MethodInterceptor;
import org.springframework.cglib.proxy.MethodProxy;

import java.lang.reflect.Method;

public class CglibProxy implements MethodInterceptor {

    // private static CglibProxy proxy = new CglibProxy();
    private Enhancer enhancer = new Enhancer();

    public Object getProxy(Class clazz) {
        enhancer.setSuperclass(clazz);// 设置需要创建子类的类
        enhancer.setCallback(this);
        return enhancer.create();// 通过字节码技术动态创建子类实例
    }

    @Override
    public Object intercept(Object arg0, Method arg1, Object[] arg2,
                            MethodProxy arg3) throws Throwable {
        Object result = arg3.invokeSuper(arg0, arg2);
        return result;
    }
}
public class UserServiceImpl{
    public void removeUser(int userId) {
        System.out.println("模拟删除用户:" + userId);
    }
    public void addUser(int userId) {
        // TODO Auto-generated method stub
    }
    public static void main(String[] args) {
        CglibProxy proxy = new CglibProxy();
        UserServiceImpl userService =(UserServiceImpl)proxy.getProxy(UserServiceImpl.class);
        userService.removeUser(7);
    }
}

freemarker在Spring中的View渲染关建过程

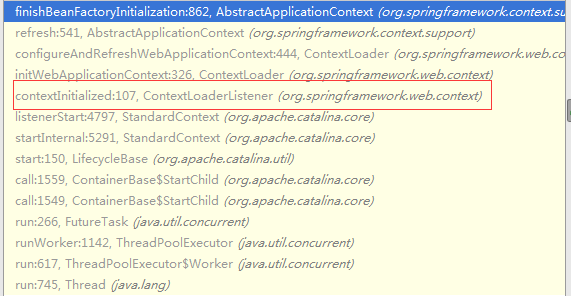
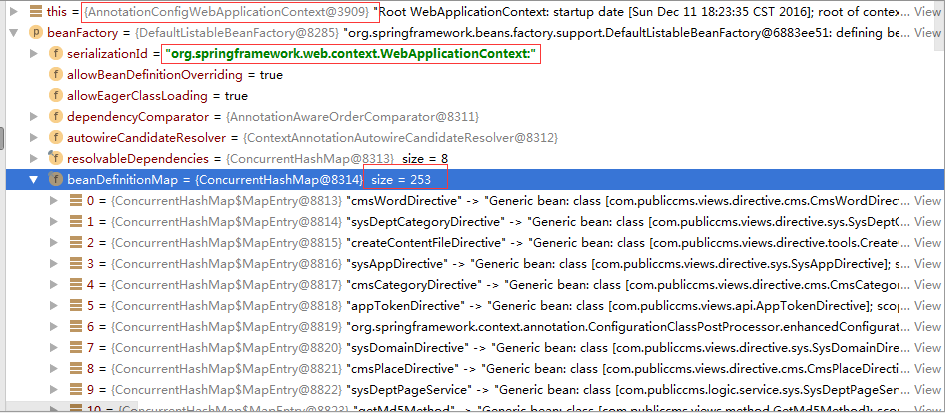
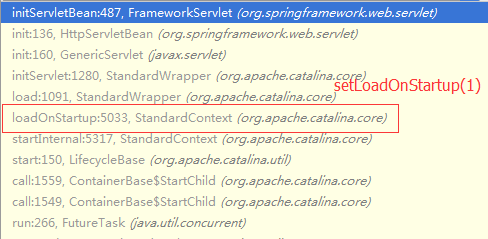
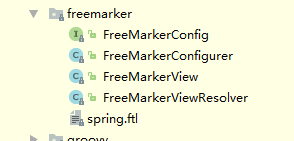
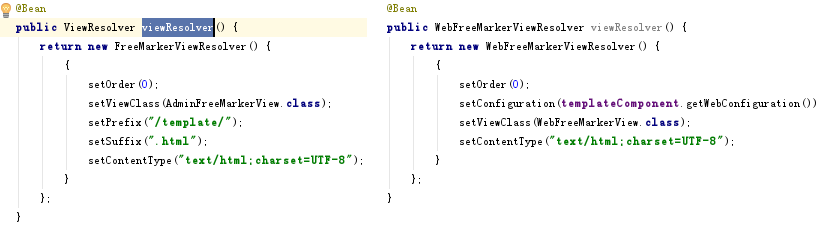
1.Spring已经集成了FreeMarker的相关组件,保存在org.springframework.web.servlet.view.freemarker之下,如下图所示:


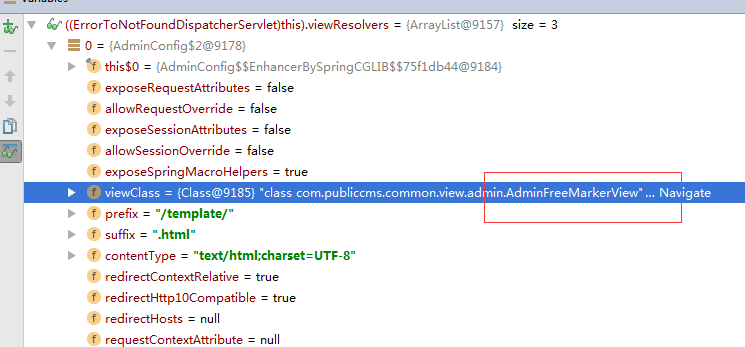
2.在RequestMapping的处理后,是如何关联freemarker视图处理呢?关键在DispatcherServlet类中。

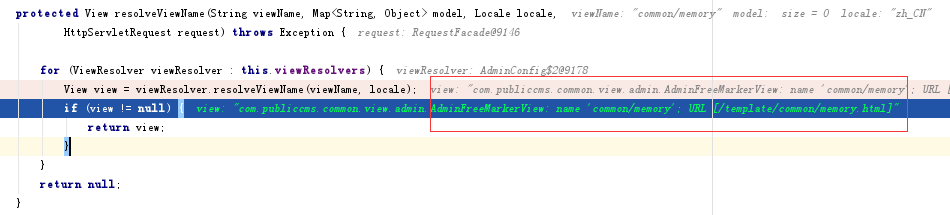
protected View resolveViewName(String viewName, Map model, Locale locale,
			HttpServletRequest request) throws Exception {
	for (ViewResolver viewResolver : this.viewResolvers) {
	  //返回FreeMarkerView对象,保存到view中。
		View view = viewResolver.resolveViewName(viewName, locale);
		if (view != null) {
			return view;
		}
	}
	return null;
}

protected void render(ModelAndView mv, HttpServletRequest request, HttpServletResponse response) throws Exception {
	View view;
	//从requestmapping处理函数返回来后,根据viewname,即相对路径,获取FreeMarkerView对象。
	view = resolveViewName(mv.getViewName(), mv.getModelInternal(), locale, request);
	
	view.render(mv.getModelInternal(), request, response);
}


3.FreeMarkerView负责freemarker的渲染,其关键函数如下:

protected Configuration getConfiguration() {
        //该configuration对象是FreeMarkerConfigurer对象,而后续渲染所需要的资源将是从该configure中获取。 
        //该configuration是FreeMarkerView的成员。
	return this.configuration;
}

protected Template getTemplate(String name, Locale locale) throws IOException {
        //在getTimplate的过程中,configuration对象,也被传递到Template中,方便后续
        //构建Environment对象使用如template.getConfiguration();
	return (getEncoding() != null ?
			getConfiguration().getTemplate(name, locale, getEncoding()) :
			getConfiguration().getTemplate(name, locale));
}

protected Template getTemplate(Locale locale) throws IOException {
  //通过getUrl获
	return getTemplate(getUrl(), locale);
}
	
protected void doRender(Map model, HttpServletRequest request, HttpServletResponse response) throws Exception {

	SimpleHash fmModel = buildTemplateModel(model, request, response);

	Locale locale = RequestContextUtils.getLocale(request);
	processTemplate(getTemplate(locale), fmModel, response);
}


4.它是如何把每个freemarker的指令存放到configure中的呢?如下:

@Autowired(required = false)
private void TemplateComponent::setFreeMarkerConfigurer(FreeMarkerConfigurer freeMarkerConfigurer,
		Map taskDirectiveMap,
		Map templateDirectiveMap, Map methodMap)
		throws IOException, TemplateModelException {
	Map freemarkerVariables = new HashMap();
	adminConfiguration = freeMarkerConfigurer.getConfiguration();
	log.info("Freemarker directives and methods Handler started");

	//根据自定义命名规则,建立命名列表。
	StringBuffer templateDirectives = new StringBuffer();
	for (Entry entry : templateDirectiveMap.entrySet()) {
		String directiveName = directivePrefix
				+ uncapitalize(entry.getKey().replaceAll(directiveRemoveRegex, BLANK));
		freemarkerVariables.put(directiveName, entry.getValue());
		if (0 != templateDirectives.length()) {
			templateDirectives.append(COMMA_DELIMITED);
		}
		templateDirectives.append(directiveName);
	}
	StringBuffer methods = new StringBuffer();
	for (Entry entry : methodMap.entrySet()) {
		String methodName = uncapitalize(entry.getKey().replaceAll(methodRemoveRegex, BLANK));
		freemarkerVariables.put(methodName, entry.getValue());
		if (0 != methods.length()) {
			methods.append(COMMA_DELIMITED);
		}
		methods.append(methodName);
	}
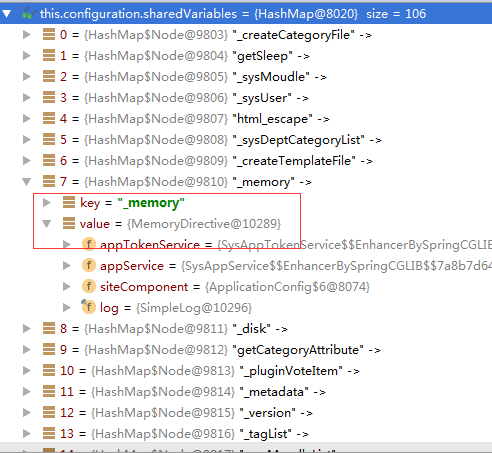
	//将命名列表和bean对象一一对应地保存到configuration中。
	adminConfiguration.setAllSharedVariables(new SimpleHash(freemarkerVariables, adminConfiguration.getObjectWrapper()));
}

public void Configuration::setAllSharedVariables(TemplateHashModelEx hash) throws TemplateModelException {
    TemplateModelIterator keys = hash.keys().iterator();
    TemplateModelIterator values = hash.values().iterator();

    while(keys.hasNext()) {
        //逐个将自定义命令和对应的bean实例,以一一对应方式保存到Configure的sharedVariable成员中。
        //_memory与MemoryDirective
        this.setSharedVariable(((TemplateScalarModel)keys.next()).getAsString(), values.next());
    }
}


5.它是如何处理模板呢?

protected void FreeMarkerView::processTemplate(Template template, SimpleHash model, HttpServletResponse response)
		throws IOException, TemplateException {

	template.process(model, response.getWriter());
}

public Template::Environment(Template template, TemplateHashModel rootDataModel, Writer out) {
    super(template);
    //模板中取出configuration,configuration已经包括各种模板扩展的自定义指令。
    this.configuration = template.getConfiguration();
    this.globalNamespace = new Environment.Namespace((Template)null);
    this.currentNamespace = this.mainNamespace = new Environment.Namespace(template);
    this.out = out;
    this.rootDataModel = rootDataModel;
    //分析模板结构,构建出指令树。
    this.importMacros(template);
}

public Environment Template::createProcessingEnvironment(Object dataModel, Writer out, ObjectWrapper wrapper) throws TemplateException, IOException {    
    return new Environment(this, (TemplateHashModel)dataModelHash, out);
}

//递归式,处理每一个自定义指令。
void Environment::visit(TemplateElement element) throws IOException, TemplateException {
    this.pushElement(element);
    try {
        //element.accept就是自定义指令的执行过程,如它会调用MemoryDirective。
        TemplateElement[] te = element.accept(this);
        if(te != null) {
            TemplateElement[] var3 = te;
            int var4 = te.length;

            for(int var5 = 0; var5 < var4; ++var5) {
                TemplateElement el = var3[var5];
                if(el == null) {
                    break;
                }

                this.visit(el);
            }
        }
    } catch (TemplateException var10) {
        this.handleTemplateException(var10);
    } finally {
        this.popElement();
    }
}
//从Root节点开始,处理自定义模板指令。
public void Environment::process() throws TemplateException, IOException {
	this.visit(this.getTemplate().getRootTreeNode());
}

public void Template::process(Object dataModel, Writer out) throws TemplateException, IOException {
    //this.createProcessingEnvironment(dataModel, out, (ObjectWrapper)null),返回的是Environment对象。
    this.createProcessingEnvironment(dataModel, out, (ObjectWrapper)null).process();
}

6.每个模块执行过程:element.accept(this))最终会调用以下代码。

@Component
public class MemoryDirective extends AbstractTemplateDirective {
    @Override
    public void execute(RenderHandler handler) throws IOException, Exception {
        Runtime runtime = Runtime.getRuntime();
        handler.put("freeMemory", runtime.freeMemory());
        handler.put("totalMemory", runtime.totalMemory());
        handler.put("maxMemory", runtime.maxMemory());
        handler.render();
    }
}

在Spring中获取当前所有beanmap和某特定beanmap记录集

@Component
public class MyControllerSet {

    @Autowired()
    public void setAllBeanObject2(Map objs, Map ctrls)
    {
        //objs和ctrls会分别返回所以的beanmap对象和BaseControler对象,看后图示。
        int i = 0;
    }
}
public abstract class BaseControler {
}
-------------------------------
@Controller
@RequestMapping("/demo")
public class DemoController extends BaseControler{
    private static final Logger logger = Logger.getLogger(DemoController.class);
}
--------------------------------
@Controller
public class ExampleController  extends BaseControler{
}


git历史commit修改

修改最后一次提交记录。

git commit --amend

——————————————-
修改最近第N次记录。
1.rebase到需要修改的注释

$ git rebase -i HEAD~5

2.显示形式如下:

pick e0b2e6e [PLCS#1201612060035]for: 增加异常处理dfdsfsdfsdfdsfjkksdjfs
pick 4df06f8 [PLCS#1201612060035]for: [PLCS#1201612060035]for: 增加了与

如果显示有错误如下,则需要按提示执行 git stash。

Cannot rebase: You have unstaged changes.
Please commit or stash them.

3.使用vi命令,把pick字符串修改为edit,并保存。

pick e0b2e6e [PLCS#1201612060035]for: 增加异常处理dfdsfsdfsdfdsfjkksdjfs
edit 4df06f8 [PLCS#1201612060035]for: [PLCS#1201612060035]for: 增加了与

4.再次执行以下命令

git commit --amend

5.修改好注释后。执行以下命令,完成注释修改。

git rebase --continue

6.git log检查。

Spring免配置启动过程

1.启动时,tomcat调用SpringServletContainerInitializer的onStartup函数,传当前可被调用的启动类。

public void onStartup(Set> webAppInitializerClasses, ServletContext servletContext){
   	for (Class waiClass : webAppInitializerClasses) {
		// Be defensive: Some servlet containers provide us with invalid classes,
		// no matter what @HandlesTypes says...
		if (!waiClass.isInterface() && !Modifier.isAbstract(waiClass.getModifiers()) &&
				WebApplicationInitializer.class.isAssignableFrom(waiClass)) {
			try {
				initializers.add((WebApplicationInitializer) waiClass.newInstance());
			}
			catch (Throwable ex) {
				throw new ServletException("Failed to instantiate WebApplicationInitializer class", ex);
			}
		}
	}
	for (WebApplicationInitializer initializer : initializers) {
		initializer.onStartup(servletContext);
	}
}


2.如果有RootConfigClasses配置,则会注册ContextLoaderListener,如AdminInitializer类,多个AbstractAnnotationConfigDispatcherServletInitializer中,有且仅有一个可以配置RootConfigClasses,其余的如果配置了则会抛异常。

AdminInitializer类的Root配置。
protected Class[] getRootConfigClasses() {
        return new Class[] { ApplicationConfig.class };
    }
WebInitializer和ApiInitializer都是返回null.
protected Class[] getRootConfigClasses() {
        return null;
    }
protected void registerContextLoaderListener(ServletContext servletContext) {
	WebApplicationContext rootAppContext = createRootApplicationContext();
	if (rootAppContext != null) {
		ContextLoaderListener listener = new ContextLoaderListener(rootAppContext);
		listener.setContextInitializers(getRootApplicationContextInitializers());
                //在onStartUp函数结束后,Tomcat会主动调ContextLoaderListener类的contextInitialized函数。
		servletContext.addListener(listener);
	}
	else {
		logger.debug("No ContextLoaderListener registered, as " +
				"createRootApplicationContext() did not return an application context");
	}
}

3.创建DispatcherServlet对象并注册。setLoadOnStartup(1)参数为1,表示Tomcat在执行完ContextLoaderListener的相关beanmap处理后,将依次调用Servlet的loadOnStartup函数。

protected void registerDispatcherServlet(ServletContext servletContext) {
	FrameworkServlet dispatcherServlet = createDispatcherServlet(servletAppContext);
	ServletRegistration.Dynamic registration = servletContext.addServlet(servletName, dispatcherServlet);
	//setLoadOnStartup(1),将继ContextLoaderListener之后被调用。
	registration.setLoadOnStartup(1);
	registration.addMapping(getServletMappings());
	registration.setAsyncSupported(isAsyncSupported());
}

4.经上述三个步骤,程序将会返回至Tomcat内部,至此完成了onStartup的调用。该过程Tomcat只是完成了HttpServlet的注册和ContextLoaderListener的注册,而beanFactory扫描Controller/Service/Conponent/Repository注解建立beanmap及相应的单实例,以及涉及到的Controller的成员注入,仍没有开始。
5.因为是异步调用的关系,Tomcat接着调用ContextLoaderListener完成WebApplicationContext配置。

public WebApplicationContext initWebApplicationContext(ServletContext servletContext) {
	if (servletContext.getAttribute(WebApplicationContext.ROOT_WEB_APPLICATION_CONTEXT_ATTRIBUTE) != null) {
	  //这段异常,表示有且只有一个getRootConfigClasses函数能被返回全局配置。其它均会共享使用它的全局beanmap。
		throw new IllegalStateException(
				"Cannot initialize context because there is already a root application context present - " +
				"check whether you have multiple ContextLoader* definitions in your web.xml!");
	}
	try {
		if (this.context instanceof ConfigurableWebApplicationContext) {
			ConfigurableWebApplicationContext cwac = (ConfigurableWebApplicationContext) this.context;
			if (!cwac.isActive()) {
			  //将扫描指定的目录下的所有Component组件,并形成beanmap,并依据autowired注解自动完成每一个bean对象的单实例化。
				configureAndRefreshWebApplicationContext(cwac, servletContext);
			}
		}
                //保存到servletContext的属性中,方便后续DispatcherContext的bean调用及合并。
		servletContext.setAttribute(WebApplicationContext.ROOT_WEB_APPLICATION_CONTEXT_ATTRIBUTE, this.context);
		return this.context;
	}
	catch (RuntimeException ex) {
		logger.error("Context initialization failed", ex);
		servletContext.setAttribute(WebApplicationContext.ROOT_WEB_APPLICATION_CONTEXT_ATTRIBUTE, ex);
		throw ex;
	}
	catch (Error err) {
		logger.error("Context initialization failed", err);
		servletContext.setAttribute(WebApplicationContext.ROOT_WEB_APPLICATION_CONTEXT_ATTRIBUTE, err);
		throw err;
	}
}


6.因为setLoadOnStartup的关系,Tomcat调用Servlet的bean初始化。

protected final void initServletBean() throws ServletException {
	getServletContext().log("Initializing Spring FrameworkServlet '" + getServletName() + "'");
	if (this.logger.isInfoEnabled()) {
		this.logger.info("FrameworkServlet '" + getServletName() + "': initialization started");
	}
	long startTime = System.currentTimeMillis();

	try {
	  //此处是initWebAppicationContext与5步骤中的initWebApplicationContext不是同一个函数。
	  //但函数的用途是一致的,都是用于依据bean配置构建beanmap及单实例化。
	  //此处的配置文件是由getServletConfigClasses提供。
		this.webApplicationContext = initWebApplicationContext();
		initFrameworkServlet();
	}
	catch (ServletException ex) {
		this.logger.error("Context initialization failed", ex);
		throw ex;
	}
	catch (RuntimeException ex) {
		this.logger.error("Context initialization failed", ex);
		throw ex;
	}

	if (this.logger.isInfoEnabled()) {
		long elapsedTime = System.currentTimeMillis() - startTime;
		this.logger.info("FrameworkServlet '" + getServletName() + "': initialization completed in " +
				elapsedTime + " ms");
	}
}

protected WebApplicationContext initWebApplicationContext() {
  //获取getRootConfigClasses设置的全局配置,由此可知每个DispatchServlet对象均会继承全局Root配置。
	WebApplicationContext rootContext =
			WebApplicationContextUtils.getWebApplicationContext(getServletContext());
	WebApplicationContext wac = null;

	if (this.webApplicationContext != null) {
		// A context instance was injected at construction time -> use it
		wac = this.webApplicationContext;
		if (wac instanceof ConfigurableWebApplicationContext) {
			ConfigurableWebApplicationContext cwac = (ConfigurableWebApplicationContext) wac;
			if (!cwac.isActive()) {
				// The context has not yet been refreshed -> provide services such as
				// setting the parent context, setting the application context id, etc
				if (cwac.getParent() == null) {
					// The context instance was injected without an explicit parent -> set
					// the root application context (if any; may be null) as the parent
					cwac.setParent(rootContext);
				}
				//和Root配置一样的搜索过程,建立DispatchServlet的beanmap列表。
				configureAndRefreshWebApplicationContext(cwac);
			}
		}
	}
	
	if (!this.refreshEventReceived) {
		// Either the context is not a ConfigurableApplicationContext with refresh
		// support or the context injected at construction time had already been
		// refreshed -> trigger initial onRefresh manually here.
		onRefresh(wac);
	}

	return wac;
}

7.到这步骤,已经完成Spring的初始化进程了,如果不报错的话,应该可以访问网站了。

摘:spring中DispatcherServlet、WebApplicationContext、ServletContext之间的关系

  1. 首先,对于一个web应用,其部署在web容器中,web容器提供其一个全局的上下文环境,这个上下文就是ServletContext,其为后面的spring IoC容器提供宿主环境;
  2. 其次,在web.xml中会提供有contextLoaderListener。在web容器启动时,会触发容器初始化事件,此时contextLoaderListener会监听到这个事件,其contextInitialized方法会被调用,在这个方法中,spring会初始化一个启动上下文,这个上下文被称为根上下文,即WebApplicationContext,这是一个接口类,确切的说,其实际的实现类是XmlWebApplicationContext。这个就是spring的IoC容器,其对应的Bean定义的配置由web.xml中的context-param标签指定。在这个IoC容器初始化完毕后,spring以WebApplicationContext.ROOTWEBAPPLICATIONCONTEXTATTRIBUTE为属性Key,将其存储到ServletContext中,便于获取;
  3. 再次,contextLoaderListener监听器初始化完毕后,开始初始化web.xml中配置的Servlet,这个servlet可以配置多个,以最常见的DispatcherServlet为例,这个servlet实际上是一个标准的前端控制器,用以转发、匹配、处理每个servlet请求。DispatcherServlet上下文在初始化的时候会建立自己的IoC上下文,用以持有spring mvc相关的bean。在建立DispatcherServlet自己的IoC上下文时,会利用WebApplicationContext.ROOTWEBAPPLICATIONCONTEXTATTRIBUTE先从ServletContext中获取之前的根上下文(即WebApplicationContext)作为自己上下文的parent上下文。有了这个parent上下文之后,再初始化自己持有的上下文。这个DispatcherServlet初始化自己上下文的工作在其initStrategies方法中可以看到,大概的工作就是初始化处理器映射、视图解析等。这个servlet自己持有的上下文默认实现类也是mlWebApplicationContext。初始化完毕后,spring以与servlet的名字相关(此处不是简单的以servlet名为Key,而是通过一些转换,具体可自行查看源码)的属性为属性Key,也将其存到ServletContext中,以便后续使用。这样每个servlet就持有自己的上下文,即拥有自己独立的bean空间,同时各个servlet共享相同的bean,即根上下文(第2步中初始化的上下文)定义的那些bean。