月度归档:2015年01月

scrapyd的调试

关于scrapyd的调试,真有一种是”踏破铁鞋无觅处,得来全不费功夫的感觉”,现记录全过程。

第一种方法:


第二种方法:

from twisted.scripts.twistd import run

from os.path import join, dirname

from sys import argv

import scrapyd

argv[1:1] = [‘-n’, ‘-y’, join(dirname(scrapyd.__file__), ‘txapp.py’)]

run()

然后调试该main.py,即得结果。

开源的网站漏洞扫描器

Golismero

官网:http://www.golismero.com/

Golismero是一款开源的Web扫描器,它不但自带不少的安全测试工具,而且还可导入分析市面流行的扫描工具的结果,比如Openvas,Wfuzz, SQLMap, DNS recon等,并自动分析。Golismero采用插件形式的框架结构,由纯python编写,并集成了许多开源的安全工具,可以运行在Windows,Linux, BSD,OS X等系统上,几乎没有系统依赖性,唯一的要求就是python的版本不低于2.7,其官网是:http://golismero-project.com。

Centos开发环境安装快速命令

快捷命令(Centos7环境特别建议该方式,因为gcc是4.8.5,gdb是7.6.1):

yum groupinstall ‘Development Tools’


你也可以这样:

yum -y install firefox gcc gcc-c++ autoconf automake gdb git perl svn libtool flex bison pkgconfig vim subversion git lrzsz openssl curl wget curl p7zip mysql openssl-devel mysql-server mysql-devel zlib-devel curl-devel

yum install -y python-devel libxml2-devel libxslt-devel python-lxml sqlite-devel libffi-devel openssl-devel mysql-server mysql-devel zlib-devel curl-devel

消除allowed_domains的影响

在使用scrapy genspider xxx xxx.yyy时指定了一个域名,而这些域名将会记录在相应的spider中的allowed_domains参数中,这些参数会影响我们使用动态url捕获网站源码。因为在爬行某网站时,就会进使用这个域名进行判断爬行的url是否为合法的url,如果不是对应的url就会自动终止爬行。所以如果你要使用一个爬虫爬所有不同网站时,就需要屏蔽这个参数的影响。

Python单线程异步执行所有任务

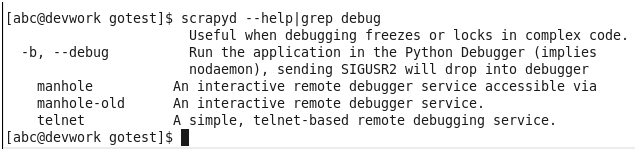
经过测试和源码分析,证实scrapy是单线程异步模式进行工作。

start t = 1421317312.693043 thread id <property object at 0x7faab1e4be10>, http://www.baidu.com/1

end t = 1421317312.693043 thread id <property object at 0x7faab1e4be10>, http://www.baidu.com/1

2015-01-15 02:21:52-0800 [dmoz] DEBUG: Crawled (200) <GET http://www.baidu.com/1> (referer: None)

2015-01-15 02:21:52-0800 [dmoz] DEBUG: Crawled (200) <GET http://www.baidu.com/2> (referer: None)

start t = 1421317312.697041 thread id <property object at 0x7faab1e4be10>, http://www.baidu.com/2

end t = 1421317312.697041 thread id <property object at 0x7faab1e4be10>, http://www.baidu.com/2

xxxxxxxxxxxxxxxxxxxxxxxxxxx

————parse t = 1421317312.699310 thread id <property object at 0x7faab1e4be10>, http://www.baidu.com/1

start t = 1421317370.153754 thread id <property object at 0x7faab1e4be10>, http://www.baidu.com/3

end t = 1421317370.153754 thread id <property object at 0x7faab1e4be10>, http://www.baidu.com/3

————parse t = 1421317370.156391 thread id <property object at 0x7faab1e4be10>, http://www.baidu.com/2

2015-01-15 02:22:50-0800 [dmoz] DEBUG: Crawled (200) <GET http://www.baidu.com/3> (referer: None)

start t = 1421317370.171718 thread id <property object at 0x7faab1e4be10>, http://www.baidu.com/4

end t = 1421317370.171718 thread id <property object at 0x7faab1e4be10>, http://www.baidu.com/4

————parse t = 1421317370.175629 thread id <property object at 0x7faab1e4be10>, http://www.baidu.com/3

2015-01-15 02:22:50-0800 [dmoz] DEBUG: Crawled (200) <GET http://www.baidu.com/4> (referer: None)

start t = 1421317370.194542 thread id <property object at 0x7faab1e4be10>, http://www.baidu.com/5

end t = 1421317370.194542 thread id <property object at 0x7faab1e4be10>, http://www.baidu.com/5

————parse t = 1421317370.197380 thread id <property object at 0x7faab1e4be10>, http://www.baidu.com/4

2015-01-15 02:22:50-0800 [dmoz] DEBUG: Crawled (200) <GET http://www.baidu.com/5> (referer: None)

start t = 1421317370.213179 thread id <property object at 0x7faab1e4be10>, http://www.baidu.com/6

end t = 1421317370.213179 thread id <property object at 0x7faab1e4be10>, http://www.baidu.com/6

————parse t = 1421317370.216034 thread id <property object at 0x7faab1e4be10>, http://www.baidu.com/5

2015-01-15 02:22:50-0800 [dmoz] DEBUG: Crawled (200) <GET http://www.baidu.com/6> (referer: None)

start t = 1421317370.230415 thread id <property object at 0x7faab1e4be10>, http://www.baidu.com/7

end t = 1421317370.230415 thread id <property object at 0x7faab1e4be10>, http://www.baidu.com/7

————parse t = 1421317370.233487 thread id <property object at 0x7faab1e4be10>, http://www.baidu.com/6

2015-01-15 02:22:50-0800 [dmoz] DEBUG: Crawled (200) <GET http://www.baidu.com/7> (referer: None)

start t = 1421317370.249530 thread id <property object at 0x7faab1e4be10>, http://www.baidu.com/8

end t = 1421317370.249530 thread id <property object at 0x7faab1e4be10>, http://www.baidu.com/8

————parse t = 1421317370.252307 thread id <property object at 0x7faab1e4be10>, http://www.baidu.com/7

C++开源推荐

迷你嵌入式Javascript引擎,在项目中引用简单,在手机类项目使用更好。

http://www.duktape.org/


貌似为duiengine的升级版,duiengine是基于原金山开源界面改造而来,现有一伙志同道合的基友在维护,是国内开源的兴幸

http://code.taobao.org/svn/soui2/trunk


腾迅大讲堂

http://djt.qq.com/

http://djt.qq.com/ppts/全是PPT文档,价值较高。

中文字符写文件失败解决办法

在python中虽然已经在py文件头中已经加入编码文件标识,但在写文件时,仍然是报失败的。

报错如下:

据网络大牛说,这类报错只发生在python2.7.x版本上,而2.6和3.x都没有问题,而我一般在2.7.x下开发,所以仍是要解决这类问题。

解决办法也简单,如下:

在程序入口的地方设置默认字符串编码为utf-8即可。

import sys

reload(sys) #

sys.setdefaultencoding(‘utf-8’)

网上的更详细解释:

解决pycurl安装错误

由于libcurl的源码编译因素,在安装pycurl可能会导致以下两种错误。

错误1

ImportError: pycurl: libcurl link-time ssl backend (openssl) is different from compile-time ssl backend (none/other)

错误2

ImportError: pycurl: libcurl link-time ssl backend (nss) is different from compile-time ssl backend (openssl)

解决办法:

错误1的解决办法如下:

# pip uninstall pycurl

# export PYCURL_SSL_LIBRARY=openssl

# pip install pycurl

错误2的解决办法如下:

# pip uninstall pycurl

# export PYCURL_SSL_LIBRARY=nss

# pip install pycurl


以下是网上一些更详细的解决办法

pip uninstall pycurl

export PYCURL_SSL_LIBRARY=[nss|openssl|ssl|gnutls]

pip install pycurl

#xor

curl -O https://pypi.python.org/packages/source/p/pycurl/pycurl-7.19.3.1.tar.gz

#...

python setup.py --with-[nss|openssl|ssl|gnutls] install


HBase的python开发

关于HBase在python上的开发环境配置和测试,在网上虽然有较多的描述,但描述的得太简单,再者很多初学者第一次接触hbase+hdfs这种大数据架构时,可能还没有走到测试这步,就已经累死在集群配置上了,为此想在进行测试相关功能前,本人简单的总结一下,自已遇到的问题以及解决办法。

  1. 选择合适的兼容的版本,关于版本的兼容性问题,请参照以下官方网址:

    https://hbase.apache.org/book/configuration.html#hadoop

    选择合适配置参考教程,本人在配置过程中耗费很多时间,原因就是教程选择,不是选择错了,就是选择得太简单,从而导致无法正确运行集群,本人为此分享个网盘资源(网盘http://pan.baidu.com/s/1c0haT9I),以供参考。

    免密码登录配置:此为集群必须设置的第一步。原因是启动集群时,在各集群的主处理器调用xxx.sh文件,会间接调用ssh命令登录从处理器,有空的人仔细可以分析一下各.sh的配置文件的关系,本人以hbase的配置文件简单描述一下调用顺序关系。

    Start-hbase.sh调用hbase-daemons.sh,然后hbase-daemons.sh又调用zookeepers.sh和regionservers.sh以及master-backup.sh配置文件,在这三个文件中,就会调用ssh命令登录从处理器,如图所示。

    Hdfs的配置文件调用关系和hbase的类似。


    安装顺序:先是安装Hadoop,然后是HBase。依照网盘的教程,配置集群。请注意配置Hadoop1和Hadoop2是有差别的,两种配置不要混淆。

    网盘http://pan.baidu.com/s/1c0haT9I

  2. 配置完成后,使用Hbase shell命令进行测试时,可能会报一些奇怪的错误如下图为其中一种表现情况

    这问题主要是Hadoop的扩展库和HBase的扩展库,使用了不同版本导致,一般情况下使用较新的版本替换旧的版本。

——————————————————————————————————-

现在开始描述python的环境配置。

  1. 安装thrift库,有两种方法。

    方法一:yum install thrift.

    方法二:下载thrift源码编译安装,此方法较复杂,网上也有很多介绍,本人也尝试了好几次,才正确编译出来。

  2. 生成hbase库,也有两种方法。

    方法一:直接使用现成的,这方法是本人偶然发现hbase的源代码的example目录下发现的。

         检查hbase的源目录

         hbase-0.98.9\hbase-examples\src\main\python\thrift1\gen-by

         hbase-0.98.9\hbase-examples\src\main\python\thrift2\gen-by

    方法二:使用thrift源码编译出来的thrift执行文件,然后进入hbase的源码目录,按以下命令生成

         cd hbase-0.98.9\hbase-thrift\src\main\resources\org\apache\hadoop\hbase\thrift && thrift –gen py Hbase.thrift

    或cd hbase-0.98.9\hbase-thrift\src\main\resources\org\apache\hadoop\hbase\thrift2 &&
    thrift –gen py hbase.thrift

  3. 实例测试

    网盘http://pan.baidu.com/s/1c0haT9I,解压example文件,有如下文件:

    严格按照以下顺序启动集群和测试,否则有可能会出现连接不通问题。

    启动hadoop集群:start-all.sh

    启动hbase集群: start-hbase.sh

    启动thrift1服务端:hbase-daemon.sh start thrift,进行测试thrift1和thrift3例子。

    启动thrift2服务端:hbase-daemon.sh start thrift2,进行测试thrift2的例子。

    注:thrift默认的监听端口是9090,如果thrift的端口被占用,可以用netstat -tunlp | grep 9090进行检查端口被谁占用