—–
keystone.js是一个基于express&mongodb的cms框架。
https://github.com/keystonejs/keystone
—–
DoraCMS是基于Nodejs+express+mongodb编写的一套内容管理系统,结构简单,较目前一些开源的cms,doracms易于拓展,特别适合前端开发工程师做二次开发。
https://github.com/doramart/DoraCMS
作者归档:xinlu
egg.js的例子
egg.js的node.js要求必须要8以上。
https://eggjs.org/zh-cn/intro/quickstart.html
———————–
https://github.com/cnodejs/egg-cnode
———————————–
基于 Egg + Vue + Webpack 多页面和单页面服务端客户端渲染同构工程骨架项目
https://github.com/hubcarl/egg-vue-webpack-boilerplate
基于Egg + React + Webpack 多页面和单页面服务端渲染同构工程骨架项目
https://github.com/hubcarl/egg-react-webpack-boilerplate
微信小程序社区全栈解决方案
https://github.com/seasonstar/egg-24time
EggJS+Mysql+sequelize+Bootstrap 搭建Blog管理系统
https://github.com/adamchenjiawei/eggJs-Blog
搭建基于Egg.js的基本网站
https://github.com/accforgit/douban-by-Egg
cAdvisor的单机监控
cAdvisor是谷哥提供的一款单机docker运行监测工具,包括CPU、内存、网络等,缺点是监控的时间段只在几分钟,没有历史查询及持久化的能力,简单查看一下没有问题,如果要用于企业级监控还是使用grafana+elk这类。
简单的测试命令如下,可以直接看到输出log,结束后,仍可以docker start mytest直接启动:
docker run --name mytest  -p 8080:8080 -v /var/run:/var/run:rw -v /:/rootfs:ro -v /sys:/sys:ro -v /var/lib/docker/:/var/lib/docker:ro  google/cadvisor:latest
-------
也可以使用docker-compose.yml配置来启动,如下:。
version: '3'
services:
  cadvisor:
    ## Image
    build: cadvisor
    ##image: google/cadvisor:v0.27.1

    ## Base
    privileged: false
    restart: always
    container_name: cadvisor
    hostname: ${ACADVISOR_HOSTNAME}
    command: -storage_driver=influxdb -storage_driver_db=${ACADVISOR_DB} -storage_driver_host=${INFLUXBD_SERVER_IP}:${INFLUXDB_SERVER_PORT}

    ## Network
    #network_mode: host
    #expose:
    ports:
      - "8080:8080"
    #depends_on:
    #link:

    ## Storage
    volumes:
      - /etc/localtime:/etc/localtime:ro
      - /etc/timezone:/etc/timezone:ro
      - /:/rootfs:ro
      - /var/run:/var/run:rw
      - /sys:/sys:ro
      - /var/lib/docker/:/var/lib/docker:ro

    ## Env
    environment:
      - SERVICE_IGNORE=true
如果遇到无法启动,则可以直接用以下命令,检查日志输出结果。
docker logs mytest
————————
如果报错如下:
[abc@localhost ~]$ docker logs mytest
I0501 02:01:54.006051       1 storagedriver.go:50] Caching stats in memory for 2m0s
I0501 02:01:54.006344       1 manager.go:151] cAdvisor running in container: "/sys/fs/cgroup/cpuacct,cpu"
I0501 02:01:54.037279       1 fs.go:139] Filesystem UUIDs: map[]
I0501 02:01:54.037305       1 fs.go:140] Filesystem partitions: map[shm:{mountpoint:/dev/shm major:0 minor:79 fsType:tmpfs blockSize:0} tmpfs:{mountpoint:/dev major:0 minor:82 fsType:tmpfs blockSize:0} /dev/mapper/cl-root:{mountpoint:/var/lib/docker major:253 minor:0 fsType:xfs blockSize:0} /dev/sda1:{mountpoint:/rootfs/boot major:8 minor:1 fsType:xfs blockSize:0}]
I0501 02:01:54.039141       1 manager.go:225] Machine: {NumCores:2 CpuFrequency:2807689 MemoryCapacity:3958325248 HugePages:[{PageSize:1048576 NumPages:0} {PageSize:2048 NumPages:0}] MachineID:fef8b2542f22422eaf1adab44a0cd5f2 SystemUUID:F91D4D56-9CDF-2AB7-E229-52E12085A954 BootID:7a90ab7b-3915-4615-ab38-3df3c3824a4e Filesystems:[{Device:overlay DeviceMajor:0 DeviceMinor:78 Capacity:39700664320 Type:vfs Inodes:19394560 HasInodes:true} {Device:tmpfs DeviceMajor:0 DeviceMinor:82 Capacity:1979162624 Type:vfs Inodes:483194 HasInodes:true} {Device:/dev/mapper/cl-root DeviceMajor:253 DeviceMinor:0 Capacity:39700664320 Type:vfs Inodes:19394560 HasInodes:true} {Device:/dev/sda1 DeviceMajor:8 DeviceMinor:1 Capacity:1063256064 Type:vfs Inodes:524288 HasInodes:true} {Device:shm DeviceMajor:0 DeviceMinor:79 Capacity:67108864 Type:vfs Inodes:483194 HasInodes:true}] DiskMap:map[253:0:{Name:dm-0 Major:253 Minor:0 Size:39720058880 Scheduler:none} 253:1:{Name:dm-1 Major:253 Minor:1 Size:2147483648 Scheduler:none} 8:0:{Name:sda Major:8 Minor:0 Size:42949672960 Scheduler:deadline}] NetworkDevices:[{Name:br-00027b44406b MacAddress:02:42:58:af:8f:6a Speed:0 Mtu:1500} {Name:ens33 MacAddress:00:0c:29:85:a9:54 Speed:1000 Mtu:1500}] Topology:[{Id:0 Memory:4294365184 Cores:[{Id:0 Threads:[0] Caches:[]} {Id:1 Threads:[1] Caches:[]}] Caches:[{Size:6291456 Type:Unified Level:3}]}] CloudProvider:Unknown InstanceType:Unknown InstanceID:None}
I0501 02:01:54.040527       1 manager.go:231] Version: {KernelVersion:3.10.0-514.el7.x86_64 ContainerOsVersion:Alpine Linux v3.4 DockerVersion:1.13.1 DockerAPIVersion:1.26 CadvisorVersion:v0.28.3 CadvisorRevision:1e567c2}
I0501 02:01:54.057139       1 factory.go:356] Registering Docker factory
I0501 02:01:56.058709       1 factory.go:54] Registering systemd factory
I0501 02:01:56.060014       1 factory.go:86] Registering Raw factory
I0501 02:01:56.061514       1 manager.go:1178] Started watching for new ooms in manager
W0501 02:01:56.061593       1 manager.go:313] Could not configure a source for OOM detection, disabling OOM events: open /dev/kmsg: no such file or directory
I0501 02:01:56.078795       1 manager.go:329] Starting recovery of all containers
I0501 02:01:56.156028       1 manager.go:334] Recovery completed
F0501 02:01:56.156054       1 cadvisor.go:156] Failed to start container manager: inotify_add_watch /sys/fs/cgroup/cpuacct,cpu: no such file or directory
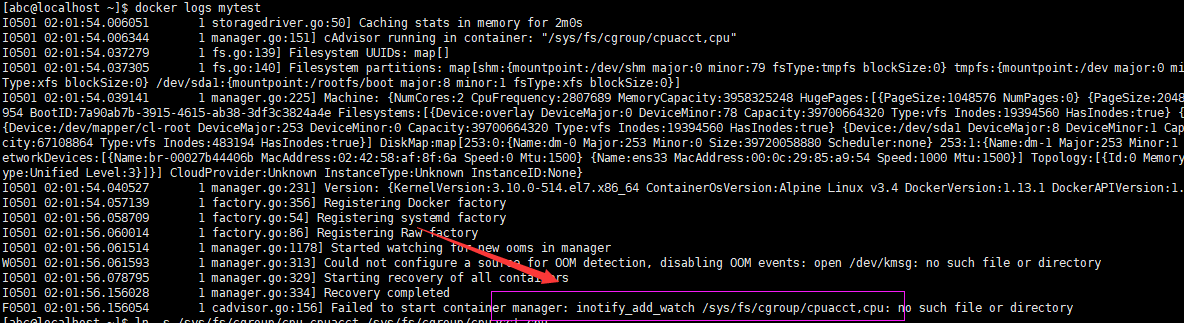
这是谷歌的新版bug,需要如下解决
mount -o remount,rw '/sys/fs/cgroup'
ln -s /sys/fs/cgroup/cpu,cpuacct /sys/fs/cgroup/cpuacct,cpu
————————-
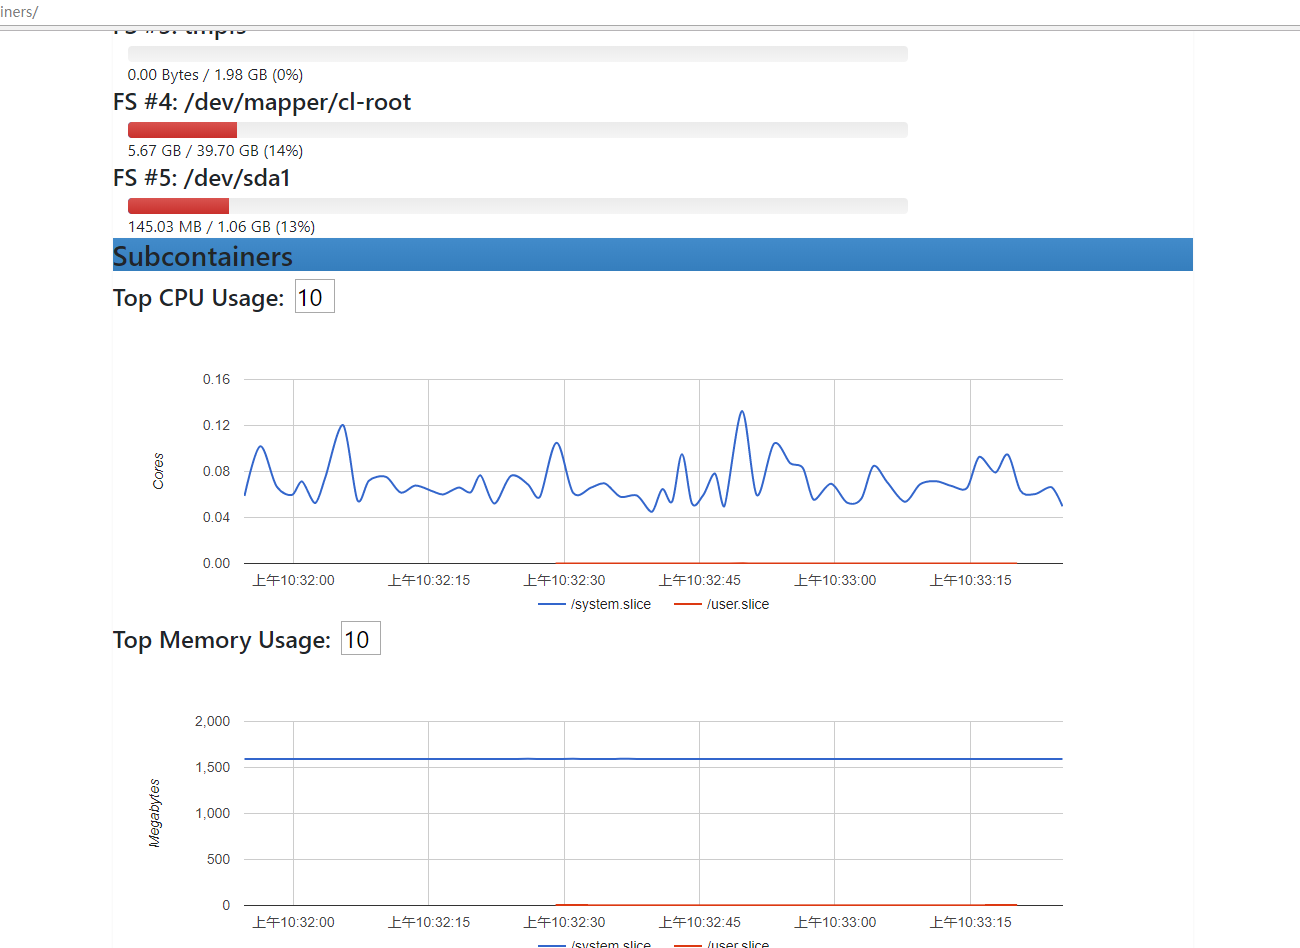
附上使用截图
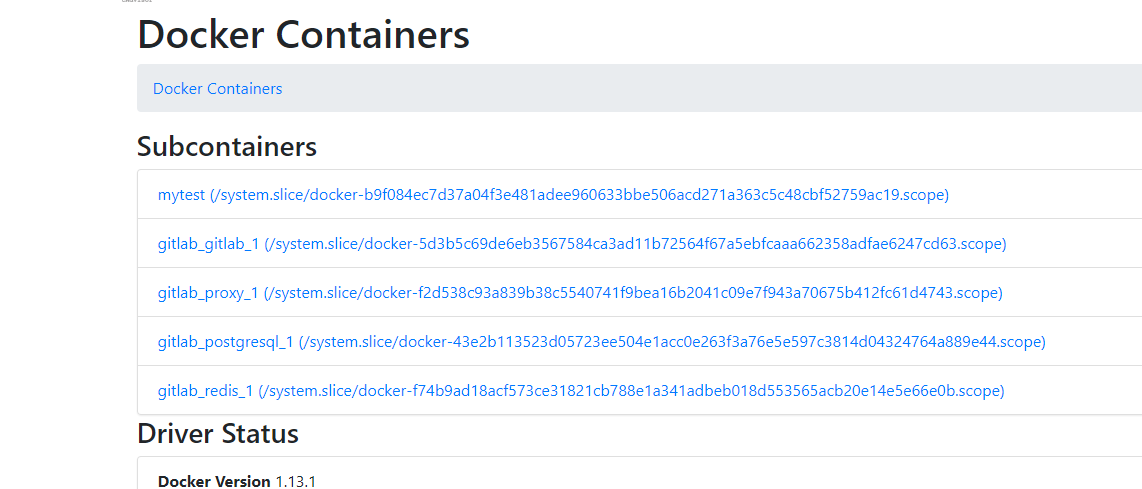
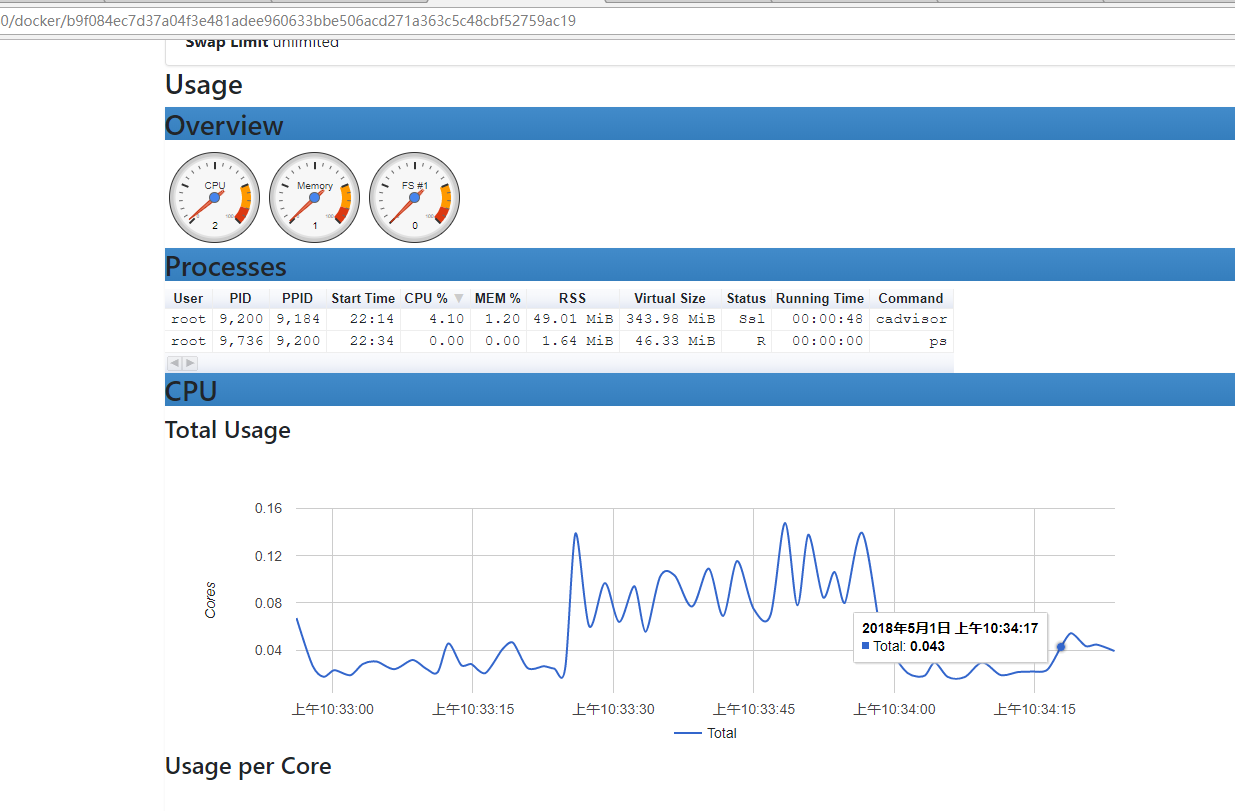
具体至某一容器
环境变量的修改
docker-compose的文件是不支持环境变量的使用,故为了适应在不同环境中配置不同的变量值如IP地址,则需要利用envsubst这个程序。
1.创建一个与环境变量相关的docker模板,命名为base-compose.yml,内容大概如下:。
version: '3'
services:
  cadvisor:
    ## Image
    build: cadvisor
    ##image: google/cadvisor:v0.27.1

    ## Base
    privileged: false
    restart: always
    container_name: cadvisor
    hostname: ${ACADVISOR_HOSTNAME}
    command: -storage_driver=influxdb -storage_driver_db=${ACADVISOR_DB} -storage_driver_host=${INFLUXBD_SERVER_IP}:${INFLUXDB_SERVER_PORT}

    ## Network
    #network_mode: host
    #expose:
    ports:
      - "9090:8080"
    #depends_on:
    #link:

    ## Storage
    volumes:
      - /etc/localtime:/etc/localtime:ro
      - /etc/timezone:/etc/timezone:ro
      - /:/rootfs:ro
      - /var/run:/var/run:rw
      - /sys:/sys:ro
      - /var/lib/docker/:/var/lib/docker:ro

    ## Env
    environment:
      - SERVICE_IGNORE=true
2.具体的环境变量如下,文件如下:
#!/bin/bash
export PRIVATE_IP=$(cat /etc/hosts | grep `hostname` |awk '{print $1}')
ret=$(curl https://ipapi.co/json| grep -v org)
ret=`echo $ret | sed 's/ip/public_ip/g'`
IP_INFO=`echo $ret | sed 's/"//g'| sed 's/{//g'| sed 's/}//g'| sed '/^$/g'| sed 's/[[:space:]]//g'`

export PUBLIC_IP=`echo $IP_INFO | awk -F ',' '{print $1}' | awk -F ':' '{print $2}'`

export MONITOR_VOLUME='/home/xxx/volume/monitor'
export KMS_VOLUME='/home/xxx/volume/kms'

export ACADVISOR_HOSTNAME=`hostname`
export ACADVISOR_DB='cadvisor'

export INFLUXBD_SERVER_IP=${PUBLIC_IP}
export INFLUXDB_SERVER_PORT='8086'

export GRAFANA_SERVER_IP=${PUBLIC_IP}
export GRAFANA_SERVER_PORT='13000'

export GRAPHITE_SERVER_IP=${PUBLIC_IP}
export GRAPHITE_SERVER_PORT='12003'

export ESEARCH_SERVER_URL='http://'${PUBLIC_IP}':9200'
3.替换指令
#!/bin/bash
source env.sh
envsubst  docker-compose.yml
如何在docker内部建立应用的编译环境
1.随便下载一个ubuntu或centos的镜像,如centos:7.4.1708版本。
2.执行如何命令,一定要加上”-it -d”的交互指令,这两个指令其在后台执行,并默认执行交互动作。
docker run --name lnmp-build -itd -v /home/abc/build/lnmp/lnmp1.4-full:/lnmp1.4-full  centos:7.4.1708 /bin/bash
或
docker run --name lnmp-build -itd -v /home/abc/build/lnmp/lnmp1.4-full:/lnmp1.4-full  centos:7.4.1708
#必须带上-it -d参数,
#若只有-d参数时,由于centos没有相应的CMD指令,则会主动退出,且下一次即使docker start mytest也只是容器启动后,马上退出。
#若只有-it参数,则会直接进行交互模式,程序退出后,容器结束执行,但可以使用docker start mytest启动,并不会主动退出。
#交互模式下,不需要指定/bin/bash参数,若指定则相应运算该cmd参数。
3.进入交互模式
docker exec -it lnmp-build /bin/bash
或
docker attach lnmp-build
#前者会新创建一个终端,进行交互,后者会使用现有的终端进行交互。
普通用户直接使用docker命令
sudo groupadd docker
sudo usermod -aG dockerroot abc
sudo usermod -aG docker abc
cat /etc/group #检查是否生效。
sudo systemctl restart docker,重启docker镜像
如果提示权限不够,如下:
Got permission denied while trying to connect to the Docker daemon socket at unix:///var/run/docker.sock: Get http://%2Fvar%2Frun%2Fdocker.sock/v1.26/containers/json: dial unix /var/run/docker.sock: connect: permission denied
则修改/var/run/docker.sock权限.
sudo chmod a+rw /var/run/docker.sock
docker logs –follow –tail 10
docker启动失败解决
在使用systemctl start docker启动失败时,使用systemctl status docker.service其报告如下:
docker.service - Docker Application Container Engine
   Loaded: loaded (/usr/lib/systemd/system/docker.service; disabled; vendor preset: disabled)
   Active: failed (Result: exit-code) since Fri 2018-04-27 02:38:36 EDT; 12s ago
     Docs: http://docs.docker.com
  Process: 2356 ExecStart=/usr/bin/dockerd-current --add-runtime docker-runc=/usr/libexec/docker/docker-runc-current --default-runtime=docker-runc --exec-opt native.cgroupdriver=systemd --userland-proxy-path=/usr/libexec/docker/docker-proxy-current --seccomp-profile=/etc/docker/seccomp.json $OPTIONS $DOCKER_STORAGE_OPTIONS $DOCKER_NETWORK_OPTIONS $ADD_REGISTRY $BLOCK_REGISTRY $INSECURE_REGISTRY $REGISTRIES (code=exited, status=1/FAILURE)
 Main PID: 2356 (code=exited, status=1/FAILURE)

Apr 27 02:38:35 localhost.localdomain systemd[1]: Starting Docker Application Container Engine...
Apr 27 02:38:35 localhost.localdomain dockerd-current[2356]: time="2018-04-27T02:38:35.166869440-04:00" level=warning msg="could not change group /var/run/docker.sock to docker: group docker not found"
Apr 27 02:38:35 localhost.localdomain dockerd-current[2356]: time="2018-04-27T02:38:35.171487584-04:00" level=info msg="libcontainerd: new containerd process, pid: 2361"
Apr 27 02:38:36 localhost.localdomain dockerd-current[2356]: Error starting daemon: SELinux is not supported with the overlay2 graph driver on this kernel. Either boot into a newer kernel or disable selinux in docker (--selinux-enabled=false)
Apr 27 02:38:36 localhost.localdomain systemd[1]: docker.service: main process exited, code=exited, status=1/FAILURE
Apr 27 02:38:36 localhost.localdomain systemd[1]: Failed to start Docker Application Container Engine.
Apr 27 02:38:36 localhost.localdomain systemd[1]: Unit docker.service entered failed state.
Apr 27 02:38:36 localhost.localdomain systemd[1]: docker.service failed.
截图如下:

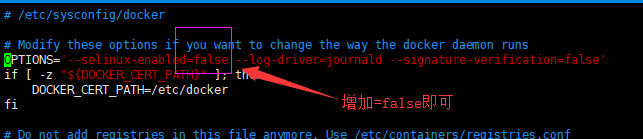
此处意思是linux的内核中的SELinux不支持 overlay2 graph driver ,解决方法有两个,要么启动一个新内核,要么就在docker里禁用selinux,–selinux-enabled=false,
解决办法如下:
vi /etc/sysconfig/docker
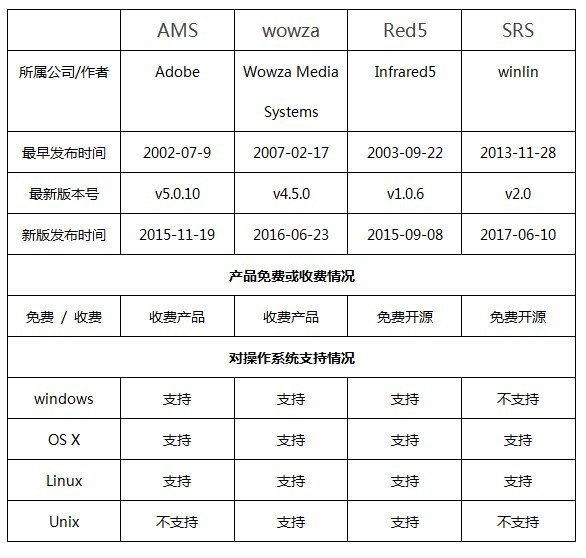
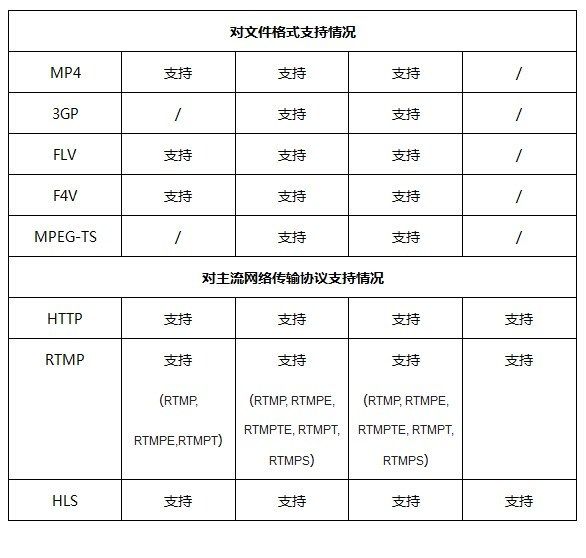
主流流媒体服务器
主流流媒体如下:
1. Red5
2. Live555
3. RtmpD
4. EasyDarwin【EasyDarwin云平台是一套由EasyDarwin、EasyCMS、EasyCamera、EasyClient、nginx、redis构成的完整云平台架构,支持分布式、跨平台、多点部署,流媒体服务器支持负载均衡,按需直播,非常适用于互联网化的安防、智能家居、幼教平台、透明厨房、透明家装等多个行业应用】
5. FFServer
6. SRS(Simple Rtmp Server)定位是运营级的互联网直播服务器集群
7. crtmpserver
8. Flash Media Server (简称FMS),后更名为Adobe Flash Media Server (简称AMS),该产品可以快速搭建起一套流媒体直播、点播服务器免费版只能10个连接,不开源。
9. EasyDarwin
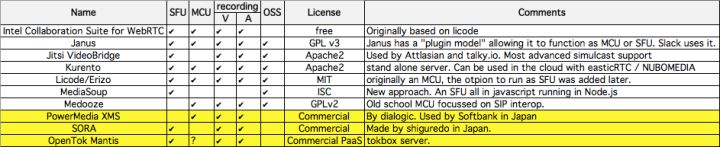
WebRTC媒体服务器
主要的webrtc媒体服务器
—-
1.Intel Collaboration Suite for WebRTC
https://software.intel.com/en-us/webrtc-sdk
包括客户端SDK(JS/Android/iOS / Windows),服务器SDK(SFU/MCU/SIP网关)。它提供了几乎所有你想要的东西。 MCU/SFU不是从头开始开发,而是基于Licode的。
顺便说一句,最近它被提及作为intel和韩国电信运营商巨头SK电讯合作的核心技术
———
2.janus
https://janus.conf.meetecho.com/index.html
Janus核心是WebRTC的“gateway”,它是用C语言实现并且是在libsrtp和libnice之上开发的(实现SRTP和ICE协议也被Google和mozilla使用)。 通过添加各种插件,可以实现不同的功能或用例,例如SFU。 正如我在前一篇文章中所写的,它已经在Slack中使用了。 许可证最初是AGPL,但是在Alex和Oleg(CoTurn的创建者)讨论后,更改为GPLv3。
————–
3.Jitsi VideoBridge
————-
4.Kurento
http://www.kurento.org/
————————–
5.Licode
http://lynckia.com/licode/index.html
————–
6.Meedooze
http://www.medooze.com/
—————————-
7.MediaSoup
https://mediasoup.org/
据我所知,这是最新的webRTC SFU项目。 核心是用C语言(使用例如libuv)实现的。 其余的代码是使用最多的JavaScript(ECMAScript 6)。 有很多未实现的webrtc功能,根据Twitter的帖子,媒体运行良好。 有趣的是,它可以使用JavaScript处理RTP包。
——————
8.
cef的Qt的封装库及webrtc的测试
1.webrtc已经在cef3.x中支持。
2.由于cef的编译复杂性,有一些第三方机构专门编译一些全功能的二进制库,并提供了相应的例子,很方便地直接引入到第三方应用中。
3.在window中,简述其编译测试如下:
A-首先下载cef的库文件。下载地址如下:
http://opensource.spotify.com/cefbuilds/index.html【记住要下载32位的版本,不要下载64位的】
下载完成,先阅读其CMakeLists.txt文件,它说明了在各个平台该如何二次编译,如window的编译截图如下:
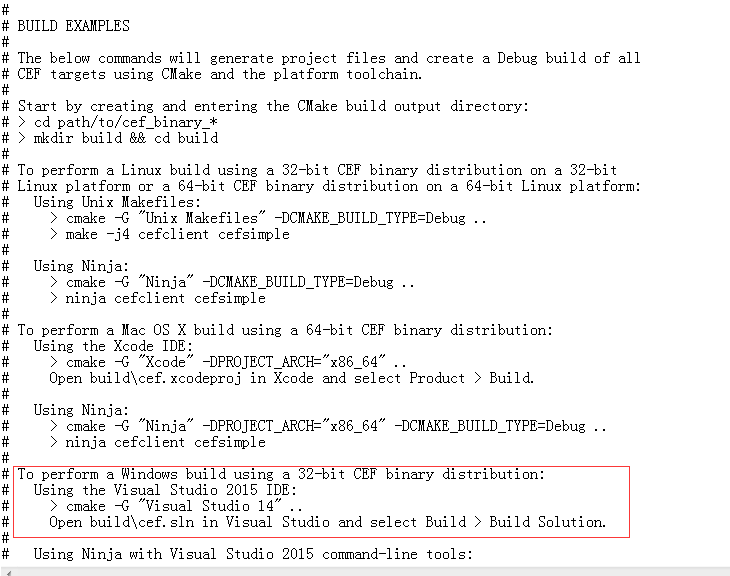
注:————–一定要用cmake -G “Visual Studio 14″【也即是vs2015,社区版就可以了编译了】的命令,令其生成工程vc的工程文件。———
注:————–不要用cmake的gui方式生成工程,因为可能会失败,而产生困扰——————————-
4.用vs2015打开工程,选择全编译。
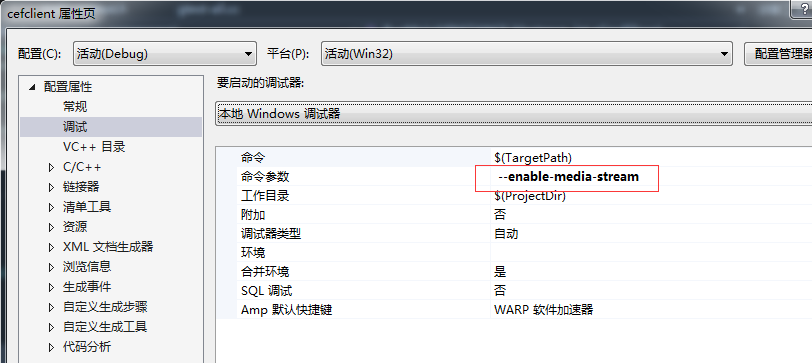
5.调试cefclient工程,在调试器中添加–enable-media-stream选项。
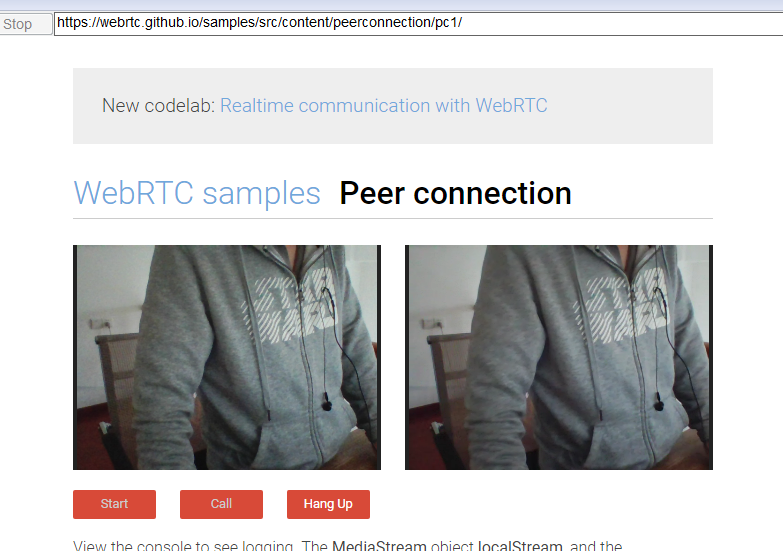
6.打开webrtc的测试页面如下:
https://webrtc.github.io/samples/
7.截图如下:经验检,摄像头及声音都正常。

8.
—————————–
有人针对这场景写了一个QT的封装库,可以方便直接被Qt使用,在github随便搜索的结果有如下,可以逐个测试。
https://tishion.github.io/QCefView/
—————————
https://github.com/GreatTux/CefMinGWQt,这个是mingw版本。
———————————–
https://github.com/Dax89/QtCEF
——————-