net.ipv4.ip_forward = 0
net.ipv4.conf.default.rp_filter = 1
net.ipv4.conf.default.accept_source_route = 0
kernel.sysrq = 0
kernel.core_uses_pid = 1
net.ipv4.tcp_syncookies = 1
net.bridge.bridge-nf-call-ip6tables = 0
net.bridge.bridge-nf-call-iptables = 0
net.bridge.bridge-nf-call-arptables = 0
kernel.msgmnb = 65536
kernel.msgmax = 65536
kernel.shmmax = 68719476736
kernel.shmall = 4294967296
net.ipv4.ip_local_port_range = 1024 65535

net.ipv4.conf.all.rp_filter = 0
net.ipv4.conf.default.rp_filter = 0
net.ipv4.conf.eth0.rp_filter = 0
net.ipv4.conf.eth1.rp_filter = 0
net.ipv4.conf.all.arp_announce = 2
net.ipv4.conf.default.arp_announce = 2
net.ipv4.conf.eth0.arp_announce = 2
net.ipv4.conf.eth1.arp_announce = 2

net.ipv4.tcp_tw_reuse = 1
net.ipv4.tcp_tw_recycle = 1
net.ipv4.tcp_fin_timeout = 10
net.ipv4.tcp_keepalive_time = 60
net.ipv4.tcp_mem = 786432 2097152 3145728
net.ipv4.tcp_rmem = 4096 4096 16777216
net.ipv4.tcp_wmem = 4096 4096 16777216
net.ipv4.tcp_max_syn_backlog = 16384
net.core.somaxconn = 20480
net.core.rmem_default = 262144
net.core.wmem_default = 262144
net.core.rmem_max = 16777216
net.core.wmem_max = 16777216
作者归档:xinlu
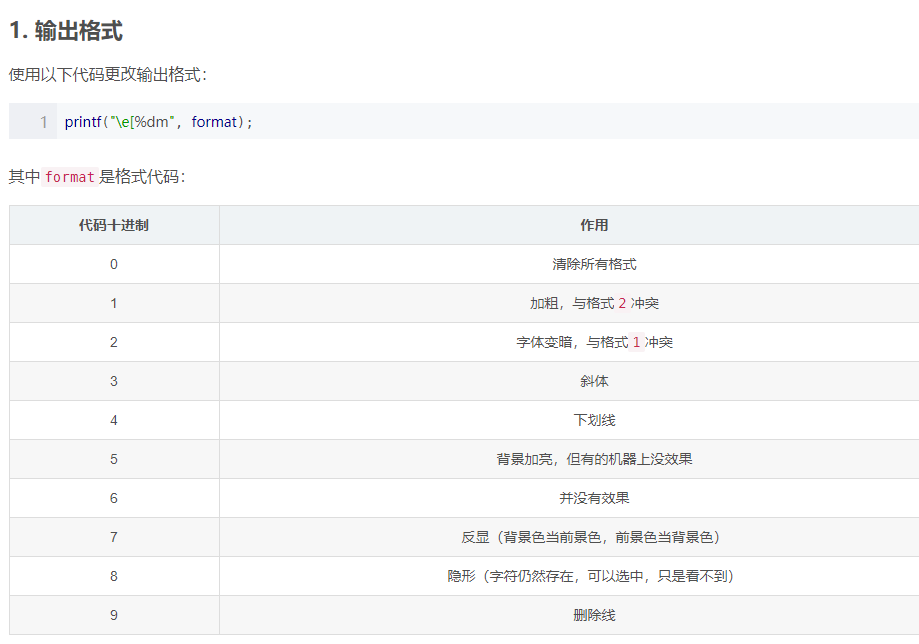
转义字符\e
Windows 平台下,conio.h 中有许多操作控制台颜色、格式的函数。但是再 Linux 平台下却没有类似的函数。经过在网上的一番搜索,找到了解决此问题的方法——转义字符\e。
注意,\e这种写法可能并不被你的编译器所支持(Linux下的GNU和Bash支持,亲测无误),因为他并不是ANSI C的。可以用\033代替。
——————————-
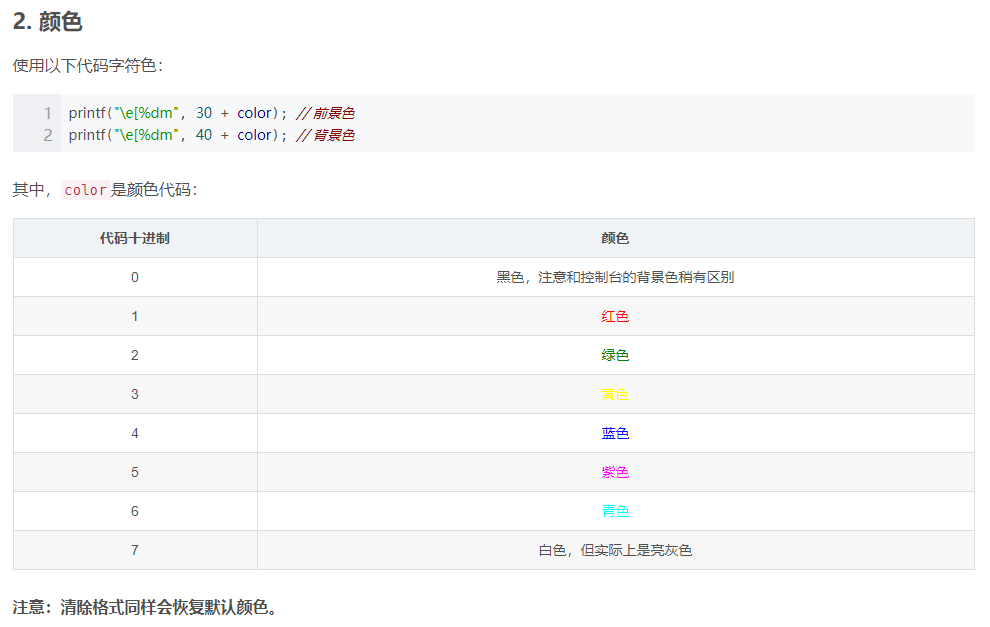
颜色值设置
颜色值设置
PS1中设置字符颜色的格式为:\[\e[F;Bm\],其中“F“为字体颜色,编号为30-37,“B”为背景颜色,编号为40-47。用 \e[m 结束颜色设置,颜色表如下:
F B
30 40 黑色
31 41 红色
32 42 绿色
33 43 黄色
34 44 蓝色
35 45 紫红色
36 46 青蓝色
37 47 白色
根据颜色表,套用入字符颜色设置格式中,就可以对linux终端命令行颜色进行个性化设置了。比如要设置命令行的格式为绿字黑底,显示当前用户的账号名称、
主机的第一个名字、完整的当前工作目录名称、24小时格式时间,就可以使用如下的命令:
# PS1='[\[\e[32;40m\]\u@\h \w \t]\$’
sed提取json中有用字符串
mytest='"summary":{"day":{"burstTotal":0,"dropTotal":135764,"flowTotal":69449},"input":{"spanCount":900,"spanInterval":10},"spanNow":{"burstTotal":0,"dropTotal":1,"flowTotal":4,"now":1548691410},"spans"'
echo $mytest| sed 's/\(.*\)"day":{"burstTotal":\([[:alnum:]]*\),"dropTotal":\([[:alnum:]]*\),"flowTotal":\([[:alnum:]]*\).*/\4/' && echo ":flow121"
excel数据导入数据库
1.安装sqlyog工具。
2.步骤一
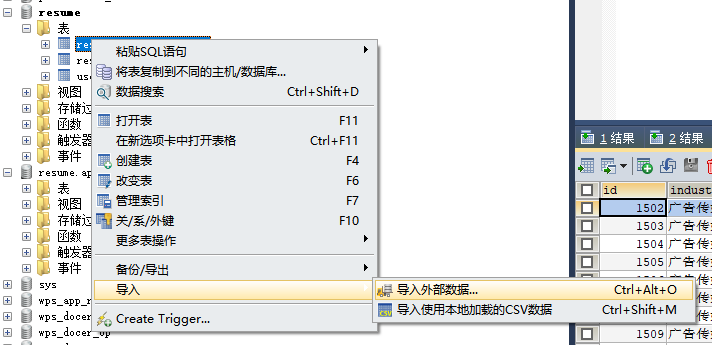
3.步骤二

4.步骤三
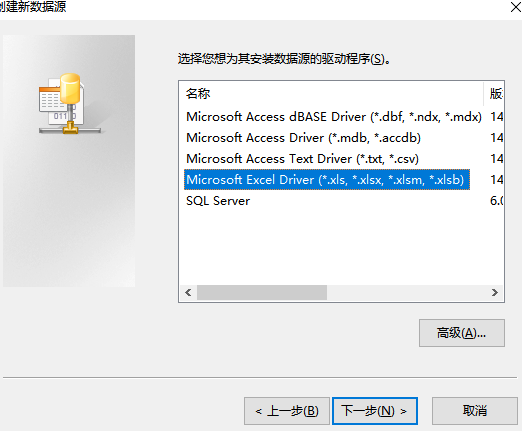
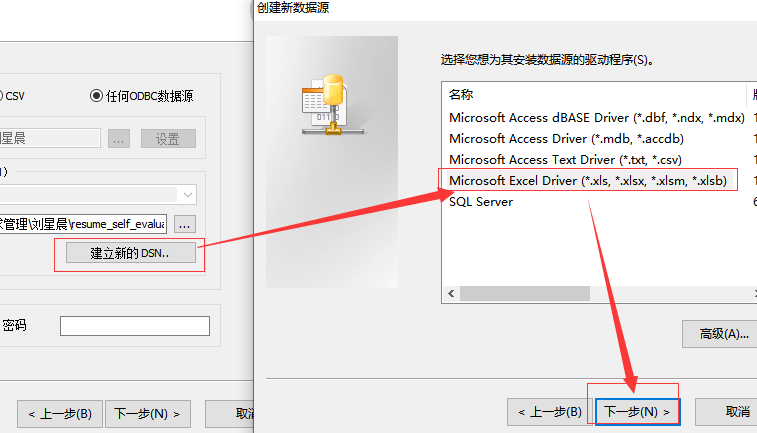
创建了DNS时,需要关联表
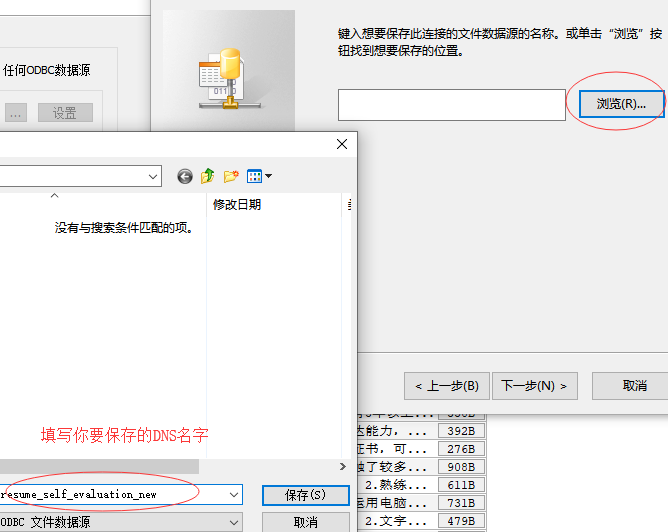
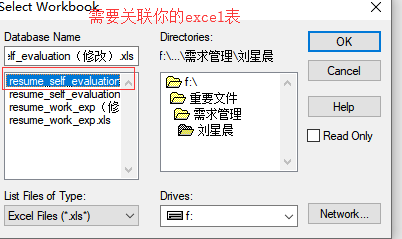
5.步骤四
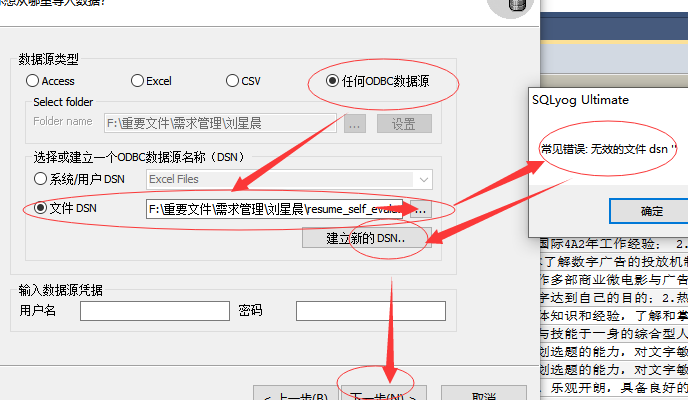
6.步骤五
logrotate例子
在/etc/logrotate.d目录下增加了一个abc文件
/data/log/nginx/*log {
    create 0644 root root
    daily
    rotate 10
    missingok
    notifempty
    compress
    sharedscripts
    postrotate
        /bin/kill -USR1 $(cat /var/run/nginx.pid 2>/dev/null) 2>/dev/null || :
    endscript
}
解决WIN10显示文字模糊
主要原因是系统允许应的缩放比例生效,按如下修改可解决。
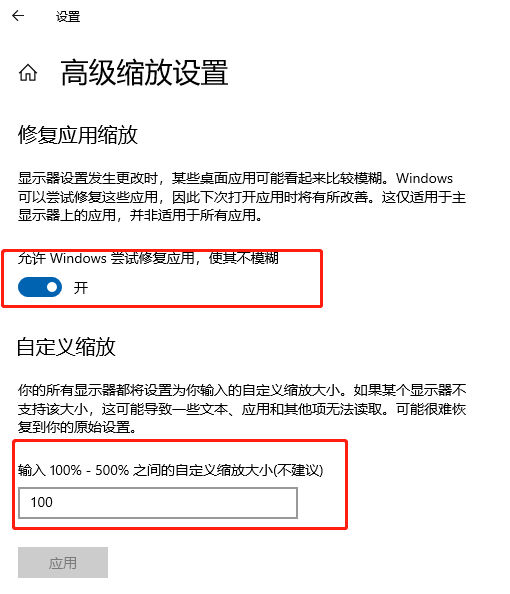
1.桌面右键->显示设置->高级缩放设置如下图:
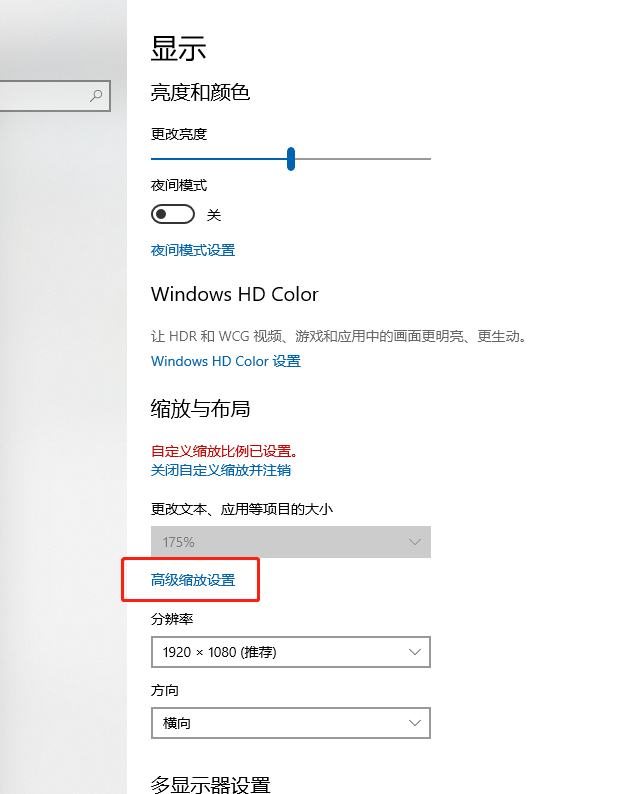
2.在高级缩放设置中,开启“允许window尝试修复应用,使其不糊模”,及在自定义缩放比例上,填上100%的缩放显示。
openresty的lua简单开发
1.nginx的location的配置
location /flow1 {
        lua_need_request_body on;
        lua_code_cache on;
        default_type application/json;
        #在content阶段,lua中可以调用所有ngx_lua的函数,但不是很适合upstream这种情形。
        content_by_lua_file /usr/local/openresty/nginx/conf/vhosts/flowservice.lua;
 }
 location /flow2 {
        error_log /data/log/nginx/flow_error.log;
        access_log /data/log/nginx/cntr.log cntr;

        lua_need_request_body on;
        lua_code_cache on;
        default_type application/json;
        set $proxyhost "wps_cntr";
        rewrite_by_lua_file  /usr/local/openresty/nginx/conf/vhosts/flowservice.lua; #Rewrite阶段是不允许带参数的。
        #return 200, $proxyhost; #当使用return时,是会导致rewrite的lua不会被调用。可能是因为return函数的关系,被系统优先调用而忽略了lua文件的调用。
        proxy_pass http://$proxyhost; #默认情况下是调用wps_cntr的,由于flowserice的影响,会调用ngx.var.proxyhost="wps_flow"的。
 }
 location /flow3 {
        lua_need_request_body on;
        lua_code_cache on;
        default_type application/json;
        set $cntr_old "wps_cntr";
        set $cntr_new "wps_flow";
        # set阶段,不能使用ngx.req.read_body的函数,这个是ngx_lua的强制需求。
        set_by_lua_file $proxyhost /usr/local/openresty/nginx/conf/vhosts/flowservice.lua $cntr_old $cntr_new; #这情况是允许带参数的。
        return 200 $proxyhost
 }
2.相应flowservice.lua的脚本编写
local json_module = os.getenv("JSON_MODULE") or "cjson"
local json = require(json_module)
local g_plugin = {}

g_plugin["Kaiwpp"] = true
g_plugin["onekeyanimation"] = true

local function find_func(mod, funcnames)
    for _, v in ipairs(funcnames) do
        if mod[v] then
            return mod[v]
        end
    end
    return nil
end

local json_encode = find_func(json, { "encode", "Encode", "to_string", "stringify", "json" })
local json_decode = find_func(json, { "decode", "Decode", "to_value", "parse" })

local function get_query_string()
    local method = ngx.var.request_method
    if "GET" == method then
       local args = ngx.req.get_uri_args()
       return args['query']
    elseif "POST" == method then
       ngx.req.read_body()
       local headers = ngx.req.get_headers()
       if headers['content-type'] == 'application/json' then
          local data = ngx.req.get_body_data()
          if data == nil then
             return nil
          end
          local args = json_decode(data)
          if args then
             return args['query']
          end
          return nil
       end
       local args = ngx.req.get_post_args()
       return args['query']
    end
end
local q = get_query_string()
if q then
   local query = json_decode(q)
   if query then
      local pn = query[1]
      if pn then
         local name = pn['plug_name']
         if name then
            if g_plugin[name] then
               ngx.var.proxyhost="wps_flow"
            end
         end
      end
   end
end
ngx.log(ngx.INFO, "abc")
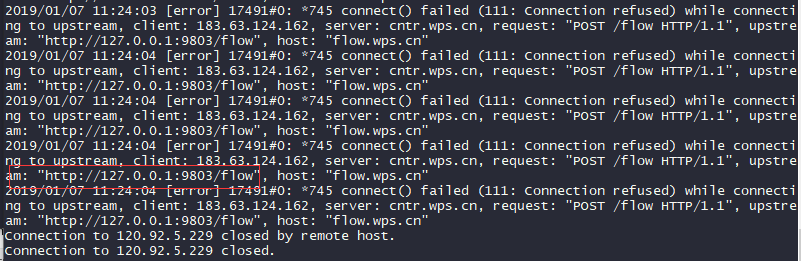
3.检验结果的方式。
A.lua脚本运行出错,看error.log可以看出出错原因。
B.ngx.log来打印,ngx.log默认是打印至err_log的地方。
C.lua运行正常,可以通过access_log来看。特别是upstream的模式,access_log的格式需要包括$upstream_addr的参数。
config配置

error_log
access_log

ab压测post数据
1.安装ab工具,需要依赖
yum -y install httpd-tools
2.AB命令行
#!/bin/sh
#POST方式,300个用户,100000个请求量。
ab -c 300 -n 100000 -p ./data.4 -T application/json http://127.0.0.1:7001/flow
#PUT方式
ab -c 200 -n 100000 -u ./data.1 -T application/json http://127.0.0.1:7001/flow
3.data.4数据内容,json格式
{"query":"[{\"app_name\":\"abcdddd\",\"status\":\"aaaaaa\"}]"}
linux内存清理
清理前

清理后
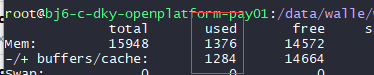
清理脚本
#! /bin/sh
used=`free -m | awk 'NR==2' | awk '{print $3}'`
free=`free -m | awk 'NR==2' | awk '{print $4}'`
echo "===========================" >> /data/logs/mem.log
date >> /data/logs/mem.log
echo "Memory usage before | [Use:${used}MB][Free:${free}MB]" >> /data/logs/mem.log
if [ $free -le 4000 ] ; then
                sync && echo 1 > /proc/sys/vm/drop_caches
                sync && echo 2 > /proc/sys/vm/drop_caches
                sync && echo 3 > /proc/sys/vm/drop_caches
                used_ok=`free -m | awk 'NR==2' | awk '{print $3}'`
                free_ok=`free -m | awk 'NR==2' | awk '{print $4}'`
                echo "Memory usage after | [Use:${used_ok}MB][Free:${free_ok}MB]" >> /data/logs/mem.log
                echo "OK" >> /data/logs/mem.log
else
                echo "Not required" >> /data/logs/mem.log
fi
exit 1