private ExecutorService executorService;
private Future mFutureBitmapRunnable;

第一步:
this.executorService = Executors.newSingleThreadExecutor();
第二步:
on camera thread callback,do like below.
public void takePhoto(ImiDevice.ImiFrame frame) {
            if (mFutureBitmapRunnable != null && !mFutureBitmapRunnable.isDone()) {
                return;
            }
            ByteBuffer buf = frame.getData();
            buf.position(0);
            final byte[] rgb24 = new byte[buf.remaining()];
            buf.get(rgb24);
            final int width = frame.getWidth();
            final int height = frame.getHeight();
            mFutureBitmapRunnable = executorService.submit(new Runnable() {
                @Override
                public void run() {
                    //to do
                }
           });
}
分类目录归档:Android开发
安卓ADB安装启动。
安装命令:
adb install -r “xxx.apk”
adb shell “am start -n appid/package” [appid是在build.grade文件的applicationId][package是包名全路径]
//adb shell “am start -n \”com.commaai.facedoor.v3/com.commaai.facedoor.activity.MainActivity\””
adb shell “adm force-stop “appid/package”
@echo off

set apkname=%1%

::传入apk路径
echo 您输入了参数:%apkname%

Set filename=%apkname%
set filename=%~nx1
echo 文件名为:%filename%
set folder=%~dp1
echo 路径为:%folder%

:tryagaint
adb connect 192.168.30.25:5555
timeout /t 3
echo "install" && adb install -r %apkname% && goto myexit
timeout /t 10
goto tryagaint

:myexit
echo "success to install"
adb shell "am start -n \"com.commaai.facedoor.v3/com.commaai.facedoor.activity.MainActivity\""
pause
android应用压测工具
第一步:创建主运行脚本run.sh
#!/bin/sh

path_current=`pwd`
path_script=$(cd "$(dirname "$0")"; pwd)

while true
do
   /bin/bash $path_script/script/check.sh
   read -p "input action[killall|start|stop|help|exit]:" mode
   case "$mode" in
     'start')
        read -p "input device IP[192.168.30.25]: " ip
        read -p "input watch type such as [temp,frame,none],default none: " type
        echo "start parameter: IP: $ip  -  type:$type"
        if [ "$ip" != "" ]; then
            /bin/bash $path_script/script/start.sh "$ip:5555" "$type"
        fi
        if [ "$ip" == "" ]; then
           echo "IP should not be empty"
        fi
     ;;
     'stop')
        read -p "input device IP[192.168.30.25]: " ip
        echo "stop parameter: IP: $ip  -  type:$type"
        if [ "$ip" != "" ]; then
           /bin/bash $path_script/script/stop.sh "$ip:5555"
        fi
     ;;
     'killall')
         /bin/bash $path_script/script/killall.sh
     ;;
     'exit')
         exit 0
     ;;
     *)
     ;;
   esac
done
第二步:创建script/connect.sh脚本
#!/bin/sh

path_current=`pwd`
path_script=$(cd "$(dirname "$0")"; pwd)

target=$1
if [ "$target" == "" ]; then
   echo "should add parameter to connect command, like connect.sh 192.168.30.25:5555"
   exit 1
fi
result=$(adb devices|grep "${target}"|grep -v offline|grep -v grep)
if [ "$result" != "" ]; then
   exit 0
fi
adb connect $target
adb -s "$target" root
第三步:创建script/check.sh脚本
#!/bin/sh

path_current=`pwd`
path_script=$(cd "$(dirname "$0")"; pwd)
ps -ef | grep "mylogcat" | grep -v grep
ps -ef | grep "mytail" | grep -v grep
ps -ef | grep "adb" | grep -v grep
第三步:创建script/stop.sh脚本
#!/bin/sh

path_current=`pwd`
path_script=$(cd "$(dirname "$0")"; pwd)

target=$1
if [ "$target" == "" ]; then
   echo "should like 192.168.30.25:5555"
   exit 1
fi

ps -ef | grep "$target"| grep -v grep

while true
do
  app_process=`ps -ef | grep "$target"| grep -v grep`
  echo $app_process | awk '{print ($2)}'
  stop=1
  if test -n "$app_process"; then
     echo "had find app process informaton"
     echo $app_process | awk '{print ($2)}' | xargs kill -9
     stop=0
  fi
  if [ $stop -eq 1 ]; then
    break;
  fi
done
第四步:创建启动脚本script/start.sh
#!/bin/sh

path_current=`pwd`
path_script=$(cd "$(dirname "$0")"; pwd)

target=$1
param=$2
if [ "$target" == "" ]; then
   echo "should like run.sh 192.168.30.25:5555 temp,frame"
   exit 1
fi

nohup /bin/bash ${path_script}/mytail.sh $* &
nohup /bin/bash ${path_script}/mylogcat.sh $* &
第五步:创建mytail.sh脚本
#!/bin/sh

path_current=`pwd`
path_script=$(cd "$(dirname "$0")"; pwd)
path_data=$path_script/../

target=$1
param=$2
if [ "$target" == "" ]; then
   echo "should like mytail.sh 192.168.30.25 temp,frame"
   exit 1
fi

while true
do
  run_time=$(date "+%Y%m%d%H%M")
  if [ ! -d "$path_data/${target}" ]; then
     mkdir -p "$path_data/${target}"
  fi
  echo "--------[${run_time}]----------------" >> $path_data/${target}/tail.txt
  /bin/bash $path_script/connect.sh $*
  adb -s "$target" shell "free -h" >> $path_data/${target}/tail.txt
  adb -s "$target" shell "top -n 1|grep com.commaai." >> $path_data/${target}/tail.txt
  sleep 1
  adb -s "$target" shell "top -n 1|grep com.commaai." >> $path_data/${target}/tail.txt
  temp=$(echo $param | grep "temp")
  if [ "$temp" != "" ];then
     adb  -s "$target" shell "cat /sys/class/thermal/thermal_zone*/temp" >>  $path_data/${target}/tail.txt
  fi
  frame=$(echo $param | grep "frame")
  if [ "$frame" != "" ];then
     adb  -s "$target" shell "tail -n 2 /storage/emulated/0/Log/brokenflow.txt" >>  $path_data/${target}/tail.txt
  fi
  sleep 50
done
第六步:创建script/mylogcat.sh脚本
#!/bin/sh

path_current=`pwd`
path_script=$(cd "$(dirname "$0")"; pwd)
path_data=$path_script/../;

target=$1
while true
do
  run_time=$(date "+%Y%m%d%H%M")
  /bin/bash $path_script/connect.sh $*
  if [ ! -d "$path_data/${target}" ]; then
     mkdir -p "$path_data/${target}"
  fi
  echo "--------[${run_time}]----------------" >> $path_data/${target}/error.txt
  adb -s "$target" logcat *:E >> $path_data/${target}/error.txt
done
第七步:创建清除所有脚本
#!/bin/sh

path_current=`pwd`
path_script=$(cd "$(dirname "$0")"; pwd)
echo "try to kill mylogcat"
while true
do
  app_process=$(ps -ef | grep "mylogcat" | grep -v grep)
  echo $app_process | awk '{print ($2)}'
  stop=1
  if test -n "$app_process"; then
    echo "had find app process informaton"
    echo $app_process | awk '{print ($2)}' | xargs kill -9
    stop=0
  fi
  if [ $stop -eq 1 ]; then
    break
  fi
done

echo "try to kill mytail"
while true
do
  app_process=$(ps -ef | grep "mytail" | grep -v grep)
  echo $app_process | awk '{print ($2)}'
  stop=1
  if test -n "$app_process"; then
    echo "had find app process informaton"
    echo $app_process | awk '{print ($2)}' | xargs kill -9
    stop=0
  fi
  if [ $stop -eq 1 ]; then
     break;
  fi
done


echo "try to kill adb"
while true
do
  app_process=$(ps -ef | grep "adb" | grep -v grep)
  echo $app_process | awk '{print ($2)}'
  stop=1
  if test -n "$app_process"; then
    echo "had find app process informaton"
    echo $app_process | awk '{print ($2)}' | xargs kill -9
    stop=0
  fi
  if [ $stop -eq 1 ]; then
    break;
  fi
done
Android开发时部分测试代码
public static String format(String format, Object... args) {
    return new Formatter().format(format, args).toString();
}

public static boolean hasDebugFlag() {
    String path = Environment.getExternalStorageDirectory() + "/Log/debug"; //文件路径
    FileWriter writer = null;
    try {
        File file = new File(path);
        return file.exists();
    }catch (Exception e) {

    }
    return false;
}

public static void removeDebugFlag() {
    String path = Environment.getExternalStorageDirectory() + "/Log/debug"; //文件路径
    FileWriter writer = null;
    try {
        File file = new File(path);
        if(file.exists()) {
            file.delete();
        }
    }catch (Exception e) {

    }
}

public static void writeLog(String fileName,String content) {
    String path = Environment.getExternalStorageDirectory() + "/Log/"; //文件路径
    FileWriter writer = null;
    try {
        File file = new File(path);
        if (!file.exists()) {  //没有创建文件夹则创建
            file.mkdirs();
        }
        Date currentTime = new Date();
        SimpleDateFormat formatter = new SimpleDateFormat("yyyy-MM-dd HH:mm:ss");
        String dateString = formatter.format(currentTime);
        // 打开一个写文件器,构造函数中的第二个参数true表示以追加形式写文件
        writer = new FileWriter(path + fileName, true);
        writer.write(dateString + " " + content + "\r\n");
        writer.flush();
        if (writer != null) {
            //关闭流
            writer.close();
        }
    } catch (IOException e) {
        e.printStackTrace();
    }
}

public static boolean saveBitmap(Bitmap bitmap, Long id) {
    if (bitmap == null)
        return false;

    String path = Environment.getExternalStorageDirectory() + "/Log/";
    FileOutputStream fos = null;
    try {
        File f = new File(path +id.toString() + ".png");
        if(f.exists()) {
            f.delete();
        }
        f.createNewFile();
        fos = new FileOutputStream(f);
        bitmap.compress(Bitmap.CompressFormat.PNG, 100, fos);
        fos.flush();
        return true;
    } catch (Exception e) {
        e.printStackTrace();
    } finally {
        if (fos != null) {
            try {
                fos.close();
            } catch (IOException e) {
                e.printStackTrace();
            }
        }
    }
    return false;
}

public void dumpFrame(ImiDevice.ImiFrame nextFrame, Long id) {
    try{
        ByteBuffer frameData = nextFrame.getData();
        int width = nextFrame.getWidth();
        int height = nextFrame.getHeight();
        frameData.position(0);
        int length = frameData.remaining();
        byte[] buf = new byte[length];
        frameData.get(buf);
        Bitmap save = com.commaai.face.util.Utils.RGB2Bitmap(buf, width, height);
        saveBitmap(save, id);
    }catch (Exception e) {
        writeLog("brokenflow.txt", "failed to save bitmap");
    }
}

使用逻辑
if(hasDebugFlag()) {
    dumpcnt = 20;
    removeDebugFlag();
}

if(dumpcnt > 0) {
    dumpcnt--;
    total++;
    dumpFrame(nextFrame, total);
}
Android编译第三方库脚本模板
#!/bin/bash
path_current=`pwd`
path_script=$(cd "$(dirname "$0")"; pwd)

DEFAULT_PATH=$PATH
ANDROID_NDK_HOME=~/Android/Sdk/ndk/20.1.5948944

declare -A qt_architectures=( ["x86_64"]="x86_64" ["x86"]="x86" ["arm64"]="arm64-v8a" ["arm"]="armeabi-v7a" )
rm -rf android
if [ ! -d "${ANDROID_NDK_HOME}/toolchains/llvm/prebuilt/linux-x86_64/bin" ]; then
    echo "failed to find linux-x86_64 home. please install ndk-r20+ version in ubuntu-18.04 system"
    exit 1
fi
ANDROID_TOOLCHAIN="${ANDROID_NDK_HOME}/toolchains/llvm/prebuilt/linux-x86_64/bin"
for arch in ${!qt_architectures[@]}
do
    case $arch in
        arm)
            ANDROID_API=16
            ;;
        x86)
            ANDROID_API=16
            ;;
        arm64)
            ANDROID_API=21
            ;;
        x86_64)
            ANDROID_API=21
            ;;
    esac
    rm -rf ${path_script}/build

    ANDROID_DEFINITION="-DCMAKE_FIND_ROOT_PATH:PATH=${path_script}/../openssl/android/${arch};${path_script}/../zlib/android/${arch}"
    ANDROID_DEFINITION="${ANDROID_DEFINITION} -DWITH_EXAMPLES=OFF"
    ANDROID_DEFINITION="${ANDROID_DEFINITION} -DCMAKE_BUILD_TYPE:STRING=Release"
    ANDROID_DEFINITION="${ANDROID_DEFINITION} -DANDROID_ABI:STRING=${qt_architectures[$arch]}"
    ANDROID_DEFINITION="${ANDROID_DEFINITION} -DANDROID_NATIVE_API_LEVEL:STRING=${ANDROID_API}"
    ANDROID_DEFINITION="${ANDROID_DEFINITION} -DANDROID_NDK:PATH=${ANDROID_NDK_HOME}"
    ANDROID_DEFINITION="${ANDROID_DEFINITION} -DCMAKE_CXX_COMPILER:STRING=${ANDROID_TOOLCHAIN}/clang++"
    ANDROID_DEFINITION="${ANDROID_DEFINITION} -DCMAKE_C_COMPILER:STRING=${ANDROID_TOOLCHAIN}/clang"
    ANDROID_DEFINITION="${ANDROID_DEFINITION} -DCMAKE_TOOLCHAIN_FILE:PATH=${ANDROID_NDK_HOME}/build/cmake/android.toolchain.cmake"
    mkdir -p ${path_script}/build && cd ${path_script}/build && cmake -DCMAKE_C_FLAGS="-fPIC -Wall" -DCMAKE_INSTALL_PREFIX=${path_script}/android/${arch} ${ANDROID_DEFINITION} ../libssh-0.9.3
    make clean && make && make install
done
Qt5.12.8ForAndroid
如果只是使用Qt自身提供的组件,而不引入第三方组件,则建议使用Window系统,因为Qt和Android支持得非常成熟。
但一旦需要引入第三方库时,建议使用ubuntu进行开发。因为官方的linux版本,也是基于ubuntu来开发的。
而在选择ubuntu的版本是非常重要,因为选择错误是经常无法正常启动模拟器或调试的。
本人也是在使用ubuntu20.04/ubuntu18.10/ubuntu19.x/Centos7.x等,吃心苦头后仍不得结果,才开始思考如何让系统顺利运行包括单步调试/编译openssl/zib等第三方组等。
核心关健点:只要能找到官方原生编译系统的环境或配置,并重现该环境,则一定能成功单步调试/自由编译第三方组件
首先,官方仓库是没有发现任何编译脚本。
只能通过源码搜索,检查系统的蛛丝马迹了。
我是按以下方法找到最佳系统版本的。
第一步:下载最新的LTS版本Qt5.12.8的Linux版本,随便找一个linux系统安装,包括源码。
第二步:在源码目录下:搜索“grep -r ‘ubuntu’ ./”,然后它会显示下以下一些信息。
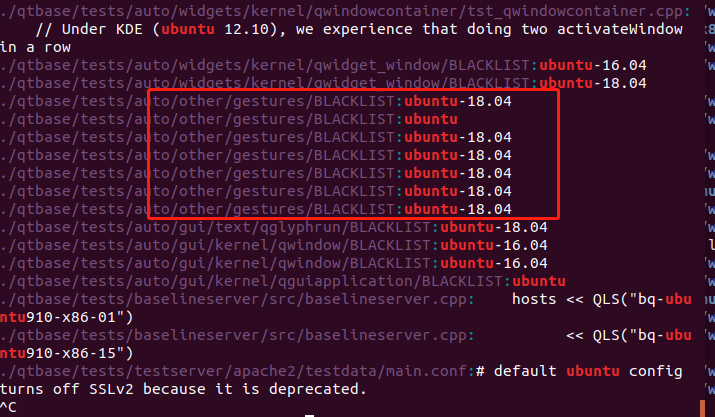
第三步:从输出的信息中,可以确认Qt5.12.8是在ubuntu18.04环境下编译的。
事实上也验证在18.04中安装确实是成功实现单步调试和自由编译第三方包的体验。
以下是安装过程的总结:
1.安装准备
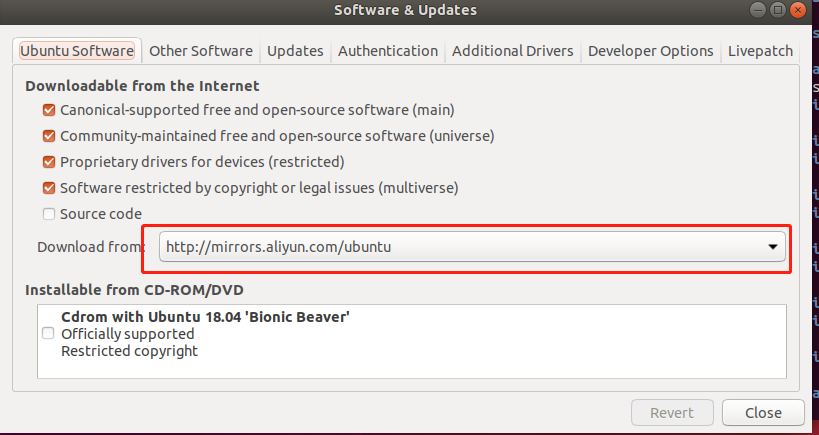
>>Ubuntu18.04,安装后,需要把软件源切换至阿里源。
>>Qt5.12.x最新版【5.12.x只选择LTS版,因为LTS版是Linux系统最常用的,问题最少且最快被修复的版本】
>>AndroidStudio3.5.2版,【从r25开始,AndroidSDK只随IDE一起发布,且SDK结构也与旧版有较大差异。】
>>JDK1.8.x版本。
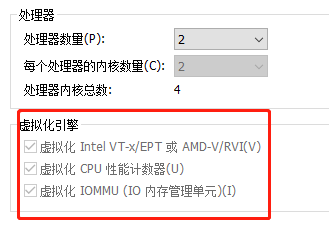
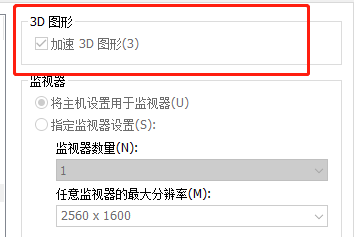
2.系统安装【VMWare虚拟机安装】。
系统安装,Ubuntu18.04安装成功后,按以下步骤开启GPU和CPU加速,这是android模拟器需要VT-x和图形3D加速
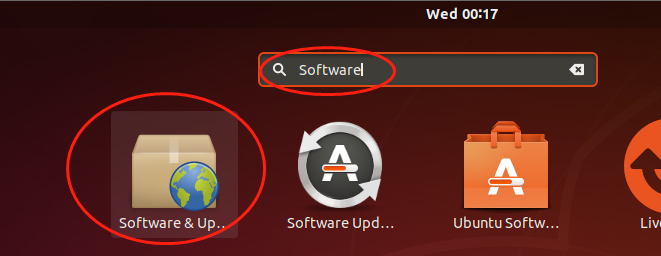
切换软件源
3.安装Qt5.12.8【当前最新版】。把所有组件全部选择上。
4.安装JDK1.8.x版本。
5.安装AndroidStudio,本人选择的是AndroidStudio3.5.2版本,目标是SDK,但从R24版本后的SDK工具是和IDE捆绑一起。
从SDKr24版后,SDK工具已经发生比较大的变化,且不再独立发布,且结构也发生比较大的变化且不兼容,这需要特别注意。
我是默认安装了Android-10
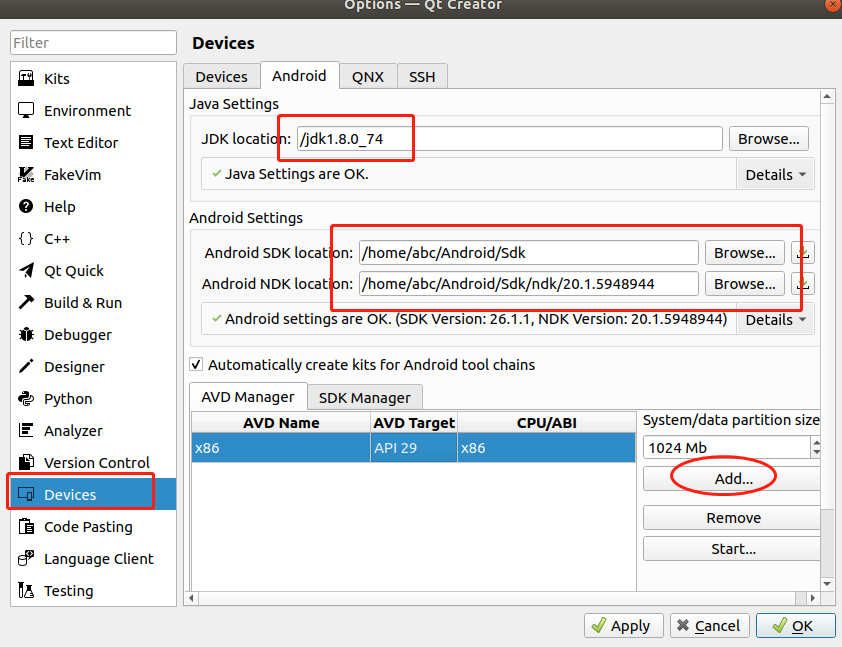
6.配置Qt的Android。
===========================================================
问题列表
问题一:无法创建模拟器,如下图:
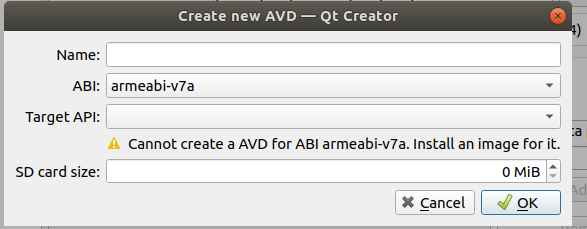
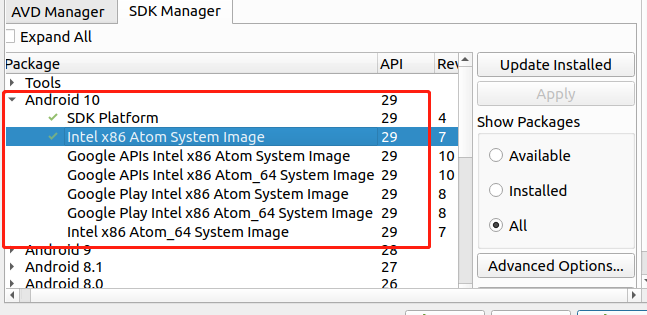
需要安装相应的SytemImage,如下图所示【从Android8以后,模拟器主要是提供x86模拟器,而Arm是直接连接设备即可,既然是模拟器那是哪一种模拟器就不重要了】:
=————————————-
问题二:
Android SDK启动提示:Failed to load module “canberra-gtk-module”
sudo apt-get install libcanberra-gtk-module
————————————————
问题三:
Linux环境下,如下报如下错:
cannot find -lGL
collect2:error:ld returned 1 exit status
sudo apt-get install libgl1-mesa-dev
—————————
问题三:
gcc无法使用
ubuntu:
报错When executing step “Make”
sudo apt-get install build-essential
—————————————–
WebRtc的支持
因为代码需要翻墙下载,故建议在海外的主机上,先在docker容器中建立相应的编译环境,然后把镜像拷贝回来。如果镜像的系统与本地的系统是同一个版本如centosv7.3,则可以从镜像中把包拷贝出来,在宿主机编译。
————————-
源代码获取步骤
1.下载depot_tools工具,并把执行路径加入环境变量中。
export PATH=$PATH:/path/depot_tools
2.按以下步骤
mkdir webrtc-checkout
cd webrtc-checkout
fetch --nohooks webrtc
gclient sync,在这个步骤时如果出错,可能是缺少bzip2及bzip2-devel库。
编译步骤
1.把depot_tools的执行路径加入到系统中。
source depot_tools_env.sh
2.在webrtc_checkout/src目录下,生成或清理原编译代码。
gn gen out/Default && gn clean out/Default
3.在webrtc_checkout/src目录下,执行程序编译指令
ninja -C out/Default
—————————————
编译工具使用:depot_tools
https://storage.googleapis.com/chrome-infra/depot_tools.zip
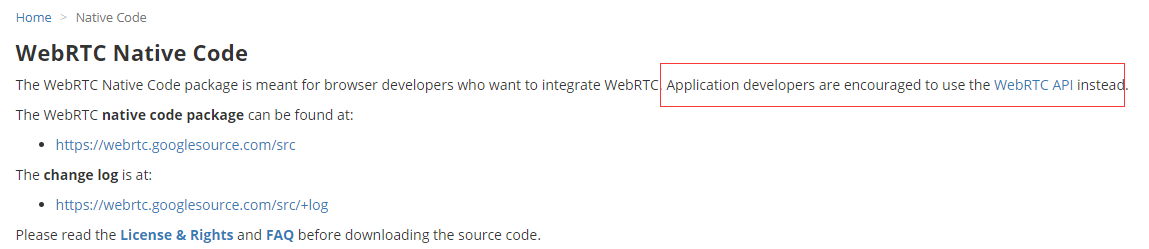
官方建议使用WebRtc Api的版本进行开发。
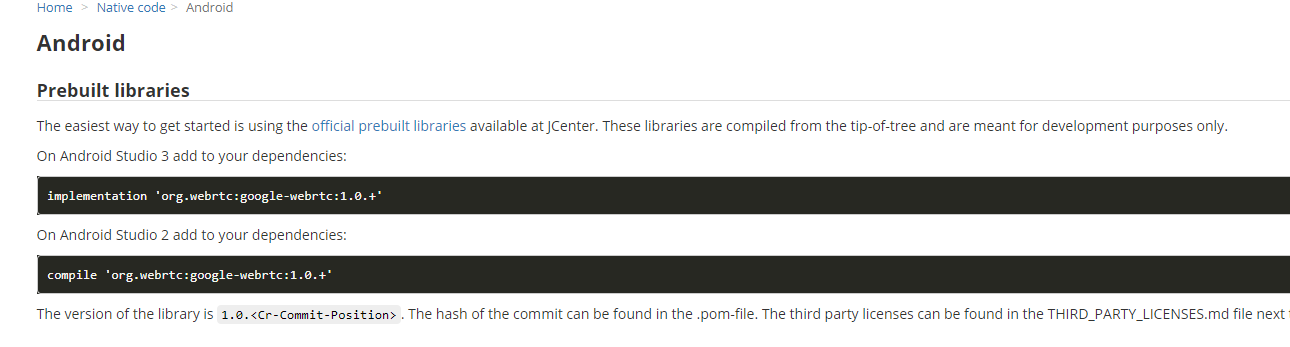
一、Android预编译库
https://webrtc.org/native-code/android/
https://bintray.com/google/webrtc/google-webrtc
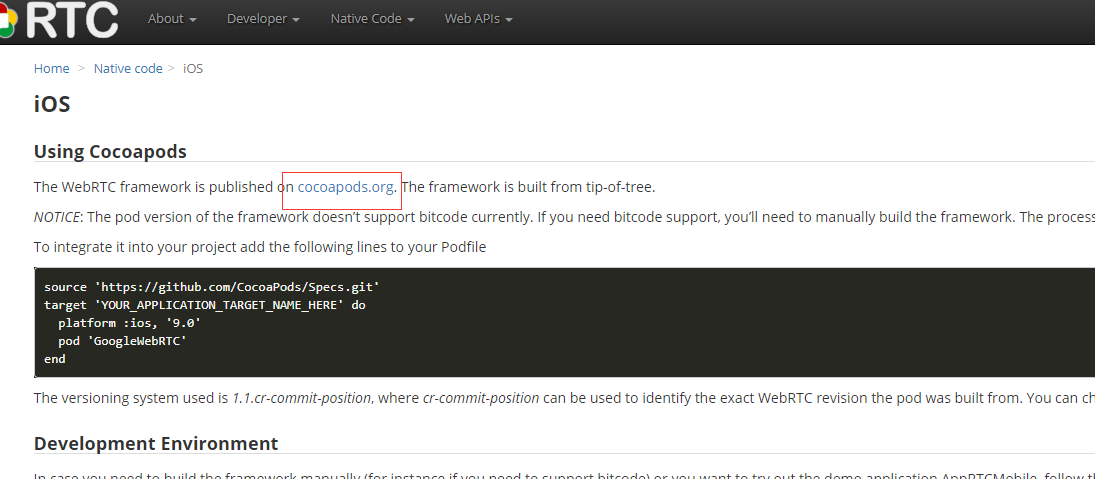
二、IOS预编译库
https://webrtc.org/native-code/ios/
https://cocoapods.org/pods/GoogleWebRTC
三、原生API
https://webrtc.org/native-code/native-apis/
OpenWebRtc的版本,最后更新日期是2015年4月26日
https://www.openwebrtc.org/
android实用开源库
所有组件,类似awesome-android那个。
https://github.com/Trinea/android-open-project
———-
阿里牛人开源的库,感觉common库比较实用,其它库可以参考一下。
https://litesuits.com/?f=zh
—-
动态插件系统的例子
https://github.com/mmin18/AndroidDynamicLoader
—-
快速开发的SDK,基于flagment定制了很多UI组件。
https://github.com/liaohuqiu/cube-sdk
https://github.com/liaohuqiu/android-cube-app
——–
进程Daemon
https://github.com/liaohuqiu/MarsDaemon
android局部变量不能调试问题
在gradle文件把testCoverageEnabled设为false就可以了
buildTypes {
release {
debuggable false
minifyEnabled false //删除没有用到的文件
proguardFiles getDefaultProguardFile(‘proguard-android.txt’), ‘proguard-rules.pro’
}
debug {
debuggable true
testCoverageEnabled false
}
}
APK反编译工具
方法一:
http://ibotpeaches.github.io/Apktool/
方法二:
有时方法一,并不凑效。可以试这个方法,把apk后缀名改为.zip,然后用winrar打开,这个方法是可以破开天猫的apk。