分类目录归档:Linux开发

Linux开发,只要在Linux环境下的一切相关开发,包括c++\goLang\Web,shell命令等。

LXQT-QTermWidget的编译

LXQT的编译说明
https://github.com/lxqt/lxqt/wiki/Building-from-source

流程如下:
1.安装Qt5。

yum install qt5-qtbase-devel qt5-qtsvg-devel qt5-qttools-devel qt5-qtx11extras-devel

2.安装CMake,一定用要官方包安装,并编辑bashrc文件。

export PATH=$PATH:/cmake-3.15.3/bin

3.下载lxqt-build-tools编译工具并安装。

git clone https://github.com/lxqt/lxqt-build-tools.git
假如是解压在~/lxqt/lxqt-build-tools目录下。
则创建编译目录~/lxqt/build
构建指令如下:
cmake ../lxqt-build-tools
make && make install
它会安装至/usr/local的某个目录下。

4.下载

git clone git@github.com:kxtry/qtermwidget.git
使用CLion构建及编译即可。
此版本已经与原版不一样,有修改。
原版可能无法编译完成,原因是QString("sdfsdfds")会编译不通过,因为从Qt5.9版本开始,QString(char *p)设置成私有函数了。
自动拉起服务脚本

crontab -e
*/1 * * * * sh /data/scripts/run-flow.sh start
#!/bin/sh

path_current=`pwd`
path_script=$(cd "$(dirname "$0")"; pwd)
mode=$1

logfile=/data/scripts/check.log
app_process=`ps -ef | grep "flowservice"| grep -v grep`
echo `date` >> $logfile
echo "ready to check...." >> $logfile
case "$mode" in
   'start')
        echo "$app_process" >> $logfile
        echo "it's ready to start op...."
        if test -n "$app_process"; then
                echo ""
                echo "$app_process"
                echo ""
        else
                cd $path_script   #进入脚本所在目录下,目的是使springboot的config目录生效。
                nohup /data/code/service.flow.wps.cn/flowservice --config=/data/code/service.flow.wps.cn/config/config-prod.toml > /data/code/service.flow.wps.cn/info.txt 2>&1 &
                echo "success to restart flowservice" >> $logfile
                cd $path_current

        fi

        echo 'success to start.'
        ;;
   'stop')
        echo "it's ready to check process..."
        if test -n "$app_process"; then
                echo "had find app process informaton"
                echo $app_process | awk '{print ($2)}' | xargs kill -9
        fi
        echo 'success to kill.'
        ;;
    *)
        basename=`basename "$0"`
        echo "Usage: $basename  {start|stop}  [ server options ]"
        exit 1
        ;;
esac
exit 1

GoLang的AST语法树

package main

import (
	"fmt"
	"go/ast"
	"go/parser"
	"go/token"
)

func main() {
	// src is the input for which we want to print the AST.
	src := `
// @router /login [post]
// @router2 /login2 [post]
package main
func main() {
	println("Hello, World!")
}
`

	// Create the AST by parsing src.
	fset := token.NewFileSet() // positions are relative to fset
	f, err := parser.ParseFile(fset, "", src, parser.ParseComments)
	if err != nil {
		panic(err)
	}
	for _, comment := range f.Comments {
		fmt.Println(comment.Text())
	}

	// Print the AST.
	ast.Print(fset, f)

}

运行结果如下:

@router /login [post]
@router2 /login2 [post]

     0  *ast.File {
     1  .  Doc: *ast.CommentGroup {
     2  .  .  List: []*ast.Comment (len = 2) {
     3  .  .  .  0: *ast.Comment {
     4  .  .  .  .  Slash: 2:1
     5  .  .  .  .  Text: "// @router /login [post]"
     6  .  .  .  }
     7  .  .  .  1: *ast.Comment {
     8  .  .  .  .  Slash: 3:1
     9  .  .  .  .  Text: "// @router2 /login2 [post]"
    10  .  .  .  }
    11  .  .  }
    12  .  }
    13  .  Package: 4:1
    14  .  Name: *ast.Ident {
    15  .  .  NamePos: 4:9
    16  .  .  Name: "main"
    17  .  }
    18  .  Decls: []ast.Decl (len = 1) {
    19  .  .  0: *ast.FuncDecl {
    20  .  .  .  Name: *ast.Ident {
    21  .  .  .  .  NamePos: 5:6
    22  .  .  .  .  Name: "main"
    23  .  .  .  .  Obj: *ast.Object {
    24  .  .  .  .  .  Kind: func
    25  .  .  .  .  .  Name: "main"
    26  .  .  .  .  .  Decl: *(obj @ 19)
    27  .  .  .  .  }
    28  .  .  .  }
    29  .  .  .  Type: *ast.FuncType {
    30  .  .  .  .  Func: 5:1
    31  .  .  .  .  Params: *ast.FieldList {
    32  .  .  .  .  .  Opening: 5:10
    33  .  .  .  .  .  Closing: 5:11
    34  .  .  .  .  }
    35  .  .  .  }
    36  .  .  .  Body: *ast.BlockStmt {
    37  .  .  .  .  Lbrace: 5:13
    38  .  .  .  .  List: []ast.Stmt (len = 1) {
    39  .  .  .  .  .  0: *ast.ExprStmt {
    40  .  .  .  .  .  .  X: *ast.CallExpr {
    41  .  .  .  .  .  .  .  Fun: *ast.Ident {
    42  .  .  .  .  .  .  .  .  NamePos: 6:2
    43  .  .  .  .  .  .  .  .  Name: "println"
    44  .  .  .  .  .  .  .  }
    45  .  .  .  .  .  .  .  Lparen: 6:9
    46  .  .  .  .  .  .  .  Args: []ast.Expr (len = 1) {
    47  .  .  .  .  .  .  .  .  0: *ast.BasicLit {
    48  .  .  .  .  .  .  .  .  .  ValuePos: 6:10
    49  .  .  .  .  .  .  .  .  .  Kind: STRING
    50  .  .  .  .  .  .  .  .  .  Value: "\"Hello, World!\""
    51  .  .  .  .  .  .  .  .  }
    52  .  .  .  .  .  .  .  }
    53  .  .  .  .  .  .  .  Ellipsis: -
    54  .  .  .  .  .  .  .  Rparen: 6:25
    55  .  .  .  .  .  .  }
    56  .  .  .  .  .  }
    57  .  .  .  .  }
    58  .  .  .  .  Rbrace: 7:1
    59  .  .  .  }
    60  .  .  }
    61  .  }
    62  .  Scope: *ast.Scope {
    63  .  .  Objects: map[string]*ast.Object (len = 1) {
    64  .  .  .  "main": *(obj @ 23)
    65  .  .  }
    66  .  }
    67  .  Unresolved: []*ast.Ident (len = 1) {
    68  .  .  0: *(obj @ 41)
    69  .  }
    70  .  Comments: []*ast.CommentGroup (len = 1) {
    71  .  .  0: *(obj @ 1)
    72  .  }
    73  }

批量启动远程控制脚本

#!/bin/sh
path_current=`pwd`
path_script=$(cd "$(dirname "$0")"; pwd)
server=$1
cfg=$path_script/config
if [ $# -lt 0 ]; then
   awk '{if($1 == "Host"){print $2}}' $cfg
else
   len=${#server}-1
   star=${server:1-2}
   prefix=${server:0:len}
   if [ "$star" == "*" ];then
      servers=$(grep '^Host ' F:/tools/myssh/config | sort -u | sed 's/^Host //')
      for svc in ${servers}
      do
         svchit=${svc:0:len}
         if [ $svchit == $prefix ]; then
            if [ "$svchit*" != "$svc" ]; then            
               $path_script/exec.exe -F F:\\tools\\myssh\\config "$svc"
            fi
         fi
      done
      exit
   fi
   $path_script/exec.exe -F F:\\tools\\myssh\\config $*
fi

nginx的惊群效应导至响应时间长变大,CPU消耗增加

在流控后台上,观测到单主机CPU消耗为27%左右,请求响应为3毫秒,甚至4毫秒。
经检查,发现nginx的配置为

worker_processes auto

主机为16核,因为auto的影响,会默认为16个进程。而在top指令中显示,nginx的消耗与flowservice持平,作为转发服务,nginx的消耗是不合理的。
考虑到nginx的惊群效应:每个请求,所有nginx子进程均会响应,导致过多无谓的CPU消耗,因为把work_processes改为4个。
果然,CPU消耗由27%降为20%,响应时间由原来4毫秒,降为1毫秒。

终端开发文档参考

终端如VT100,VT50,VT220等终端,其相关的文档都汇聚在这个网站上。
https://vt100.net/
http://rtfm.etla.org/xterm/ctlseq.html重点推荐
http://man.he.net/man4/console_codes【Linux Console Codes】【Linux下的console文档,是vt102的子集】
Vt102是vt100家族的第二代指令,在原有vt100基础上增加了行插入行滚动的几个指令。

centos7.4的网络内核优化参数

net.ipv4.ip_forward = 0
net.ipv4.conf.default.rp_filter = 1
net.ipv4.conf.default.accept_source_route = 0
kernel.sysrq = 0
kernel.core_uses_pid = 1
net.ipv4.tcp_syncookies = 1
net.bridge.bridge-nf-call-ip6tables = 0
net.bridge.bridge-nf-call-iptables = 0
net.bridge.bridge-nf-call-arptables = 0
kernel.msgmnb = 65536
kernel.msgmax = 65536
kernel.shmmax = 68719476736
kernel.shmall = 4294967296
net.ipv4.ip_local_port_range = 1024 65535

net.ipv4.conf.all.rp_filter = 0
net.ipv4.conf.default.rp_filter = 0
net.ipv4.conf.eth0.rp_filter = 0
net.ipv4.conf.eth1.rp_filter = 0
net.ipv4.conf.all.arp_announce = 2
net.ipv4.conf.default.arp_announce = 2
net.ipv4.conf.eth0.arp_announce = 2
net.ipv4.conf.eth1.arp_announce = 2

net.ipv4.tcp_tw_reuse = 1
net.ipv4.tcp_tw_recycle = 1
net.ipv4.tcp_fin_timeout = 10
net.ipv4.tcp_keepalive_time = 60
net.ipv4.tcp_mem = 786432 2097152 3145728
net.ipv4.tcp_rmem = 4096 4096 16777216
net.ipv4.tcp_wmem = 4096 4096 16777216
net.ipv4.tcp_max_syn_backlog = 16384
net.core.somaxconn = 20480
net.core.rmem_default = 262144
net.core.wmem_default = 262144
net.core.rmem_max = 16777216
net.core.wmem_max = 16777216

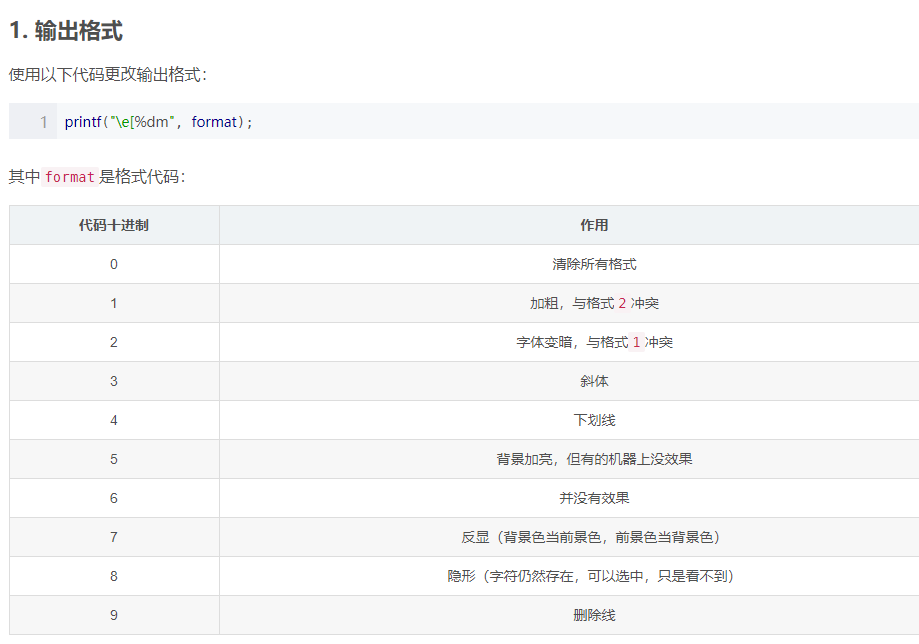
转义字符\e

Windows 平台下,conio.h 中有许多操作控制台颜色、格式的函数。但是再 Linux 平台下却没有类似的函数。经过在网上的一番搜索,找到了解决此问题的方法——转义字符\e。
注意,\e这种写法可能并不被你的编译器所支持(Linux下的GNU和Bash支持,亲测无误),因为他并不是ANSI C的。可以用\033代替。
——————————-


颜色值设置

颜色值设置

PS1中设置字符颜色的格式为:\[\e[F;Bm\],其中“F“为字体颜色,编号为30-37,“B”为背景颜色,编号为40-47。用 \e[m 结束颜色设置,颜色表如下:

F    B
30    40    黑色
31    41    红色
32    42    绿色
33    43    黄色
34    44    蓝色
35    45    紫红色
36    46    青蓝色
37    47    白色

根据颜色表,套用入字符颜色设置格式中,就可以对linux终端命令行颜色进行个性化设置了。比如要设置命令行的格式为绿字黑底,显示当前用户的账号名称、
主机的第一个名字、完整的当前工作目录名称、24小时格式时间,就可以使用如下的命令:
# PS1='[\[\e[32;40m\]\u@\h \w \t]\$’

logrotate例子

在/etc/logrotate.d目录下增加了一个abc文件

/data/log/nginx/*log {
    create 0644 root root
    daily
    rotate 10
    missingok
    notifempty
    compress
    sharedscripts
    postrotate
        /bin/kill -USR1 $(cat /var/run/nginx.pid 2>/dev/null) 2>/dev/null || :
    endscript
}