分类目录归档:PHP开发

xdebug3的调试开启方式

xdebug2和xdebug3的开启调试方式是不同的。

此外xdebug3的默认端口改为9003了,故需要修改PHPSTORM的调试端口。
——xdebug3—–的开启方式。
zend_extension=”xdebug-3.0.1.so”
xdebug.mode=debug

—-以下是xdebug2的开启方式———-
zend_extension=”xdebug-2.7.2.so”
xdebug.remote_enable = On
xdebug.profiler_enable = On
xdebug.profiler_enable_trigger = On

xdebug.auto_trace = on
xdebug.auto_profile = on
xdebug.collect_params = on
xdebug.collect_return = on
xdebug.profiler_enable = on
xdebug.trace_output_dir = “/data/logs/xdebug”
xdebug.profiler_output_dir = “/data/logs/xdebug”
xdebug.dump.GET = *
xdebug.dump.POST = *
xdebug.dump.COOKIE = *
xdebug.dump.SESSION = *
xdebug.var_display_max_data = 9056
xdebug.var_display_max_depth = 50

REMI安装PHP插件不同版本

https://centos.pkgs.org/7/remi-x86_64/

FROM centos:7.8.2003
RUN yum install -y wget && \
wget https://dl.fedoraproject.org/pub/epel/epel-release-latest-7.noarch.rpm && \
rpm -Uvh epel-release-latest-7.noarch.rpm && rm -f epel-release-latest-7.noarch.rpm && \
wget https://rpms.remirepo.net/enterprise/remi-release-7.rpm && \
rpm -Uvh remi-release-7.rpm && rm -f remi-release-7.rpm && \
yum install -y yum-utils && \
yum-config-manager --add-repo https://openresty.org/package/centos/openresty.repo && \
yum install -y crontabs && \
yum install -y openresty && \
yum install -y supervisor && \
yum install -y php72 &&\
yum install -y php72-php-pecl-psr php72-php-pear php72-php-pecl-amqp php72-php-bcmath php72-php-bcmath php72-php-mysqlnd php72-php-pgsql php72-php-common php72-php-gd php72-php-mbstring php72-php-pdo php72-php-xml php72-php-xmlrpc php72-php-soap php72-php-opcache php72-php-process php72-php-sodium && \
yum install -y php72-php-pecl-zip php72-php-pecl-redis php72-php-pecl-mongodb php72-php-pecl-grpc php72-php-pecl-protobuf php72-php-pecl-uuid php72-php-intl&&\
yum install -y php72-php-fpm && \
ln -sf /usr/bin/php72 /usr/bin/php && \
ln -sf /opt/remi/php72/root/usr/sbin/php-fpm /usr/bin/php-fpm && \
ln -sf /usr/local/openresty/nginx/sbin/nginx /usr/bin/nginx && \
mkdir -p /data/www/html && mkdir -p /data/logs \
php --version && \
php --modules
COPY ./nginx/ /usr/local/openresty/nginx/conf/
COPY ./start.sh /start.sh
RUN chmod a+x /start.sh
COPY ./supervisor.ini /etc/supervisord.d/
COPY ./php-fpm/ /etc/opt/remi/php72/
COPY ./html/ /data/www/html/
COPY ./logrotate/ /data/logrotate/
WORKDIR /data/www
EXPOSE 80
ENTRYPOINT ["/bin/bash", "/start.sh"]

https://centos.pkgs.org/7/remi-x86_64/php72-php-pecl-grpc-1.33.1-1.el7.remi.x86_64.rpm.html

yum install php72-php-pecl-grpc-1.33.1

YUM安装PHP7的开发环境

第一步:安装remi源
yum install epel-release -y
或rpm -Uvh http://dl.fedoraproject.org/pub/epel/epel-release-latest-7.noarch.rpm
rpm -Uvh http://rpms.remirepo.net/enterprise/remi-release-7.rpm
或yum install http://rpms.famillecollet.com/enterprise/remi-release-7.rpm
第二步:配置php7.2仓库
yum -y install yum-utils
yum-config-manager –enable remi-php72 #yum -y install yum-utils
第三步:安装PHP
yum install php 因为上一步remi配置,所以这里会指向php72
第四步:安装扩展组件
yum install php php72-php-opcache php72-php-ldap php72-php-odbc php72-php-pear php72-php-xml php72-php-xmlrpc php72-php-soap curl curl-devel php72-php-mbstring php72-php-mysqlnd php72-php-fpm php72-php-gd php72-php-xdebug php72-php-pecl-mysql php72-php-pecl-memcached php72-php-pecl-memcache php72-php-pecl-redis
第五步:安装php-fpm
yum install php72-php-fpm
systemctl restart php72-php-fpm #启动php-fpm服务
netstat -tunlp|grep 9000 #查看9000端口是否正常启动了

php的配置文件及组件的安装位置
/etc/opt/remi/php72
/etc/opt/remi/php72/php-fpm.d/*.conf
—————————
安装xdebug
搜索相应库:yum search php|grep xdebug

yum install php72-php-pecl-xdebug

CentOS 7 provides PHP version 5.4 in its official repository

Command to install the EPEL repository configuration package:
    yum install https://dl.fedoraproject.org/pub/epel/epel-release-latest-7.noarch.rpm

Command to install the Remi repository configuration package:
    yum install https://rpms.remirepo.net/enterprise/remi-release-7.rpm

Command to install the yum-utils package (for the yum-config-manager command):
    yum install yum-utils

You want a single version which means replacing base packages from the distribution

Packages have the same name than the base repository, ie php-*

Some common dependencies are available in remi-safe repository, which is enabled by default

PHP version 7.2 packages are available for CentOS 7 in remi-php72 repository

Command to enable the repository:
    yum-config-manager --enable remi-php72

If the priorities plugin is enabled, ensure remi-php72 have higher priority (a lower value) than base and updates

Command to upgrade (the repository only provides PHP):
    yum update

Command to install additional packages:
    yum install php-xxx

Command to install testing packages:
    yum --enablerepo=remi-php72-test install php-xxx

Command to check the installed version and available extensions:
    php --version
    php --modules

unixsocket内核优化

在常见的nginx+unixsocket相比nginx+tcp回环,更能提升性能,但由于内核参数的限制,导致unixsockets不稳定,需要进行内核参数优化。
参考swoole的优化。
https://wiki.swoole.com/wiki/page/11.html

在偶然发现以下命令,可以解决本地回环失败或TIME_WAIT数量太多问题:
sysctl -w net.ipv4.tcp_timestamps=1
查cat /proc/sys/net/ipv4/tcp_timestamps确认是否为0,如果是0则需要执行上述命令设置为1。

【sysctl -p】激活
———————
1.ulimit设置,
vim /etc/security/limits.conf

* soft nofile 262140
* hard nofile 262140
root soft nofile 262140
root hard nofile 262140
* soft core unlimited
* hard core unlimited
root soft core unlimited
root hard core unlimited

2.修改sysctl.conf配置
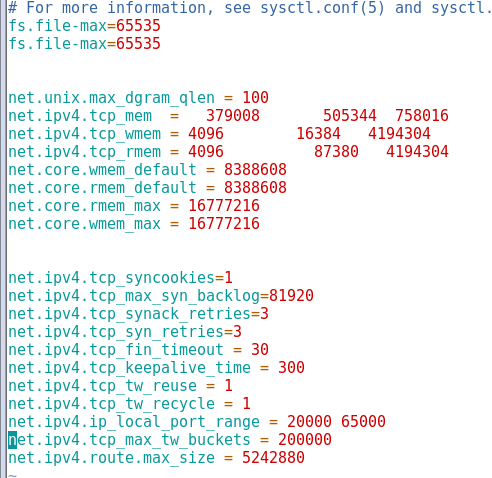
vim /etc/sysctl.conf
以下配置在Centos7.x系统下,长期运行下,确认OK的。

net.ipv4.ip_forward = 0
net.ipv4.conf.default.rp_filter = 1
net.ipv4.conf.default.accept_source_route = 0
kernel.sysrq = 0
kernel.core_uses_pid = 1
net.ipv4.tcp_syncookies = 1
net.bridge.bridge-nf-call-ip6tables = 0
net.bridge.bridge-nf-call-iptables = 0
net.bridge.bridge-nf-call-arptables = 0
kernel.msgmnb = 65536
kernel.msgmax = 65536
kernel.shmmax = 68719476736
kernel.shmall = 4294967296
net.ipv4.tcp_keepalive_time = 1200
net.ipv4.ip_local_port_range = 1024 65535

net.ipv4.conf.all.rp_filter = 0
net.ipv4.conf.default.rp_filter = 0
net.ipv4.conf.eth0.rp_filter = 0
net.ipv4.conf.eth1.rp_filter = 0
net.ipv4.conf.all.arp_announce = 2
net.ipv4.conf.default.arp_announce = 2
net.ipv4.conf.eth0.arp_announce = 2
net.ipv4.conf.eth1.arp_announce = 2

net.ipv4.tcp_mem = 379008       505344  758016
net.ipv4.tcp_wmem = 4096        16384   4194304
net.ipv4.tcp_rmem = 4096          87380   4194304
net.core.wmem_default = 8388608
net.core.rmem_default = 8388608
net.core.rmem_max = 16777216
net.core.wmem_max = 16777216
net.ipv4.tcp_syncookies = 1
net.ipv4.tcp_max_syn_backlog = 81920
net.ipv4.tcp_synack_retries = 3
net.ipv4.tcp_syn_retries = 3
net.ipv4.tcp_fin_timeout = 30
net.ipv4.tcp_keepalive_time = 300
net.ipv4.tcp_tw_reuse = 1
net.ipv4.tcp_tw_recycle = 1
net.ipv4.ip_local_port_range = 20000 65000
net.ipv4.tcp_max_tw_buckets = 200000
net.ipv4.route.max_size = 5242880

PHP中安装主从插件

1. wget http://pecl.php.net/get/mysqlnd_ms-1.5.2.tgz 
2. tar xzvf mysqlnd_ms-1.5.2.tgz
3. cd mysqlnd_ms-1.5.2
4. /path/to/phpize
5. ./configure --enable-mysqlnd-ms --with-php-config=/usr/local/php/bin/php-config
6. make
7. make install
8. sudo /etc/init.d/php-fpm restart
9. php -m | grep mysql #看到"mysqlnd_ms"扩展表示安装成功

执行代码
      if (function_exists('mysqlnd_ms_set_qos')) {
            try {
                $db = $this->db;
                $mysqli = $db->conn_id;
                mysqlnd_ms_set_qos($mysqli, MYSQLND_MS_QOS_CONSISTENCY_SESSION);
            }catch (Exception $e) {

            }

        }

lnmp1.4的xdebug配置

1.从lnmp.org网站,下载lnmp1.4包。
2.通过install.sh安装PHP7.1版
3.通过addons.sh安装redis\memcached\apcu。
3.下载xdubug源码,按以下设置并编译。php-config与php程序在同一个目录。

./configure --enable-xdebug --with-php-config=/usr/local/php/bin/php-config
make install

4.设置php.ini调试信息

创建/usr/local/php/conf.d/010-xdebug.ini文件。
添加信息如下:
[Xdebug]
zend_extension="xdebug.so"
xdebug.remote_enable = On
xdebug.profiler_enable = On
xdebug.profiler_enable_trigger = On

xdebug.auto_trace = on
xdebug.auto_profile = on
xdebug.collect_params = on
xdebug.collect_return = on
xdebug.profiler_enable = on
xdebug.trace_output_dir = "/home/wwwlogs/xdebug"
xdebug.profiler_output_dir = "/home/wwwlogs/xdebug"
xdebug.dump.GET = *
xdebug.dump.POST = *
xdebug.dump.COOKIE = *
xdebug.dump.SESSION = *
xdebug.var_display_max_data = 9056
xdebug.var_display_max_depth = 50

5.方便调试,后续步聚可以如下修改。

chattr -i /home/wwwroot/default/.user.ini
chown abc:abc wwwroot -R
chown abc:abc wwwlog -R

thrift开发环境的搭建

1.http://thrift.apache.org/docs/
2.http://thrift.apache.org/docs/BuildingFromSource
3.http://thrift.apache.org/docs/install/
4.http://thrift.apache.org/docs/install/centos

在纯净的CentOS7.3的环境中,应该如下操作。
sudo yum -y groupinstall “Development Tools”
sudo yum -y zlib-devel openssl-devel ant
安装libevent-2.0.22-stable.tar.gz
安装boost_1_53_0.tar.gz
安装thrift-0.9.3.tar.gz

JAVA和antoconf、automake、bison是系统自带的,只需要增加ant的安装。

————————————————
相关环境变量的配置

#set java environment
export JAVA_HOME=/jdk1.8.0_101
export JRE_HOME=/jdk1.8.0_101/jre
export CLASS_PATH=.:$JAVA_HOME/lib/dt.jar:$JAVA_HOME/lib/tools.jar:$JRE_HOME/lib
export PATH=$PATH:$JAVA_HOME/bin:$JRE_HOME/bin
export ANT_HOME=/apache-ant-1.9.9
export PATH=$PATH:$ANT_HOME/bin


———————