private ExecutorService executorService;
private Future mFutureBitmapRunnable;

第一步:
this.executorService = Executors.newSingleThreadExecutor();
第二步:
on camera thread callback,do like below.
public void takePhoto(ImiDevice.ImiFrame frame) {
            if (mFutureBitmapRunnable != null && !mFutureBitmapRunnable.isDone()) {
                return;
            }
            ByteBuffer buf = frame.getData();
            buf.position(0);
            final byte[] rgb24 = new byte[buf.remaining()];
            buf.get(rgb24);
            final int width = frame.getWidth();
            final int height = frame.getHeight();
            mFutureBitmapRunnable = executorService.submit(new Runnable() {
                @Override
                public void run() {
                    //to do
                }
           });
}
VT102图形测试whiptail
#!/bin/bash

whiptail --title "K8s,  Vision @ 2019" --menu "Choose your option" 20 65 13 \
"1" "Single K8s One-click" \
"2" "Cluste K8s One-click" \
"3" "Cluste K8s add node" \
"4" "Single K8s add node" \
"5" "del node" \
"6" "Uninstall K8s" \
"7" "Quit"  3>&1 1>&2 2>&3
#!/bin/bash
whiptail --title "导入集群IP地址(包含本机ip默认第一个ip对应本机ip作为master)" --yes-button "YES" --no-button "NO"  --yesno "批量导入集群IP地址?" 10 60
#!/bin/bash
whiptail --title "#请输入本机Ip(master)并回车#" --inputbox "请检查IP是否一致,确定提交?" 10 60 "$IP" 3>&1 1>&2 2>&3
#!/bin/bash
#---
if ( whiptail --title "Title hylan:yesno" --yesno "Choose between Yes and No." 10 60 ) then
     echo "You chose Yes. Exit status was $?."
else
     echo "You chose No. Exit status was $?."
fi
#---
if (whiptail --title "Title hylan:yesno" --yes-button "Hylan" --no-button "Candy"  --yesno "Which do you like better?" 10 60) then
   echo "You chose Hylan. Exit status was $?.";
   echo "You Best!"
else
   echo "You chose Candy. Exit status was $?.";
fi
#---
whiptail --title "Title hylan:msgbox" --msgbox "Create a message box with whiptail. Choose Ok to continue." 10 60
#---
whiptail --title "Title hylan:inputbox" --inputbox "What is your pet's name?" 10 60 hylancandy 3>&1 1>&2 2>&3
#---
whiptail --title "Title hylan:passwordbox" --passwordbox "Enter your password and choose Ok to continue." 10 60 3>&1 1>&2 2>&3
#---
whiptail --title "Title hylan:menu" --menu "Choose your option" 15 60 4 \
"1" "Grilled Spicy Sausage" \
"2" "Grilled Halloumi Cheese" \
"3" "Charcoaled Chicken Wings" \
"4" "Fried Aubergine"  3>&1 1>&2 2>&3

#---
whiptail --title "Title hylan:checklist" --checklist "Choose preferred Linux distros" 15 60 4 "debian" "Venerable Debian" ON "ubuntu" "Popular Ubuntu" OFF "centos" "Stable CentOS" ON "mint" "Rising Star Mint" OFF 3>&1 1>&2 2>&3

{
     for (( i=0 ; i<=100 ; i+=20 )); do
         sleep 1
         echo $i
     done
} | whiptail --gauge "Please wait while installing" 6 60 0

#---
whiptail --title "Title hylan:checklist" --radiolist "Choose preferred Linux distros" 15 60 4 "debian" "Venerable Debian" ON "ubuntu" "Popular Ubuntu" OFF "centos" "Stable CentOS" ON "mint" "Rising Star Mint" OFF 3>&1 1>&2 2>&3
快速构建istio的测试容器
第一步:以nginx的容器为测试
build.sh脚本内容如下。
#!/bin/sh

path_current=`pwd`
path_script=$(cd "$(dirname "$0")"; pwd)

ver=$1
if [ "$ver" == "" ]; then
   echo "should like: build.sh v2"
   exit
fi

docker rmi ngtest:${ver}
docker stop mynginx
docker rm mynginx
docker run --name mynginx -d nginx:1.17.8
docker cp ./default.conf mynginx:/etc/nginx/conf.d/default.conf && docker commit mynginx ngtest:${ver}
docker stop mynginx
docker rm mynginx
echo "----------------list ngtest image---------------------"&&docker images|grep ngtest
与脚本同级目录下的default.conf配置文件如下:
server {
    listen       80;
    listen  [::]:80;
    server_name  localhost;

    location /test {
        default_type application/json;
        return 200 "vm4 - v2 - time:$date_gmt - remote:$remote_addr";
    }

    location / {
        root   /usr/share/nginx/html;
        index  index.html index.htm;
    }

    error_page   500 502 503 504  /50x.html;
    location = /50x.html {
        root   /usr/share/nginx/html;
    }
}
第二步:
apiVersion: networking.istio.io/v1alpha3
kind: Gateway
metadata:
  name: ngtest-gateway
spec:
  selector:
    istio: ingressgateway # use istio default controller
  servers:
  - port:
      number: 80
      name: http
      protocol: HTTP
    hosts:
    - "mynginx.cn"
-----------------------------------------
apiVersion: networking.istio.io/v1alpha3
kind: VirtualService
metadata:
  name: ngtest
spec:
  hosts:
  - "ngtestsvc"
  gateways:
  - ngtest-gateway
  http:
  - match:
    - uri:
        prefix: /
    route:
    - destination:
        host: ngtestsvc
        port:
          number: 1080
        subset: v1
      weight: 90
    - destination:
        host: ngtestsvc
        port:
          number: 1080
        subset: v2
      weight: 10

---------------------
apiVersion: v1
kind: Service
metadata:
  name: ngtestsvc
spec:
  type: NodePort
  ports:
  - port: 1080
    targetPort: 80
    name: http
  selector:
    app: ngtestapp

-------------------------------------
apiVersion: apps/v1
kind: Deployment
metadata:
  name: ngtestapp.v1
spec:
  replicas: 3
  selector:
    matchLabels:
      app: ngtestapp
      version: v1
  template:
    metadata:
      labels:
        app: ngtestapp
        version: v1
    spec:
      containers:
      - name: ngtest
        image: ngtest:v1
        imagePullPolicy: IfNotPresent
        ports:
        - containerPort: 80
        env:
        - name: DO_NOT_ENCRYPT
          value: "true"

------------------------------------
apiVersion: apps/v1
kind: Deployment
metadata:
  name: ngtestapp.v2
spec:
  replicas: 3
  selector:
    matchLabels:
      app: ngtestapp
      version: v2
  template:
    metadata:
      labels:
        app: ngtestapp
        version: v2
    spec:
      containers:
      - name: ngtest
        image: ngtest:v2
        imagePullPolicy: IfNotPresent
        ports:
        - containerPort: 80
        env:
        - name: DO_NOT_ENCRYPT
          value: "true"
service的三种类型
Kubernetes的service有三种类型:ClusterIP,NodePort,LoadBalancer
apiVersion: v1
kind: Service
metadata:
  name: ngtestsvc
spec:
  type: NodePort  【不指定,默认为ClusterIP】
  ports:
  - port: 1080
    targetPort: 80  【不指定时,默认与port一致】
    #nodePort: 31080 【该端口被强制划分为30000~50000之间,建议由系统自动分配,因为它会产生冲突的。】
    name: http
  selector:
    app: ngtestapp
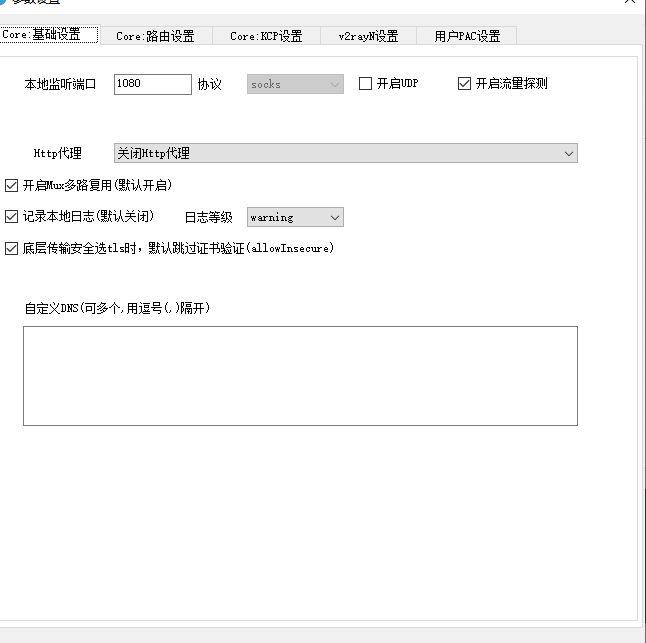
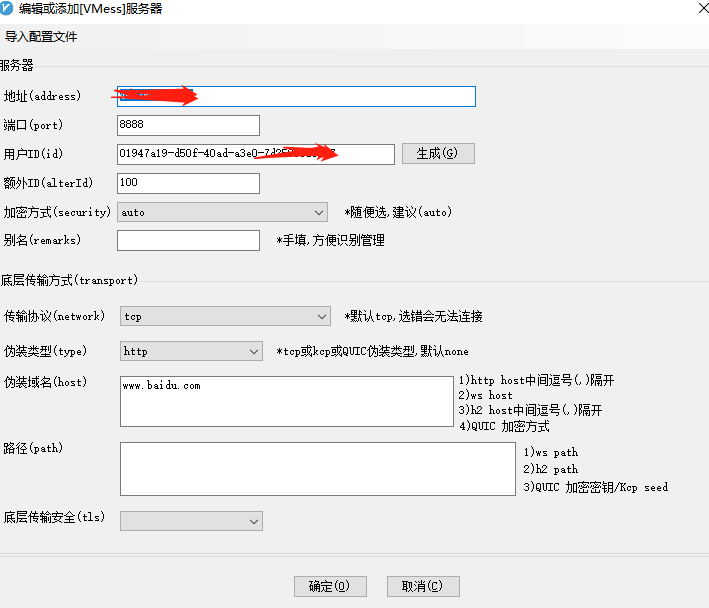
v2ray搭建部署2
一、服务端
version: "3"

services:
  v2ray:
    image: v2ray/official
    container_name: v2ray
    restart: always
    command: v2ray -config=/etc/v2ray/config.json
    ports:
      - "8888:80"
    volumes:
      - ./data:/etc/v2ray
      - ./v2ray.config.json:/etc/v2ray/config.json:ro
{
	"log": {
		"access": "/var/log/v2ray/access.log",
		"error": "/var/log/v2ray/error.log",
		"loglevel": "warning"
	},
	"inbound": {
		"port": 80,
		"protocol": "vmess",
		"settings": {
			"clients": [{
				"id": "01947a19-d50f-40ad-a3e0-7d25081f82a7",
				"level": 1,
				"alterId": 100
			}]
		},
		"streamSettings": {
			"network": "tcp",
			"tcpSettings": {
				"header": {
					"request": {
						"path": [
							"/"
						],
						"version": "1.1",
						"method": "GET",
						"headers": {
							"Host": "www.baidu.com",
							"Connection": [
								"keep-alive"
							],
							"Accept-Encoding": [
								"gzip, deflate"
							],
							"Pragma": "no-cache",
							"User-Agent": [
								"Mozilla/5.0 (Windows NT 10.0; WOW64) AppleWebKit/537.36 (KHTML, like Gecko) Chrome/55.0.2883.75 Safari/537.36",
								"Mozilla/5.0 (iPhone; CPU iPhone OS 10_0_2 like Mac OS X) AppleWebKit/601.1 (KHTML, like Gecko) CriOS/53.0.2785.109 Mobile/14A456 Safari/601.1.46"
							]
						}
					},
					"type": "http",
					"response": {
						"status": "200",
						"headers": {
							"Transfer-Encoding": [
								"chunked"
							],
							"Connection": [
								"keep-alive"
							],
							"Content-Type": [
								"application/octet-stream",
								"video/mpeg"
							],
							"Pragma": "no-cache"
						},
						"reason": "OK",
						"version": "1.1"
					}
				},
				"connectionReuse": true
			}
		}
	},
	"outbound": {
		"protocol": "freedom",
		"settings": {}
	},
	"outboundDetour": [{
		"protocol": "blackhole",
		"settings": {},
		"tag": "blocked"
	}],
	"routing": {
		"strategy": "rules",
		"settings": {
			"rules": [{
				"type": "field",
				"ip": [
					"0.0.0.0/8",
					"10.0.0.0/8",
					"100.64.0.0/10",
					"127.0.0.0/8",
					"169.254.0.0/16",
					"172.16.0.0/12",
					"192.0.0.0/24",
					"192.0.2.0/24",
					"192.168.0.0/16",
					"198.18.0.0/15",
					"198.51.100.0/24",
					"203.0.113.0/24",
					"::1/128",
					"fc00::/7",
					"fe80::/10"
				],
				"outboundTag": "blocked"
			}]
		}
	}
}
客户端
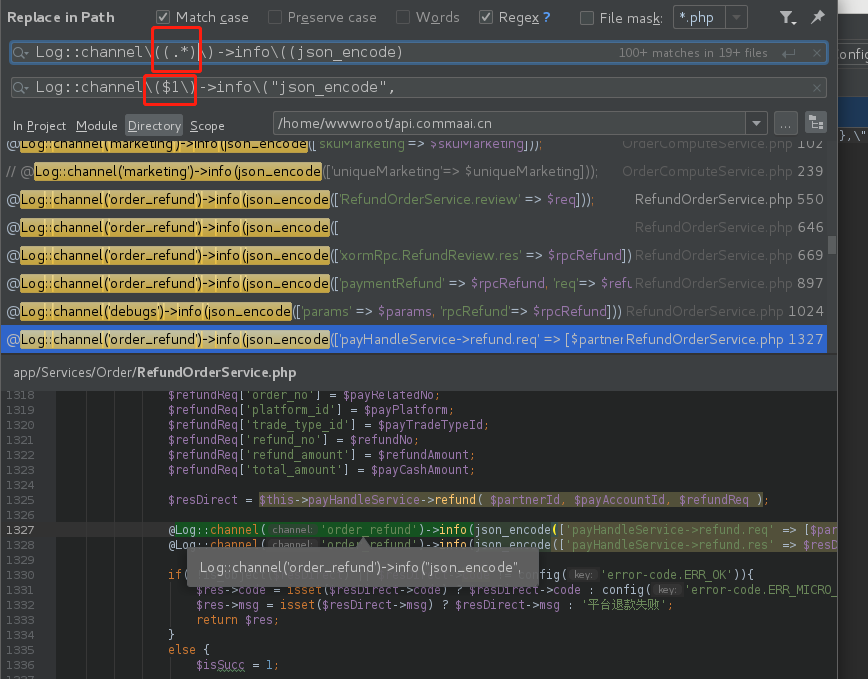
jetbrain的IDE正则替换
安卓ADB安装启动。
安装命令:
adb install -r “xxx.apk”
adb shell “am start -n appid/package” [appid是在build.grade文件的applicationId][package是包名全路径]
//adb shell “am start -n \”com.commaai.facedoor.v3/com.commaai.facedoor.activity.MainActivity\””
adb shell “adm force-stop “appid/package”
@echo off

set apkname=%1%

::传入apk路径
echo 您输入了参数:%apkname%

Set filename=%apkname%
set filename=%~nx1
echo 文件名为:%filename%
set folder=%~dp1
echo 路径为:%folder%

:tryagaint
adb connect 192.168.30.25:5555
timeout /t 3
echo "install" && adb install -r %apkname% && goto myexit
timeout /t 10
goto tryagaint

:myexit
echo "success to install"
adb shell "am start -n \"com.commaai.facedoor.v3/com.commaai.facedoor.activity.MainActivity\""
pause
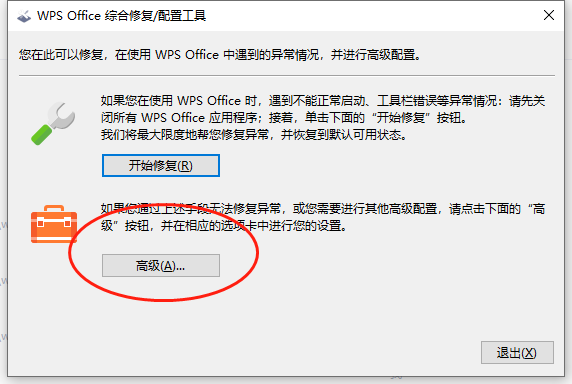
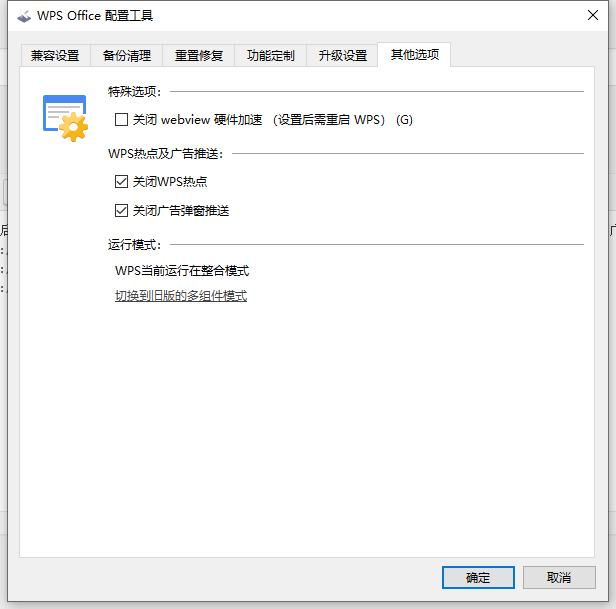
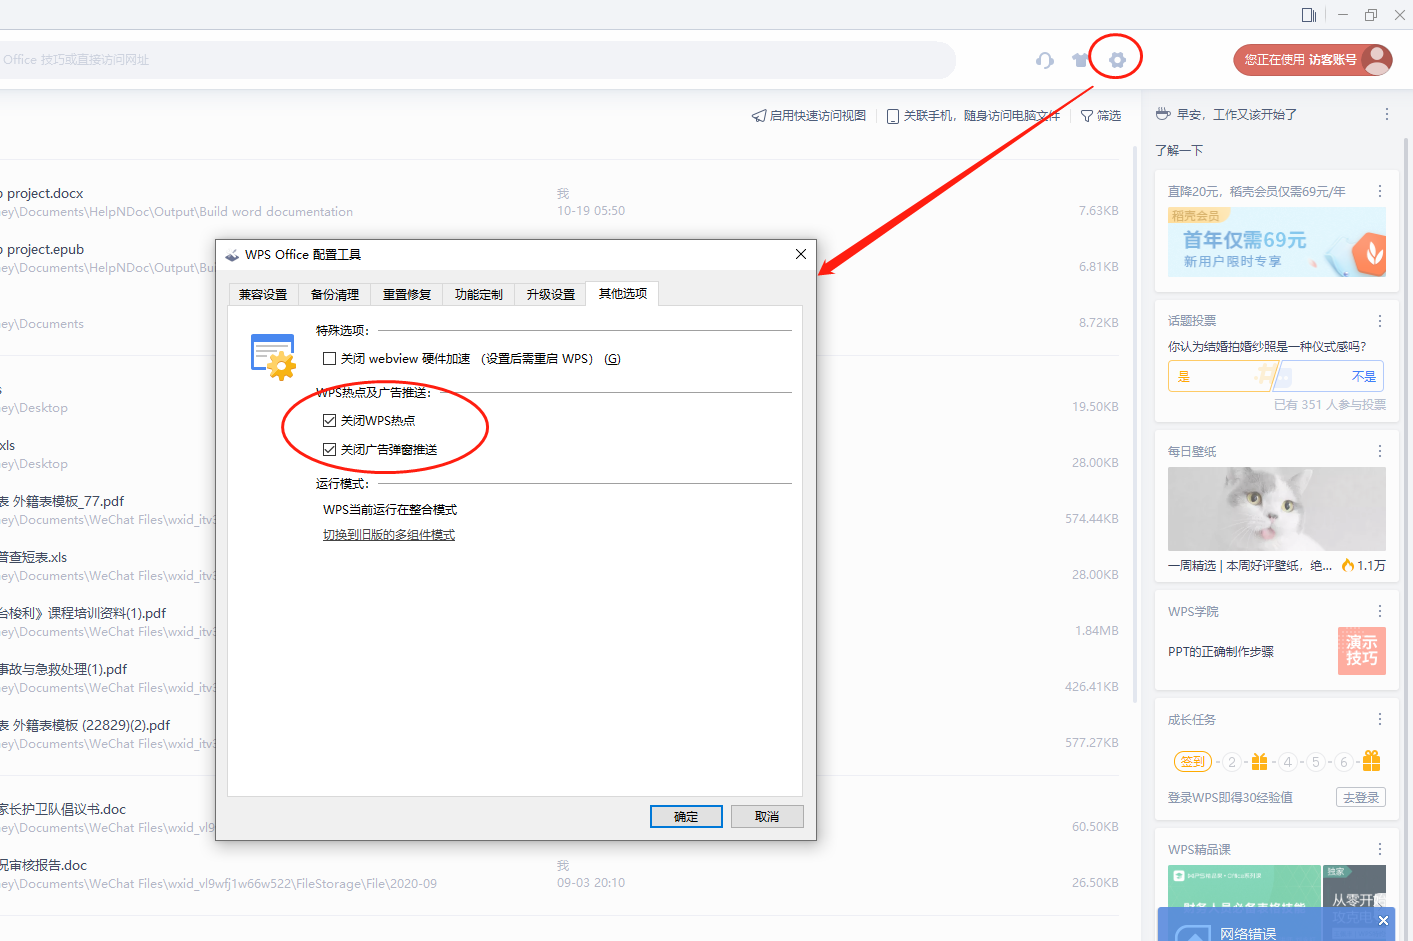
关闭WPS广告
“1.我们首先点击电脑左下角的开始。2.然后点击Wps Office文件夹。3.随后点击配置工具。4.我们在弹出的窗口中点击高级。5.再点击其他选项。6.最后取消勾选WPS热点及广告推送就可以了。

android应用压测工具
第一步:创建主运行脚本run.sh
#!/bin/sh

path_current=`pwd`
path_script=$(cd "$(dirname "$0")"; pwd)

while true
do
   /bin/bash $path_script/script/check.sh
   read -p "input action[killall|start|stop|help|exit]:" mode
   case "$mode" in
     'start')
        read -p "input device IP[192.168.30.25]: " ip
        read -p "input watch type such as [temp,frame,none],default none: " type
        echo "start parameter: IP: $ip  -  type:$type"
        if [ "$ip" != "" ]; then
            /bin/bash $path_script/script/start.sh "$ip:5555" "$type"
        fi
        if [ "$ip" == "" ]; then
           echo "IP should not be empty"
        fi
     ;;
     'stop')
        read -p "input device IP[192.168.30.25]: " ip
        echo "stop parameter: IP: $ip  -  type:$type"
        if [ "$ip" != "" ]; then
           /bin/bash $path_script/script/stop.sh "$ip:5555"
        fi
     ;;
     'killall')
         /bin/bash $path_script/script/killall.sh
     ;;
     'exit')
         exit 0
     ;;
     *)
     ;;
   esac
done
第二步:创建script/connect.sh脚本
#!/bin/sh

path_current=`pwd`
path_script=$(cd "$(dirname "$0")"; pwd)

target=$1
if [ "$target" == "" ]; then
   echo "should add parameter to connect command, like connect.sh 192.168.30.25:5555"
   exit 1
fi
result=$(adb devices|grep "${target}"|grep -v offline|grep -v grep)
if [ "$result" != "" ]; then
   exit 0
fi
adb connect $target
adb -s "$target" root
第三步:创建script/check.sh脚本
#!/bin/sh

path_current=`pwd`
path_script=$(cd "$(dirname "$0")"; pwd)
ps -ef | grep "mylogcat" | grep -v grep
ps -ef | grep "mytail" | grep -v grep
ps -ef | grep "adb" | grep -v grep
第三步:创建script/stop.sh脚本
#!/bin/sh

path_current=`pwd`
path_script=$(cd "$(dirname "$0")"; pwd)

target=$1
if [ "$target" == "" ]; then
   echo "should like 192.168.30.25:5555"
   exit 1
fi

ps -ef | grep "$target"| grep -v grep

while true
do
  app_process=`ps -ef | grep "$target"| grep -v grep`
  echo $app_process | awk '{print ($2)}'
  stop=1
  if test -n "$app_process"; then
     echo "had find app process informaton"
     echo $app_process | awk '{print ($2)}' | xargs kill -9
     stop=0
  fi
  if [ $stop -eq 1 ]; then
    break;
  fi
done
第四步:创建启动脚本script/start.sh
#!/bin/sh

path_current=`pwd`
path_script=$(cd "$(dirname "$0")"; pwd)

target=$1
param=$2
if [ "$target" == "" ]; then
   echo "should like run.sh 192.168.30.25:5555 temp,frame"
   exit 1
fi

nohup /bin/bash ${path_script}/mytail.sh $* &
nohup /bin/bash ${path_script}/mylogcat.sh $* &
第五步:创建mytail.sh脚本
#!/bin/sh

path_current=`pwd`
path_script=$(cd "$(dirname "$0")"; pwd)
path_data=$path_script/../

target=$1
param=$2
if [ "$target" == "" ]; then
   echo "should like mytail.sh 192.168.30.25 temp,frame"
   exit 1
fi

while true
do
  run_time=$(date "+%Y%m%d%H%M")
  if [ ! -d "$path_data/${target}" ]; then
     mkdir -p "$path_data/${target}"
  fi
  echo "--------[${run_time}]----------------" >> $path_data/${target}/tail.txt
  /bin/bash $path_script/connect.sh $*
  adb -s "$target" shell "free -h" >> $path_data/${target}/tail.txt
  adb -s "$target" shell "top -n 1|grep com.commaai." >> $path_data/${target}/tail.txt
  sleep 1
  adb -s "$target" shell "top -n 1|grep com.commaai." >> $path_data/${target}/tail.txt
  temp=$(echo $param | grep "temp")
  if [ "$temp" != "" ];then
     adb  -s "$target" shell "cat /sys/class/thermal/thermal_zone*/temp" >>  $path_data/${target}/tail.txt
  fi
  frame=$(echo $param | grep "frame")
  if [ "$frame" != "" ];then
     adb  -s "$target" shell "tail -n 2 /storage/emulated/0/Log/brokenflow.txt" >>  $path_data/${target}/tail.txt
  fi
  sleep 50
done
第六步:创建script/mylogcat.sh脚本
#!/bin/sh

path_current=`pwd`
path_script=$(cd "$(dirname "$0")"; pwd)
path_data=$path_script/../;

target=$1
while true
do
  run_time=$(date "+%Y%m%d%H%M")
  /bin/bash $path_script/connect.sh $*
  if [ ! -d "$path_data/${target}" ]; then
     mkdir -p "$path_data/${target}"
  fi
  echo "--------[${run_time}]----------------" >> $path_data/${target}/error.txt
  adb -s "$target" logcat *:E >> $path_data/${target}/error.txt
done
第七步:创建清除所有脚本
#!/bin/sh

path_current=`pwd`
path_script=$(cd "$(dirname "$0")"; pwd)
echo "try to kill mylogcat"
while true
do
  app_process=$(ps -ef | grep "mylogcat" | grep -v grep)
  echo $app_process | awk '{print ($2)}'
  stop=1
  if test -n "$app_process"; then
    echo "had find app process informaton"
    echo $app_process | awk '{print ($2)}' | xargs kill -9
    stop=0
  fi
  if [ $stop -eq 1 ]; then
    break
  fi
done

echo "try to kill mytail"
while true
do
  app_process=$(ps -ef | grep "mytail" | grep -v grep)
  echo $app_process | awk '{print ($2)}'
  stop=1
  if test -n "$app_process"; then
    echo "had find app process informaton"
    echo $app_process | awk '{print ($2)}' | xargs kill -9
    stop=0
  fi
  if [ $stop -eq 1 ]; then
     break;
  fi
done


echo "try to kill adb"
while true
do
  app_process=$(ps -ef | grep "adb" | grep -v grep)
  echo $app_process | awk '{print ($2)}'
  stop=1
  if test -n "$app_process"; then
    echo "had find app process informaton"
    echo $app_process | awk '{print ($2)}' | xargs kill -9
    stop=0
  fi
  if [ $stop -eq 1 ]; then
    break;
  fi
done
Android的例子
https://github.com/android/ndk-samples