1.下载:http://cdn.mysql.com/Downloads/MySQL-5.6/mysql-5.6.26-winx64.zip
2.安装mysql服务:mysqld –install mysql
3.启动数据库:net start mysql
4.停止数据库:net stop mysql
5.删除mysql服务:mysqld remove mysql
配置PHP环境变量
使用阿里LNMP,故其环境变量配置如下:
1.#vi /etc/profile
如增加一个环境变量:
export MY_REDIS_HOST="localhost"
——————-
2.修改php-fpm.conf,设置PHP环境变量:
#vi /etc/php5/fpm/php-fpm.conf
增加:
env[MY_REDIS_HOST]=$MY_REDIS_HOST
——————————-
3.在/etc/init.d/php-fpm脚本的合适位置添加:. /etc/profile。
php_fpm_BIN=${exec_prefix}/sbin/php-fpm

php_fpm_CONF=${prefix}/etc/php-fpm.conf

php_fpm_PID=${prefix}/var/run/php-fpm.pid
. /etc/profile # i'm here.
php_opts="--fpm-config $php_fpm_CONF --pid $php_fpm_PID"
wait_for_pid () {
注意,点号与路径之间有空格。实际上.与source是一样的,但是这里用source会报错
还要修改/etc/profile的权限,因为php-fpm启动用户是www-data , 而/etc/profile的权限用户为root,这里为了简章,将/etc/profile的权限设为“777”,即:
#chmod 777 /etc/profile
————————
4.修改php.ini配置。
因为php.ini默认不载入$_ENV变量定义,如果此时查看phpinfo(),会发现我们设置的环境变量为”no value”。
#vi /etc/php5/fpm/php.ini
修改:variables_order为:
variables_order="EGPCS"
————–
5.重启php-fpm
#service php5-fpm restart
6.测试设置结果。
查看phpinfo(),在”Enviroment variables” 一节与“PHP variables”一节内可能看到我们刚才设置的变量名及变量值。
使用国内镜像源来加速python pypi包的安装
pipy国内镜像目前有:
http://pypi.douban.com/ 豆瓣
http://pypi.hustunique.com/ 华中理工大学
http://pypi.sdutlinux.org/ 山东理工大学
http://pypi.mirrors.ustc.edu.cn/ 中国科学技术大学
对于pip这种在线安装的方式来说,很方便,但网络不稳定的话很要命。使用国内镜像相对好一些,如果想手动指定源,可以在pip后面跟-i 来指定源,比如用豆瓣的源来安装web.py框架:
pip install web.py -i http://pypi.douban.com/simple
注意后面要有/simple目录!!!
要配制成默认的话,需要创建或修改配置文件(linux的文件在~/.pip/pip.conf,windows在%HOMEPATH%\pip\pip.ini),修改内容为:
code:
[global]
index-url = http://pypi.douban.com/simple
————————
Configuration
Config file
pip allows you to set all command line option defaults in a standard ini style config file.
The names and locations of the configuration files vary slightly across platforms.
On Unix and Mac OS X the configuration file is: $HOME/.pip/pip.conf
On Windows, the configuration file is: %HOME%\pip\pip.ini
You can set a custom path location for the config file using the environment variable PIP_CONFIG_FILE.
The names of the settings are derived from the long command line option, e.g. if you want to use a different package index (–index-url) and set the HTTP timeout (–default-timeout) to 60 seconds your config file would look like this:
[global]
timeout = 60
index-url = http://download.zope.org/ppix
———————————
方法2:配置方式修改
easy_install:
1.打开pydistutils.cfg
vi ~/.pydistutils.cfg
——
2.写入以下内容
[easy_install]
index_url = http://e.pypi.python.org/simple
————————
pip:
1.打开pip.conf
vi ~/.pip/pip.conf
2.写入以下内容
[global]
index-url = http://e.pypi.python.org/simple
速度比较快的国内镜像,都来自清华大学,服务器在北京。公网的服务器为官方镜像
公网:http://e.pypi.python.org/simple
教育网:http://pypi.tuna.tsinghua.edu.cn/simple
磁盘挂载
在阿里云购买了个数据盘,需要挂载,但发现网上的方法太混乱了,于是把验证有效的方法转载如下:
转:
1. 虚拟机—设置—添加,选择硬盘添加
2. 首先为磁盘创建文件系统:mkfs.ext3 /dev/sdb
3. 创建挂载点:mkdir /mnt/sdb
4. 挂载:mount /dev/sdb /mnt/sdb
5. fdisk -l
发现有问题:
Disk /dev/sdb doesn’t contain a valid partition table
6. fdisk /dev/sdb
跟着向导一步步做下去(如果不知道该输入什么,就输入“m”并回车,可以打印出菜单):
Command (m for help): m
Command action
a toggle a bootable flag
b edit bsd disklabel
c toggle the dos compatibility flag
d delete a partition
l list known partition types
m print this menu
n add a new partition
(后面的菜单省略,太长了)
这里我们要添加一个新的分区,所以输入“n”:
Command (m for help): n
Command action
e extended
p primary partition (1-4)
p
Partition number (1-4): 1
First cylinder (1-14098, default 1): (此处直接回车)
Using default value 1
Last cylinder or +size or +sizeM or +sizeK (1-14098, default 14098): (此处直接回车)
Using default value 14098
Command (m for help): p
Disk /dev/sdb: 115.9 GB, 115964116992 bytes
255 heads, 63 sectors/track, 14098 cylinders
Units = cylinders of 16065 * 512 = 8225280 bytes
Device Boot Start End Blocks Id System
/dev/sdb1 1 14098 113242153+ 83 Linux
现在可以写入分区表了,所以输入“w”:
Command (m for help): w
The partition table has been altered!
Calling ioctl() to re-read partition table.
Syncing disks.
现在再fdisk -l,结果正常
PHP流行的框架

mysql数据损坏修复方法
1、myisamchk
使用 myisamchk 必须暂时停止 MySQL 服务器。例如,我们要检修 discuz 数据库。执行以下操作:
# service mysql stop (停止 MySQL );
# myisamchk -r /数据库文件的绝对路径/*MYI
# service mysql start
myisamchk 会自动检查并修复数据表中的索引错误。
2、mysqlcheck
使用 mysqlcheck 无需停止 MySQL ,可以进行热修复。操作步骤如下:
# mysqlcheck -r discuz.*
# service mysql stop (停止 MySQL );
# myisamchk -r /数据库文件的绝对路径/*MYI
# service mysql start
myisamchk 会自动检查并修复数据表中的索引错误。
注意,无论是 myisamchk 还是 mysqlcheck ,一般情况下不要使用 -f 强制修复,-f 参数会在遇到一般修复无法成功的时候删除部分出错数据以尝试修复。所以,不到万不得已不要使用 -f。
eclipsecpp从可执行程序员中导入源代码并调试
如果寻找跨平台IDE及调试环境,那eclipse是最佳选择了,因为它有一项超强功能:可以从可执行程序员导入源代码并调试程序,这种特性是非常适合自定义MakeFile项目,不需要改变项目现有结果,即可自由开发和调试了。
导入源码方式很多,
1.project explorer面板,右键菜单选择import菜单项。
2.在import对话框里选择c/c++,在展开的子选择项中选择c/c++ executable,然后点击下一步。
3.选择包含调试信息的可执行程序,然后下一步,再点击完成,这时会自动弹出调试信息配置框。
4.在这个调试配置框内,可以配置gdb版本以及环境变量等。
本人使用的是eclipse-cpp4.4 luna版本,操作系统是centos5.8
三种标准库链接方式
Linux 应用程序因为 Linux 版本的众多与各自独立性,在工程制作与使用中必须熟练掌握如下两点才能有效地工作和理想地运行。
1.Linux 下标准库链接的三种方式(全静态 , 半静态 (libgcc,libstdc++), 全动态)及其各自利弊。
2.Linux 下如何巧妙构建 achrive(*.a),并且如何设置链接选项来解决 gcc 比较特别的链接库的顺序问题。
全静态:
1.-static -pthread -lrt -ldl
2.不会发生应用程序在 不同 Linux 版本下的标准库不兼容问题。
3.生成的文件比较大,应用程序功能受限(不能调用动态库等)
全动态
1.-pthread -lrt -ldl
2.生成文件是三者中最小的
3.比较容易发生应用程序在不同 Linux 版本下标准库依赖不兼容问题。
半静态 (libgcc,libstdc++)
1.-static-libgcc -L. -pthread -lrt -ldl
2.灵活度大,能够针对不同的标准库采取不同的链接策略,从而避免不兼容问题发生。
3.结合了全静态与全动态两种链接方式的优点。
4.比较难识别哪些库容易发生不兼容问题,目前只有依靠经验积累。
5.某些功能会因选择的标准库版本而丧失。
Linux 静态库链接顺序问题及解决方法:
正如 GCC 手册中提到的那样:
It makes a difference where in the command you write this option; the linker
searches and processes libraries and object files in the order they are specified.
Thus, ‘ foo.o -lz bar.o ’ searches library ‘ z ’ after file ‘ foo.o ’ but before
‘ bar.o ’ . If ‘ bar.o ’ refers to functions in ‘ z ’ , those functions may not be loaded.
为了解决这种库链接顺序问题,我们需要增加一些链接选项 :
$(CXX) $(LINKFLAGS) $(OBJS) -Xlinker “-(” $(LIBS) -Xlinker “-)” -o $@
通过将所有需要被链接的静态库放入 -Xlinker “-(” 与 -Xlinker “-)” 之间,可以是 g++ 链接过程中, 自动循环链接所有静态库,从而解决了原本的链接顺序问题。
涉及链接选项:-Xlinker
-Xlinker option
Pass option as an option to the linker. You can use this to supply system-specific
linker options which GCC does not know how to recognize.
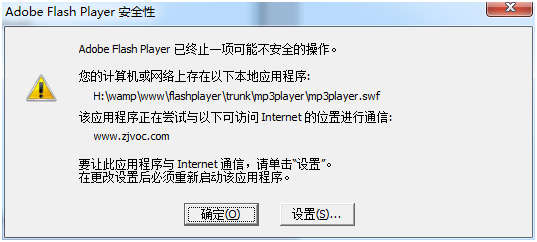
adobe flash player 已经终止一项可能不安全的操作
在启动Flash调试时,需要连接网络,结果弹出以下提示,解决方法如下:
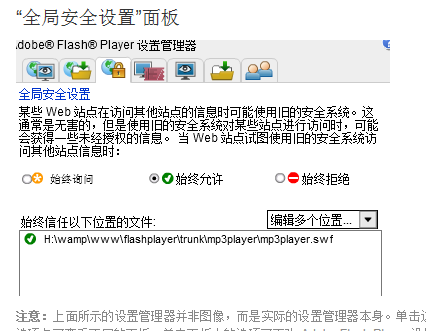
打开如下地址:http://www.macromedia.com/support/documentation/cn/flashplayer/help/settings_manager04.html
请注意一定要用IE浏览器打开,才能配置成功,如果使用其它浏览器例如谷歌浏览器,则配置不成功。
如下是我的配置:
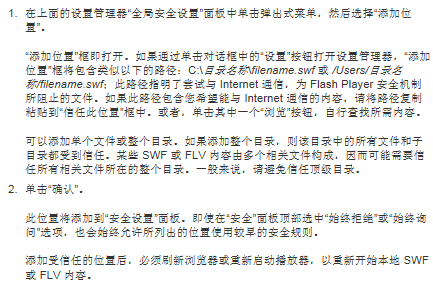
以下是摘录官方原文:
base32源码
= 5) {

            $vbits -= 5;

            $output .= $BASE32_ALPHABET[$v >> $vbits];

            $v &= ((1 << $vbits) - 1);
        }
    }

    if ($vbits > 0) {

        $v <<= (5-$vbits);
        $output .= $BASE32_ALPHABET[$v];
    }

    return $output;
}

function base32_decode($input) {
    $output = '';
    $v = 0;
    $vbits = 0;

    for($i = 0, $j = strlen($input); $i < $j; $i++) {
        $v <<= 5;
        if ($input[$i] >= 'a' && $input[$i] <= 'z') {
            $v += (ord($input[$i]) - 97);
        }
        elseif ($input[$i] >= '2' && $input[$i] <= '7') {
            $v += (24 + $input[$i]);
        }
        else {
            exit(1);
        }

        $vbits += 5;
        while($vbits >= 8){

            $vbits -= 8;

            $output .= chr($v >> $vbits);

            $v &= ((1 << $vbits) - 1);
        }
    }
    return $output;
}

$encode = base32_encode('肖斌-https://xiaobin.net/');
$decode = base32_decode($encode);
var_dump($encode, $decode);
?>