cmake_minimum_required(VERSION 3.12)
project(src C)

set(CMAKE_C_STANDARD 11)
set(CMAKE_C_FLAGS "${CMAKE_C_FLAGS} -std=gnu99 -include std.h -Wall -Wextra -Wundef -Werror -mtune=atom -g -O0  -fstack-check")
set(CMAKE_C_FLAGS "${CMAKE_C_FLAGS} -static-libgcc -MMD -MP")

#当使用add_definitions设置时,res.rc文件是无法编译通过的,要使用CMAKE_C_FLAGS。
#add_definitions(-static-libgcc -MMD -MP -std=gnu99 -include std.h -Wall -Wextra -Wundef -Werror -mtune=atom -g -O0  -fstack-check)
message("CMAKE_C_COMPILER=${CMAKE_C_COMPILER}")
message("CMAKE_RC_COMPILER=${CMAKE_RC_COMPILER}")

include_directories(.)

link_directories(/usr/lib/w32api)

add_executable(mintty WIN32
        appinfo.h
        base64.c
        base64.h
        charset.c
        charset.h
        child.c
        child.h
        config.c
        config.h
        ctrls.c
        ctrls.h
        jumplist.c
        jumplist.h
        mcwidth.c
        minibidi.c
        minibidi.h
        print.h
        printers.c
        res.h
        sixel.c
        sixel.h
        sixel_hls.c
        sixel_hls.h
        std.c
        std.h
        term.c
        term.h
        termclip.c
        termline.c
        termmouse.c
        termout.c
        termpriv.h
        textprint.c
        win.h
        winclip.c
        winctrls.c
        winctrls.h
        windialog.c
        winids.h
        winimg.c
        winimg.h
        wininput.c
        winmain.c
        winpriv.h
        winsearch.c
        winsearch.h
        wintext.c
        wintip.c
        res.rc)

target_link_libraries(mintty libusp10.a libgdiplus.a libcomctl32.a  libimm32.a libwinmm.a libwinspool.a libole32.a libuuid.a)
作者归档:xinlu
validator检验
package validator

import (
	"fmt"
	"reflect"
)


func isStructPtr(t reflect.Type) bool {
	return t.Kind() == reflect.Ptr && t.Elem().Kind() == reflect.Struct
}

func isNilOrZero(v reflect.Value) bool {
	switch v.Kind() {
	default:
		return reflect.DeepEqual(v.Interface(), reflect.Zero(v.Type()).Interface())
	case reflect.Interface, reflect.Ptr:
		return v.IsNil()
	}
}

func CheckRequired(obj interface{}, fields ...string) error  {
	reflectType := reflect.TypeOf(obj)
	reflectValue := reflect.ValueOf(obj)
	if !isStructPtr(reflectType) {
		return fmt.Errorf(
			"expected unnamed object value to be a pointer to a struct but got type %s "+
				"with value %v",
			reflectType,
			obj,
		)
	}
	elem := reflectValue.Elem()
	for i := 0; i < len(fields); i++ {
		name := fields[i]
		val := elem.FieldByName(name)
		if isNilOrZero(val) {
			return fmt.Errorf("the field of [ %s ] can't be empty", name)
		}
	}
	return nil
}
ubuntu18.04安装php5.5.38失败解决方案
configure: error: jpeglib.h not found.
configure: error: png.h not found.
apt install aptitude,另一个比apt更好的包管理工具
aptitude install libjpeg-dev libpng-dev
Centos5.x以前的镜像源
http://vault.centos.org/
常用netstat命令
统计某个IP时的连接数
netstat -nalp|grep 127.0.0.1:9006|wc
查看某个连接的创建进程
netstat -nalp|grep 120.92.21.108|grep ESTABLISHED|more
统计TIME_WAIT的数量
netstat -nalp|grep 120.92.21.108|grep TIME_WAIT|wc
netstat -nalp|grep 127.0.0.1:9006|grep ESTABLISHED|more && netstat -nalp|grep 114.112.66.246|grep ESTABLISHED|more&& netstat -nalp|grep 114.112.66.248|grep ESTABLISHED|more&& netstat -nalp|grep 114.112.66.44|grep ESTABLISHED|more&& netstat -nalp|grep 114.112.66.46|grep ESTABLISHED|more&& netstat -nalp|grep 120.131.1.61|grep ESTABLISHED|more&& netstat -nalp|grep 120.92.201.25|grep ESTABLISHED|more&& netstat -nalp|grep 120.92.20.174|grep ESTABLISHED|more&& netstat -nalp|grep 120.92.209.115|grep ESTABLISHED|more&& netstat -nalp|grep 120.92.21.108|grep ESTABLISHED|more&& netstat -nalp|grep 127.0.0.1|grep ESTABLISHED|more
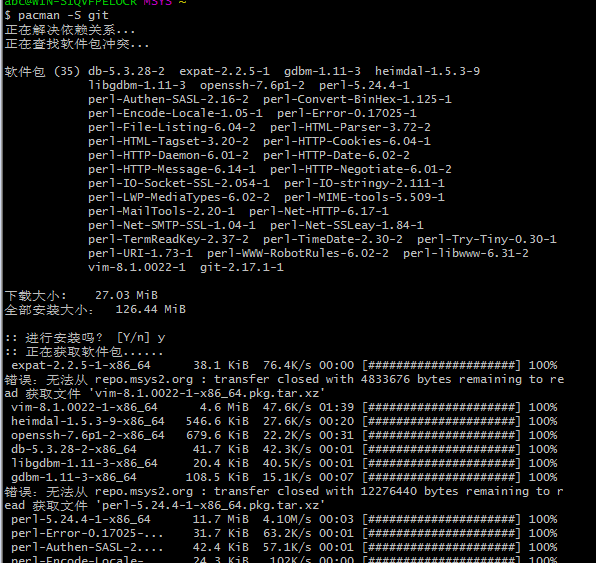
借用msys2搭建linux子系统
1.安装msys2,它自带了pacman包管理工具,可以像yum或apt-get一样轻松添加软件。
http://www.msys2.org/,安装最新版本。如果此处没有标示最新版,也可以去https://sourceforge.net/projects/msys2/下载。正常情况下,两个站点的最新版是一样的。

2.使用pacman包管理工具,安装git,它自动解决包依赖问题。
pacman -S git
unixsocket内核优化
在常见的nginx+unixsocket相比nginx+tcp回环,更能提升性能,但由于内核参数的限制,导致unixsockets不稳定,需要进行内核参数优化。
参考swoole的优化。
https://wiki.swoole.com/wiki/page/11.html
在偶然发现以下命令,可以解决本地回环失败或TIME_WAIT数量太多问题:
sysctl -w net.ipv4.tcp_timestamps=1
查cat /proc/sys/net/ipv4/tcp_timestamps确认是否为0,如果是0则需要执行上述命令设置为1。
【sysctl -p】激活
———————
1.ulimit设置,
vim /etc/security/limits.conf
* soft nofile 262140
* hard nofile 262140
root soft nofile 262140
root hard nofile 262140
* soft core unlimited
* hard core unlimited
root soft core unlimited
root hard core unlimited
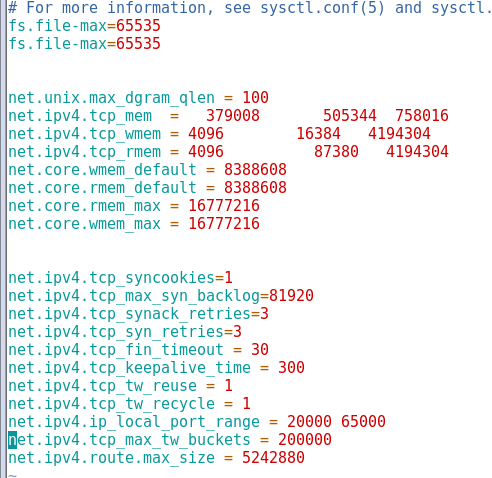
2.修改sysctl.conf配置
vim /etc/sysctl.conf
以下配置在Centos7.x系统下,长期运行下,确认OK的。
net.ipv4.ip_forward = 0
net.ipv4.conf.default.rp_filter = 1
net.ipv4.conf.default.accept_source_route = 0
kernel.sysrq = 0
kernel.core_uses_pid = 1
net.ipv4.tcp_syncookies = 1
net.bridge.bridge-nf-call-ip6tables = 0
net.bridge.bridge-nf-call-iptables = 0
net.bridge.bridge-nf-call-arptables = 0
kernel.msgmnb = 65536
kernel.msgmax = 65536
kernel.shmmax = 68719476736
kernel.shmall = 4294967296
net.ipv4.tcp_keepalive_time = 1200
net.ipv4.ip_local_port_range = 1024 65535

net.ipv4.conf.all.rp_filter = 0
net.ipv4.conf.default.rp_filter = 0
net.ipv4.conf.eth0.rp_filter = 0
net.ipv4.conf.eth1.rp_filter = 0
net.ipv4.conf.all.arp_announce = 2
net.ipv4.conf.default.arp_announce = 2
net.ipv4.conf.eth0.arp_announce = 2
net.ipv4.conf.eth1.arp_announce = 2

net.ipv4.tcp_mem = 379008       505344  758016
net.ipv4.tcp_wmem = 4096        16384   4194304
net.ipv4.tcp_rmem = 4096          87380   4194304
net.core.wmem_default = 8388608
net.core.rmem_default = 8388608
net.core.rmem_max = 16777216
net.core.wmem_max = 16777216
net.ipv4.tcp_syncookies = 1
net.ipv4.tcp_max_syn_backlog = 81920
net.ipv4.tcp_synack_retries = 3
net.ipv4.tcp_syn_retries = 3
net.ipv4.tcp_fin_timeout = 30
net.ipv4.tcp_keepalive_time = 300
net.ipv4.tcp_tw_reuse = 1
net.ipv4.tcp_tw_recycle = 1
net.ipv4.ip_local_port_range = 20000 65000
net.ipv4.tcp_max_tw_buckets = 200000
net.ipv4.route.max_size = 5242880
ssh指令定制及自动补全
1.利用Git的git-bash来做ssh的交互终端
不再使用git-bash进行交互了,统一使用msys2工具包进行管理。它可以实现linux的子系统。
注:参考这文章http://www.kxtry.com/archives/2334
2.在git-bash终端中执行【vim .bashrc】,添加以下指令
complete -W "$(echo $(grep '^Host ' F:/tools/myssh/config  | sort -u | sed 's/^Host //'))" remote
complete -W "$(echo $(grep '^Host ' F:/tools/myssh/config  | sort -u | sed 's/^Host //'))" xscp
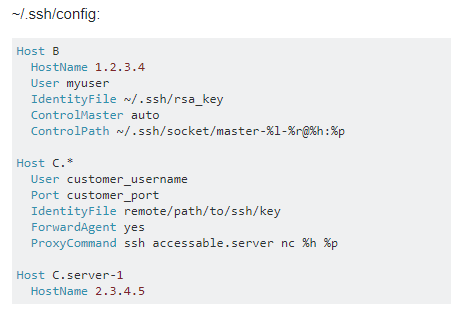
3.编辑ssh的config文件
Host logkaf67
    HostName 10.0.0.67
    Port 22
    User heguowen
    IdentityFile c:\tools\ssh\id_rsa
    ProxyJump jumpServer   #since ssh 7.3 supports.
    #ProxyCommand ssh abc@10.2.16.210 nc %h %p
4.编辑remote脚本
#!/bin/sh

path_current=`pwd`
path_script=$(cd "$(dirname "$0")"; pwd)
cfg=$path_script/config

if [ $# -lt 0 ]; then
   awk '{if($1 == "Host"){print $2}}' $cfg
else
   ssh -F $cfg $*
fi
5.编辑xscp脚本
#!/bin/sh

path_current=`pwd`
path_script=$(cd "$(dirname "$0")"; pwd)
cfg=$path_script/config
if [ $# -lt 1 ]; then
   awk '{if($1 == "Host"){print $2}}' $cfg
else
   scp -F $cfg $*
fi
SSH from A through B to C, using private key on B
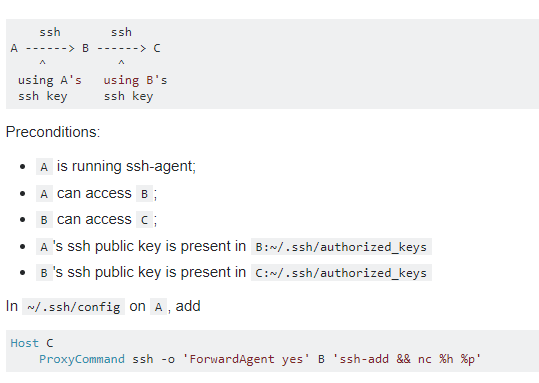
https://serverfault.com/questions/337274/ssh-from-a-through-b-to-c-using-private-key-on-b/701884#701884?tdsourcetag=s_pctim_aiomsg
Host jumpServer
        HostName x.y.z.h
        Port 22
        User abc
        IdentityFile ~/.ssh/id_rsa

Host A74
    HostName 10.1.0.1
    Port 22
    User zyx
    IdentityFile ~/.ssh/a73.id_rsa
    ProxyJump jumpServer    #ProxyJump是从ssh7.3开始支持。#ProxyCommand需要nc支持
    #ProxyCommand ssh -o 'ForwardAgent yes' jumpServer 'ssh-add && nc %h %p'
MySQL的主从配置
https://github.com/getwingm/mysql-replica
version: '2'
services:
    master:
        image: twang2218/mysql:5.7-replica
        restart: unless-stopped
        ports:
            - 3306:3306
        environment:
            - MYSQL_ROOT_PASSWORD=master_passw0rd
            - MYSQL_REPLICA_USER=replica
            - MYSQL_REPLICA_PASS=replica_Passw0rd
        command: ["mysqld", "--log-bin=mysql-bin", "--server-id=1"]
    slave:
        image: twang2218/mysql:5.7-replica
        restart: unless-stopped
        ports:
            - 3307:3306
        environment:
            - MYSQL_ROOT_PASSWORD=slave_passw0rd
            - MYSQL_REPLICA_USER=replica
            - MYSQL_REPLICA_PASS=replica_Passw0rd
            - MYSQL_MASTER_SERVER=master
            - MYSQL_MASTER_WAIT_TIME=10
        command: ["mysqld", "--log-bin=mysql-bin", "--server-id=2"]